Support Guide: OPEN One POS for Emab Stores
This guide is designed to provide support staff with a clear understanding of how Emab-affiliated stores use the OPEN One POS. It includes both an introduction to key functions and practical tips for troubleshooting and customer support.
1. About Emab and the POS Environment
Emab is a network of fuel stations and convenience stores, often combining a shop with fuel sales. Our Emab customers use the OPEN One POS to manage both retail and fuel sales.
The Gilbarco Integration
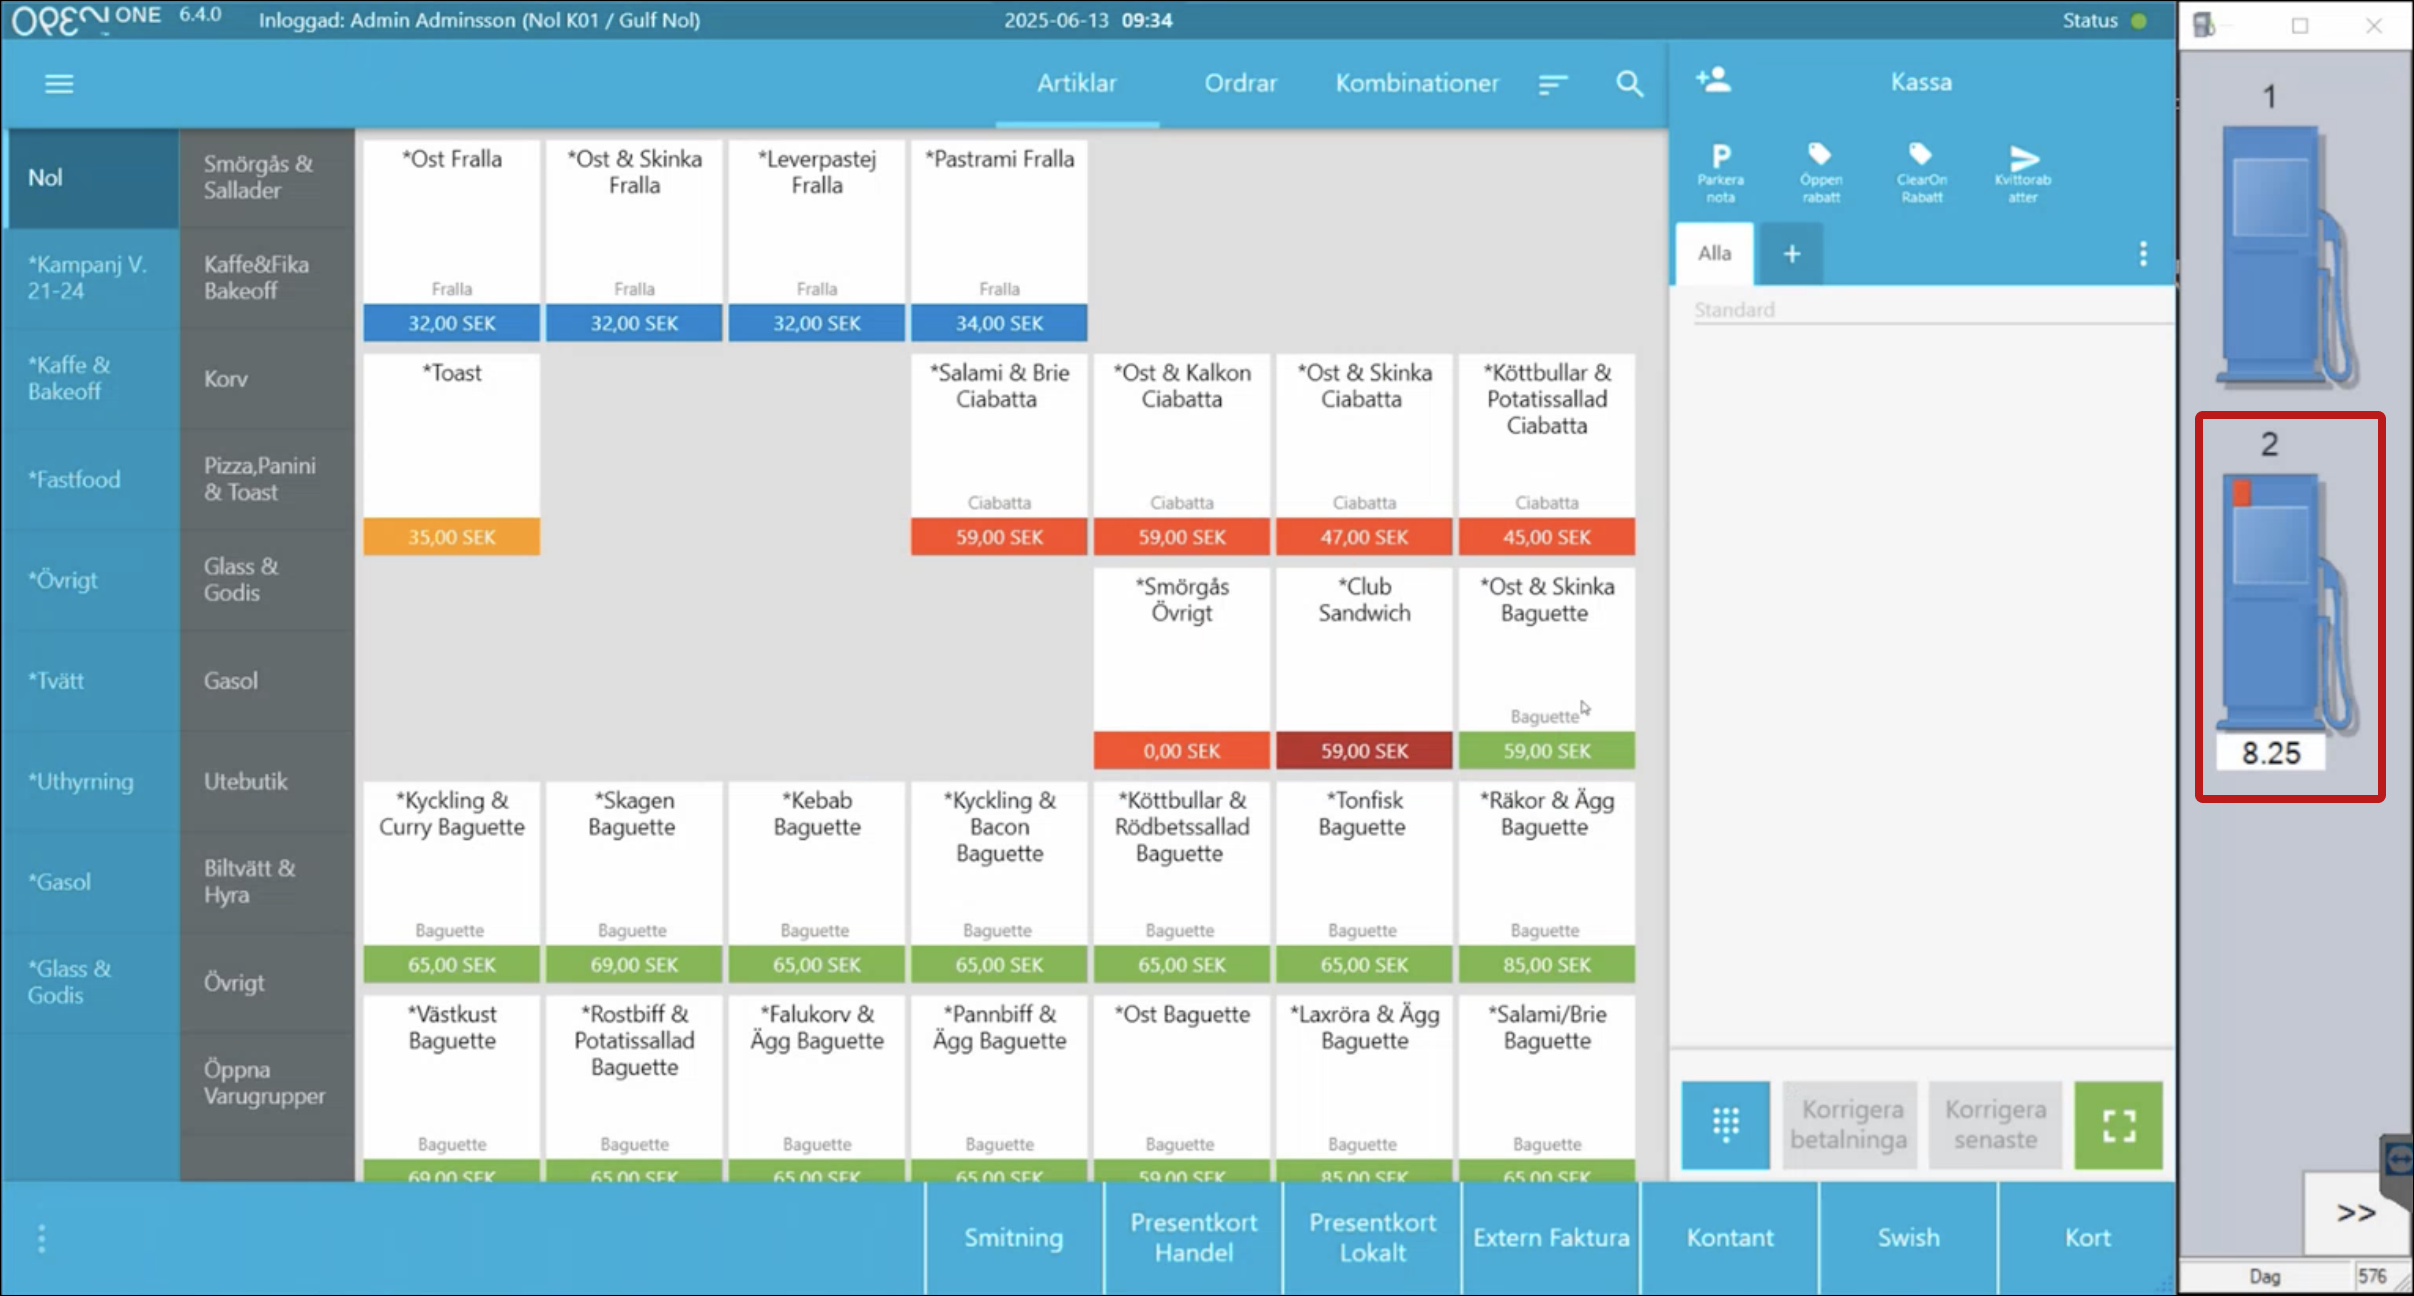
Many Emab stores use the Gilbarco system for their pumps. When Gilbarco is integrated, the pumps are displayed in the right-hand column of the POS.

The pump view can include both standard fuels and other refill types, such as windshield washer fluid.
2. How the POS Works in
Manually Added Articles and Categories
- Categories marked with a star contain articles that the store has created themselves.
- These articles often lack barcodes and must be entered manually.

Customized Start Page per Store
Each store may have its own start page based on its locally added articles and preferences. Layouts may therefore differ between Emab customers.

Customer Display
Here is an example of the customer display, showing the articles and the total amount the customer will pay.

3. Campaigns and Discounts
Central and Local Campaigns
- Central campaigns: Managed by Emab centrally and apply to all stores.
- Local campaigns: Set up by each individual store.
Example: “Small Coffee & Cinnamon Bun.”

If a Campaign Is Not Working
- Central campaigns: Refer the customer to Emab central support.
- Local campaigns: We at OPEN can assist in troubleshooting.
WARNING
Do not adjust central campaigns, as they apply to all stores.
4. Handling Fuel Transactions
Importing a Fuel Transaction into the POS
If there are unpaid fuel transactions when you attempt to complete a basket, a popup will appear asking whether you want to import the fuel transaction. Press YES to add the fuel transaction to the basket.

Charging for a Fuel Transaction
Click the pump in the right-hand column.
Red indicates that the transaction has been waiting for some time.

Select the relevant fuel transaction from the popup.
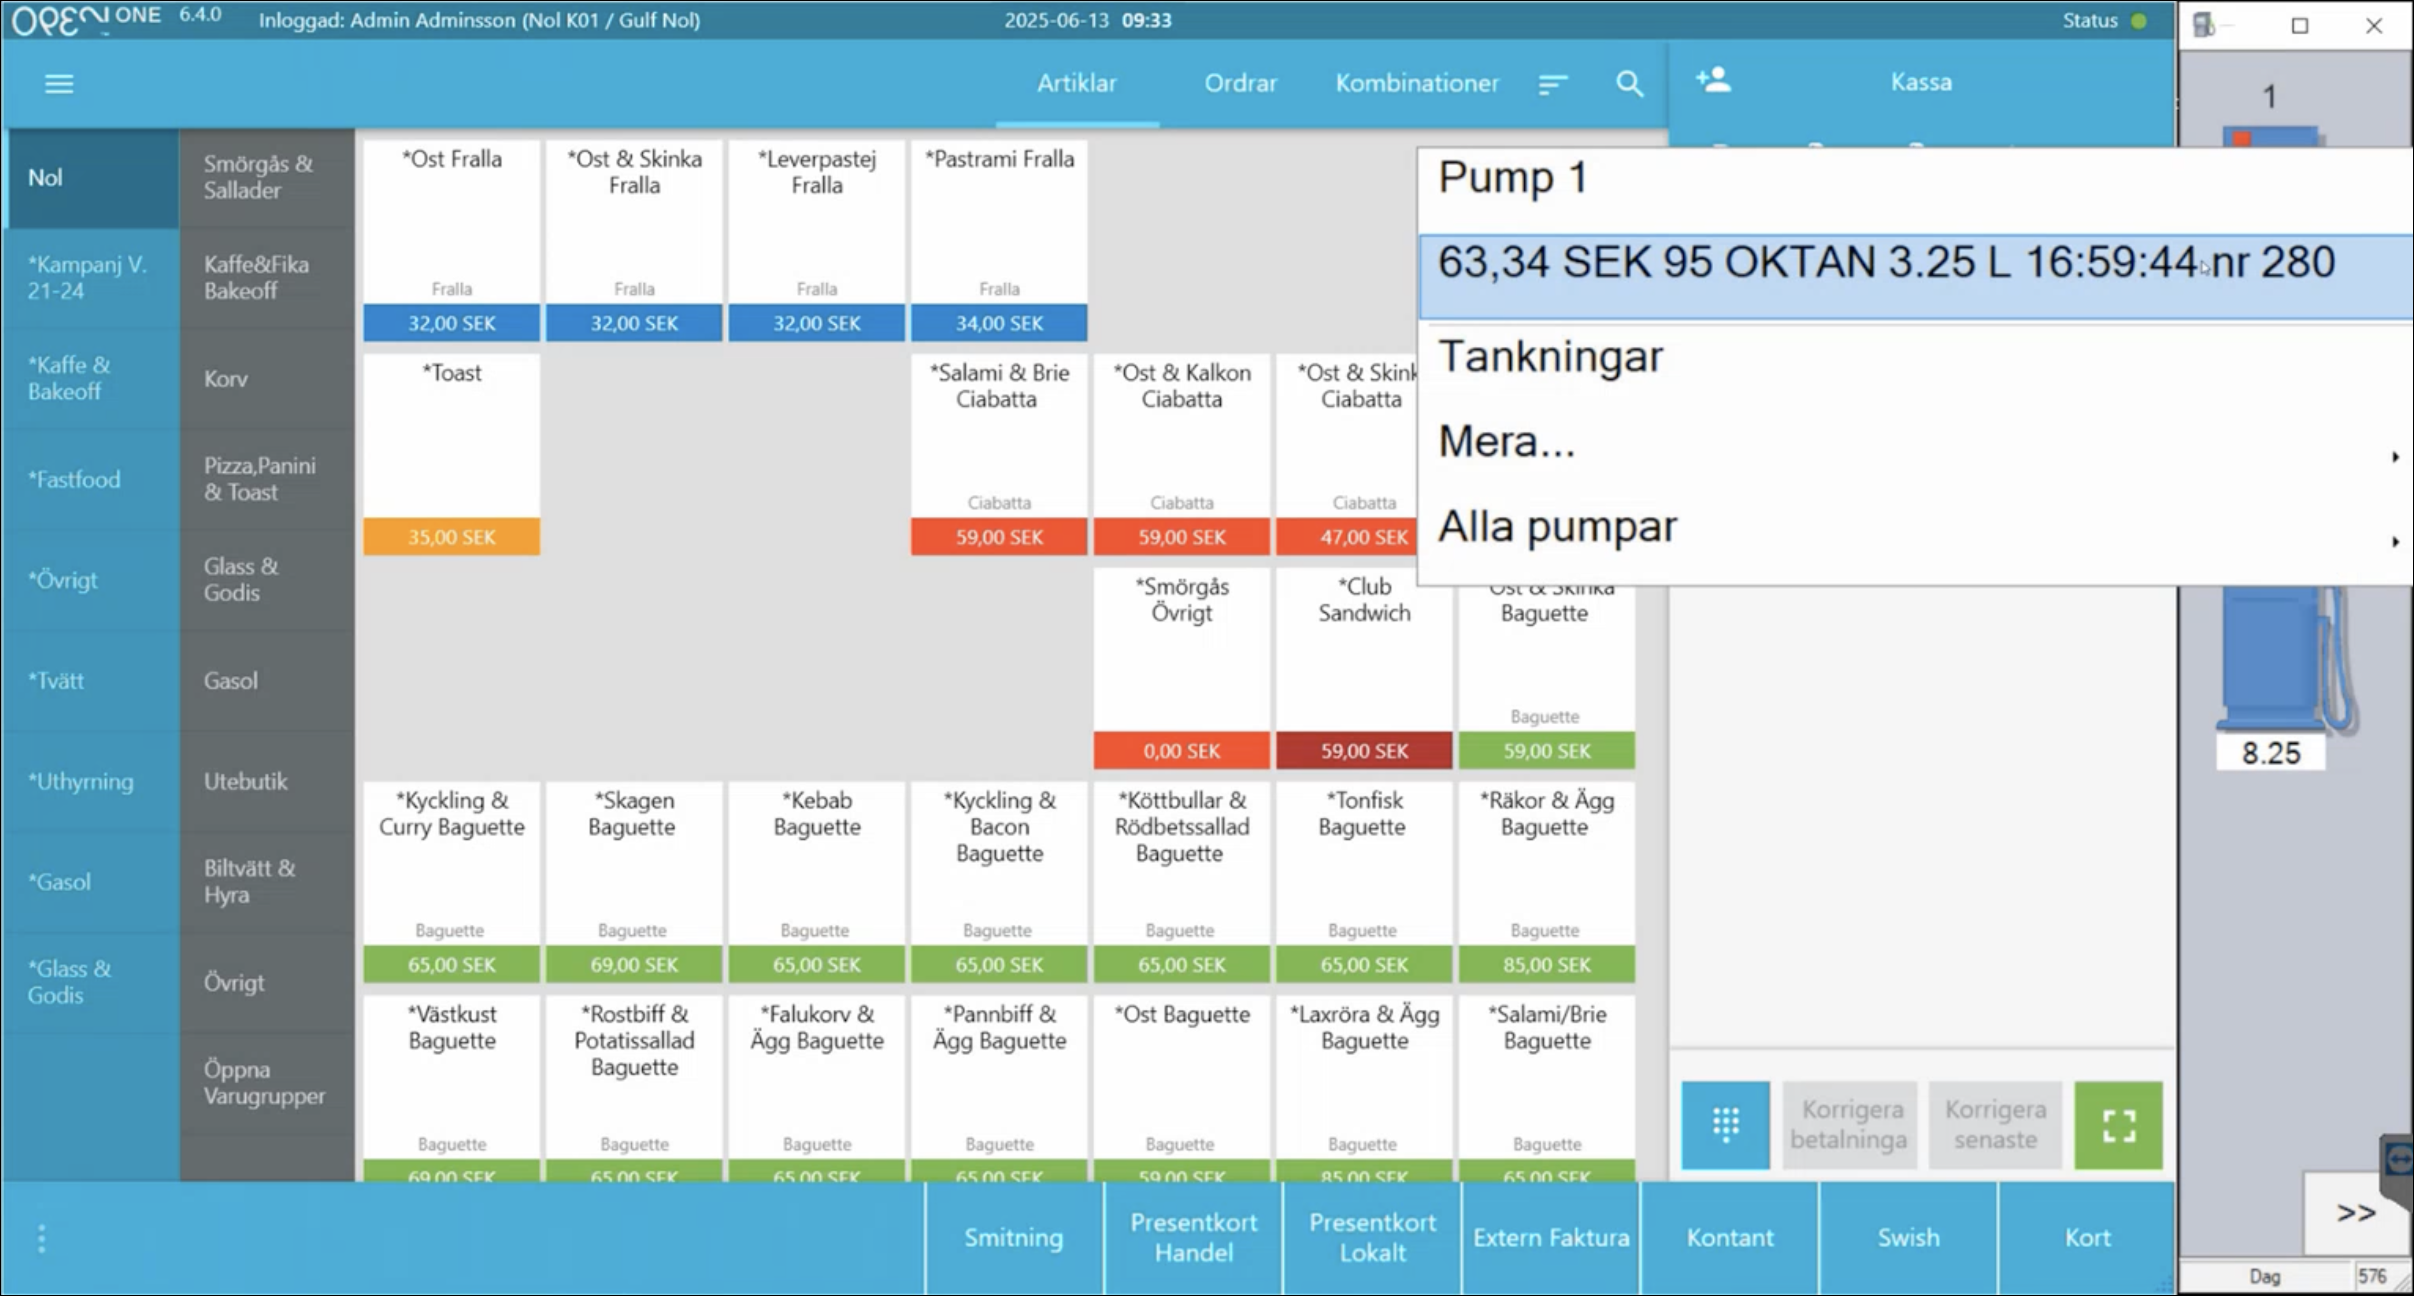
The fuel (product, quantity, price) will be imported from Gilbarco.
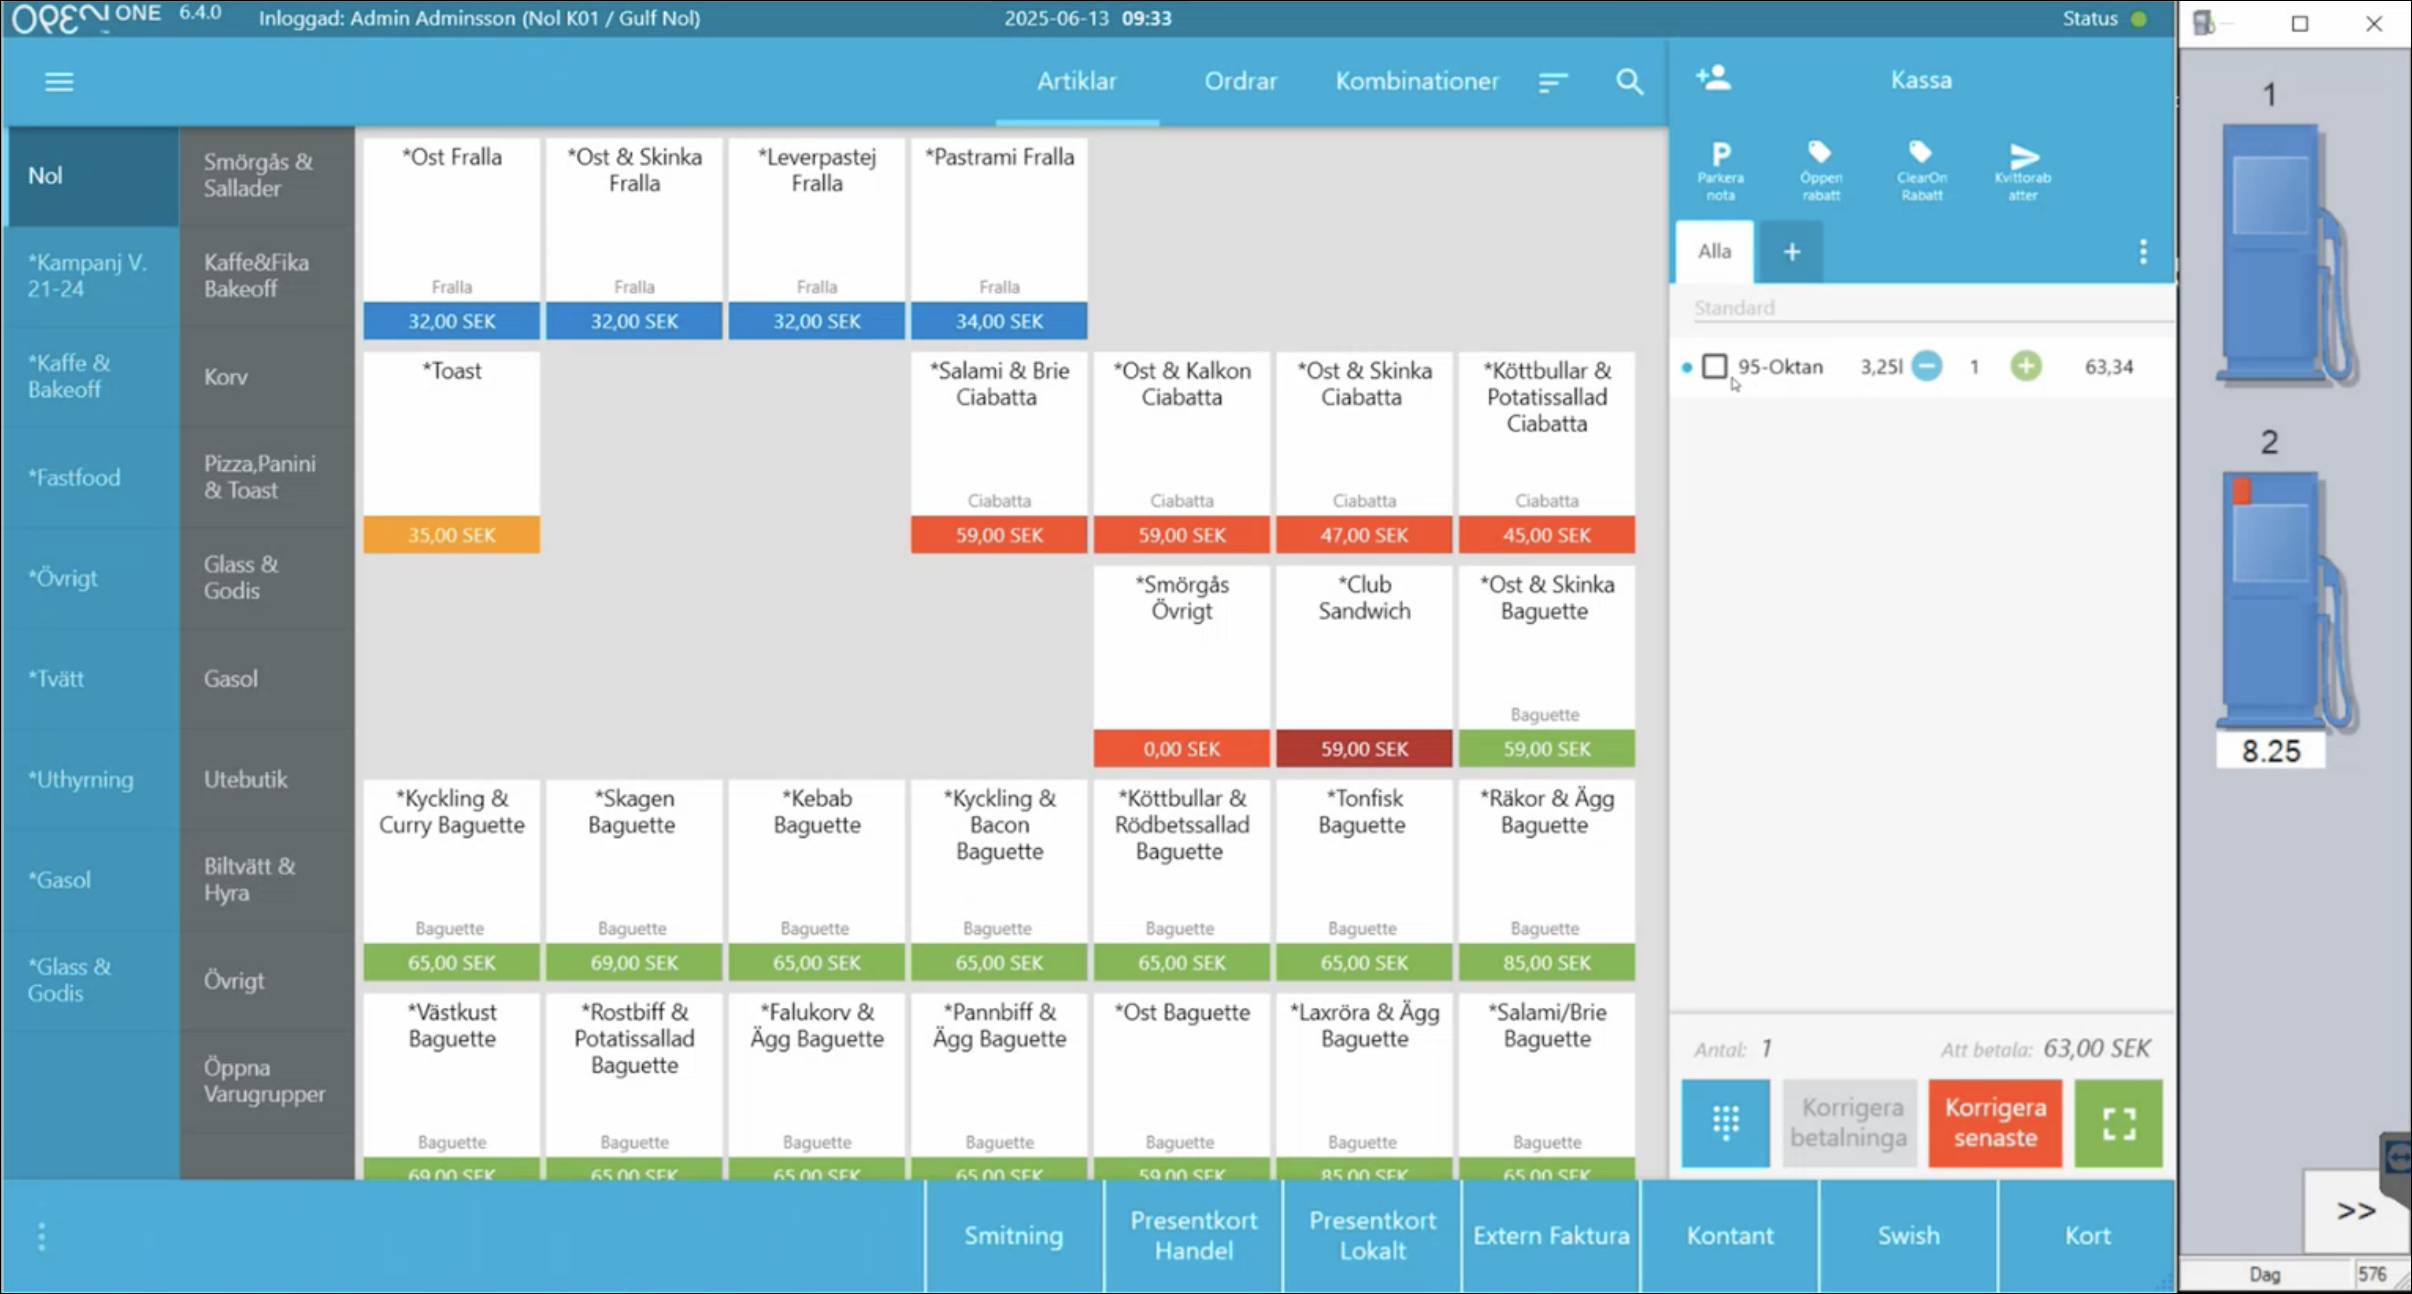
Complete the payment as usual.


Multiple Pending Fuel Transactions
A pump can have up to two pending fuel transactions at the same time.


5. ClearOn Integration
ClearOn manages discounts and value vouchers. Example: “Buy Aftonbladet + TV supplement at a discounted price.” To apply the discount, the customer needs a discount code.
Discount codes can be:
- EAN code (scannable)
- Mobile code (7 digits, entered manually)
How to:
- Enter the discount code.
- Confirm with any additional verification code.
ClearOn also provides value vouchers: for example, a voucher of SEK 2,000 (to be paid out to the customer).
INFO
For questions about discount terms – contact ClearOn.
6. Common Support Questions (FAQ)
6.1 Lost IP Connection to Gilbarco
If the POS loses connection with Gilbarco:
- Check the IP address in ProgramData > Autotank > Epsilon > Express.cfg
- If the problem persists: contact Gilbarco.


TIP
There is no standard IP address used; it can be any valid IP address.
6.2 Pump Release Sound Signal Not Working
Most fuel stations allow customers to pay for their refueling inside the store rather than at the pump. To enable this, the pump must be released, and a sound signal alerts the cashier when this happens.
If the sound signal is not working, check that the correct device is linked to the signal.
Adjust the sound settings in: ProgramData > Autotank > Epsilon > Application.cfg

The parameter UseSound determines which device in Windows is used.

TIP
This issue is unlikely to occur in normal operation as it is usually configured during the initial POS setup, but it is useful to know.
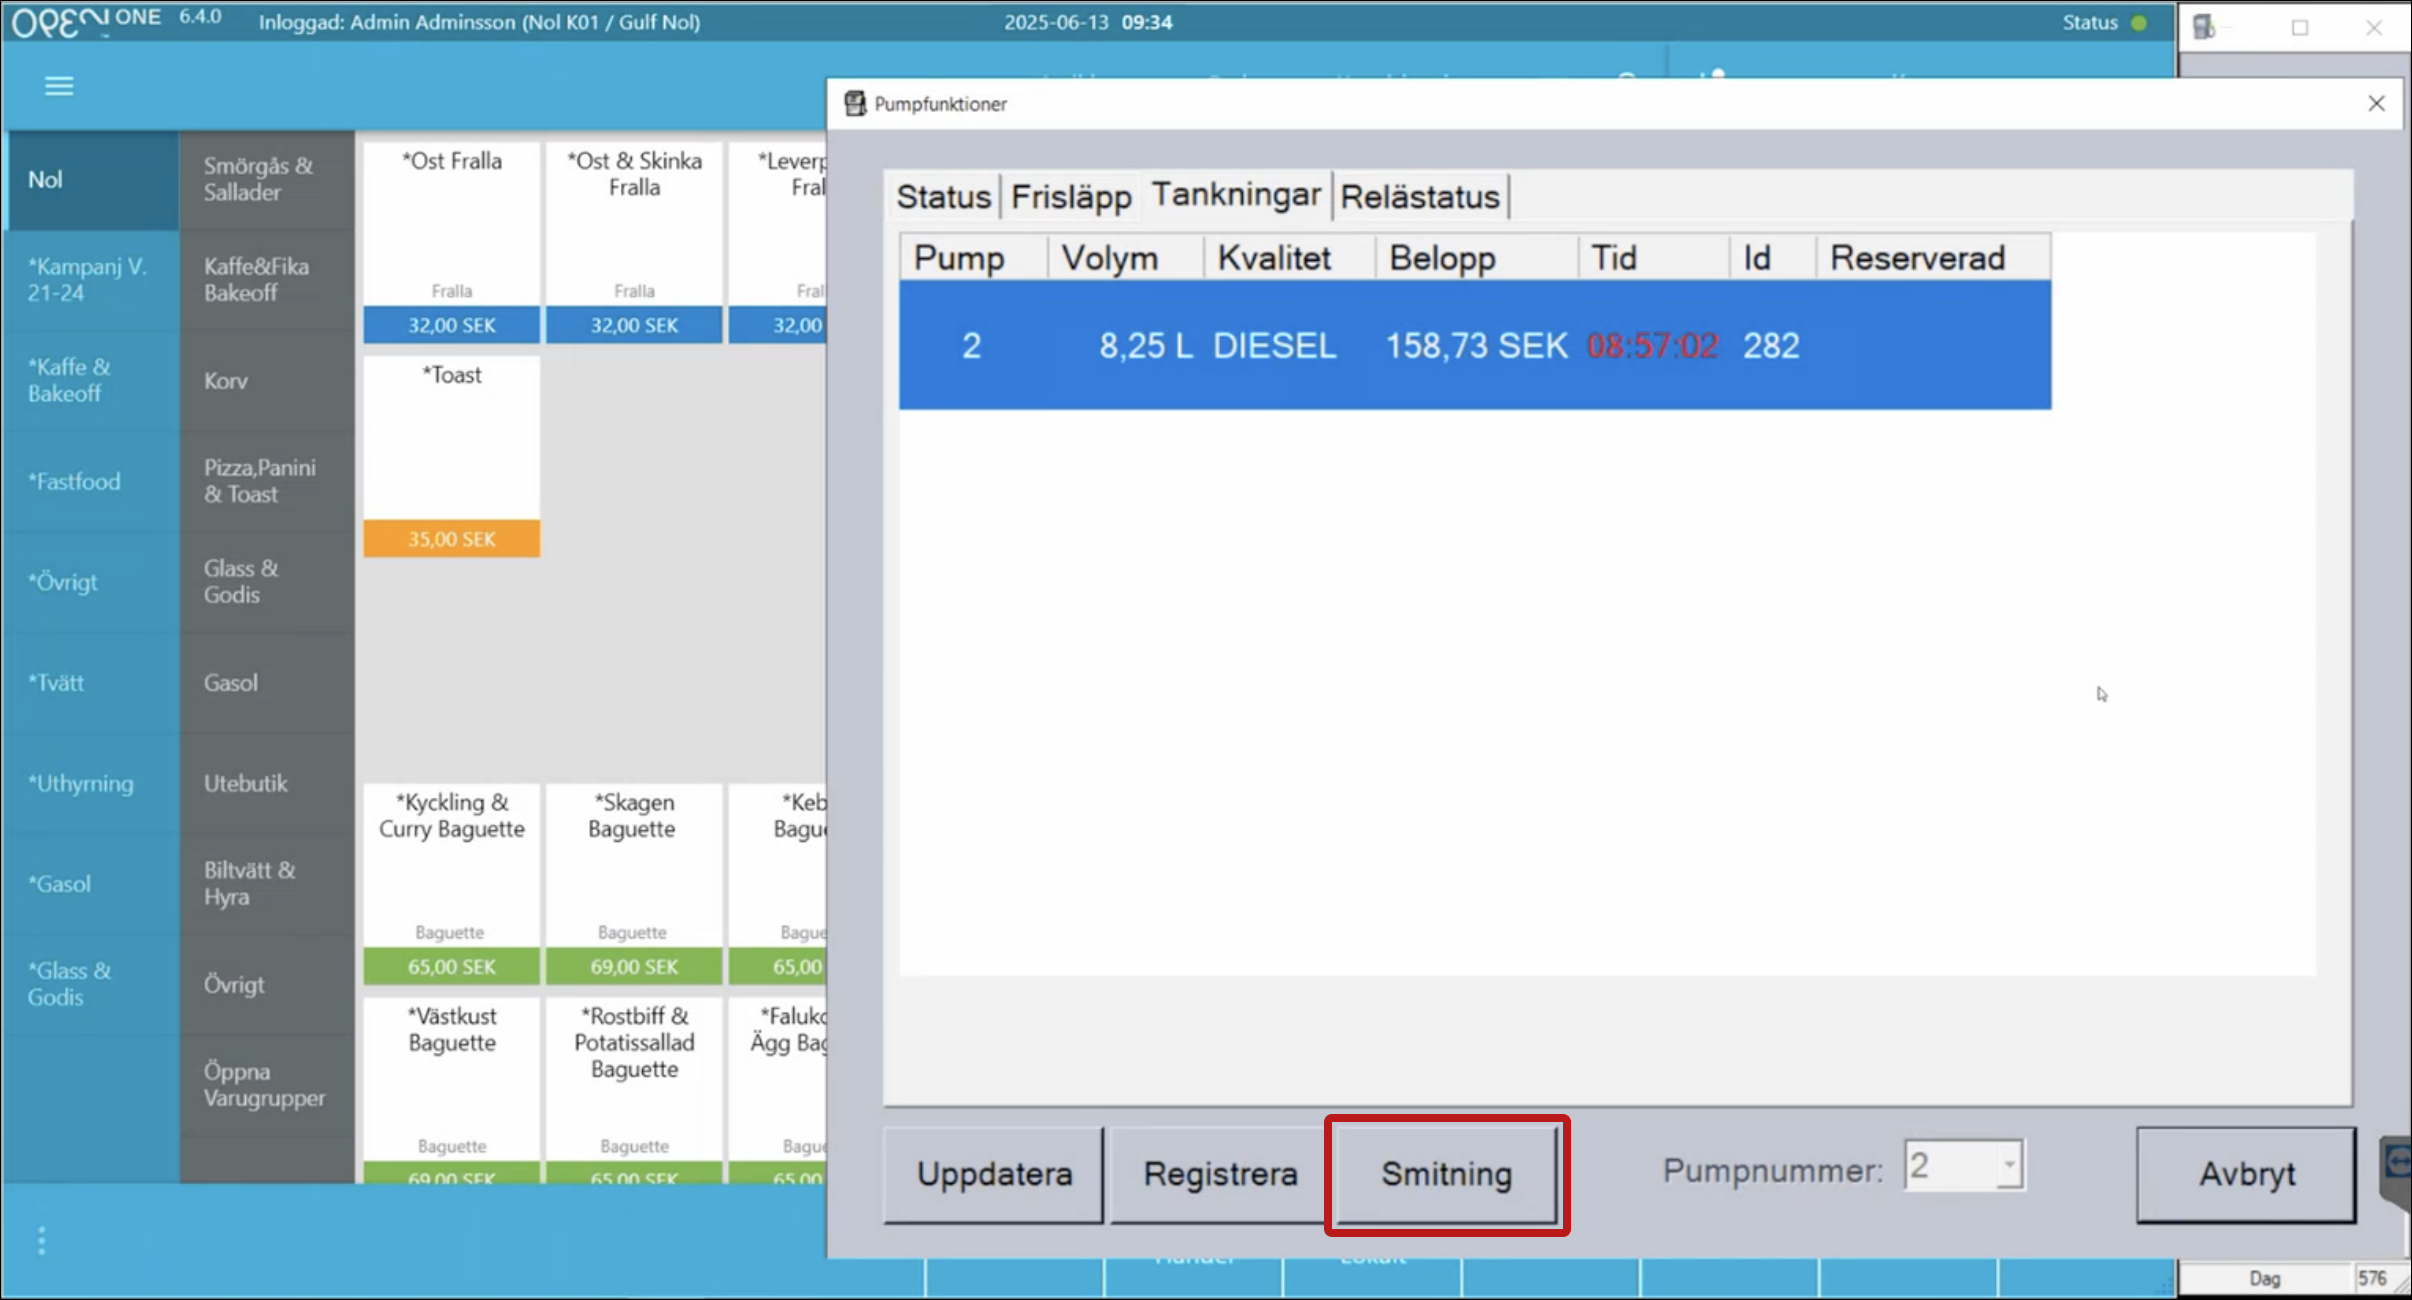
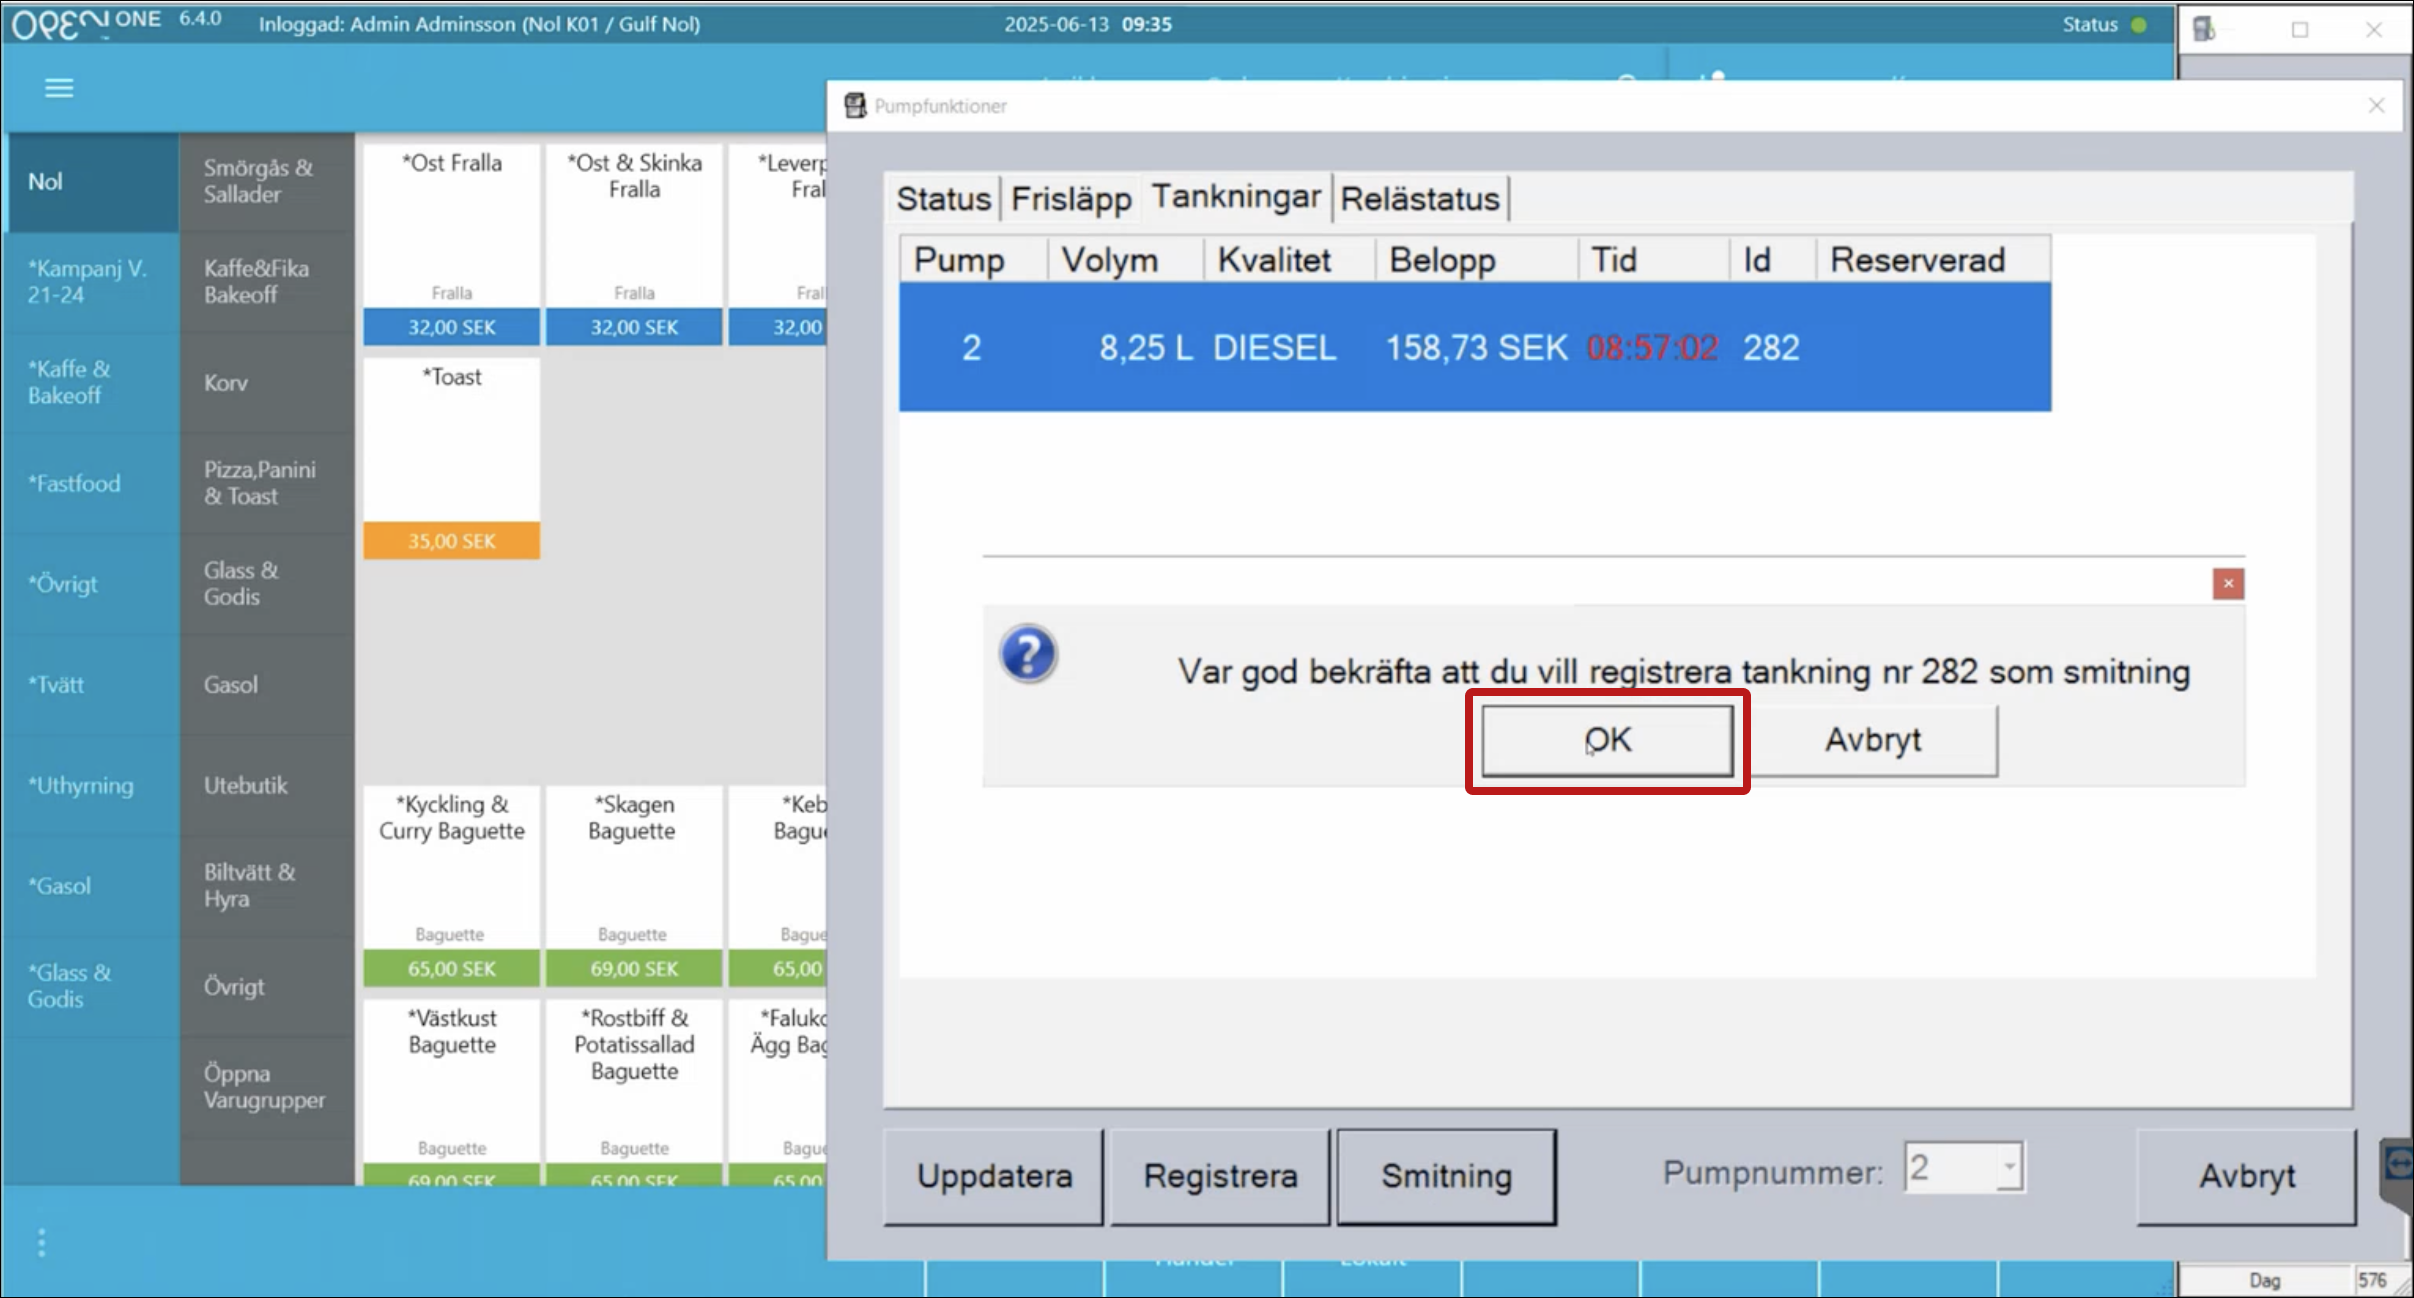
6.3 Correcting a Fuel Transaction
With the fuel transaction in the basket, press Correct Last.
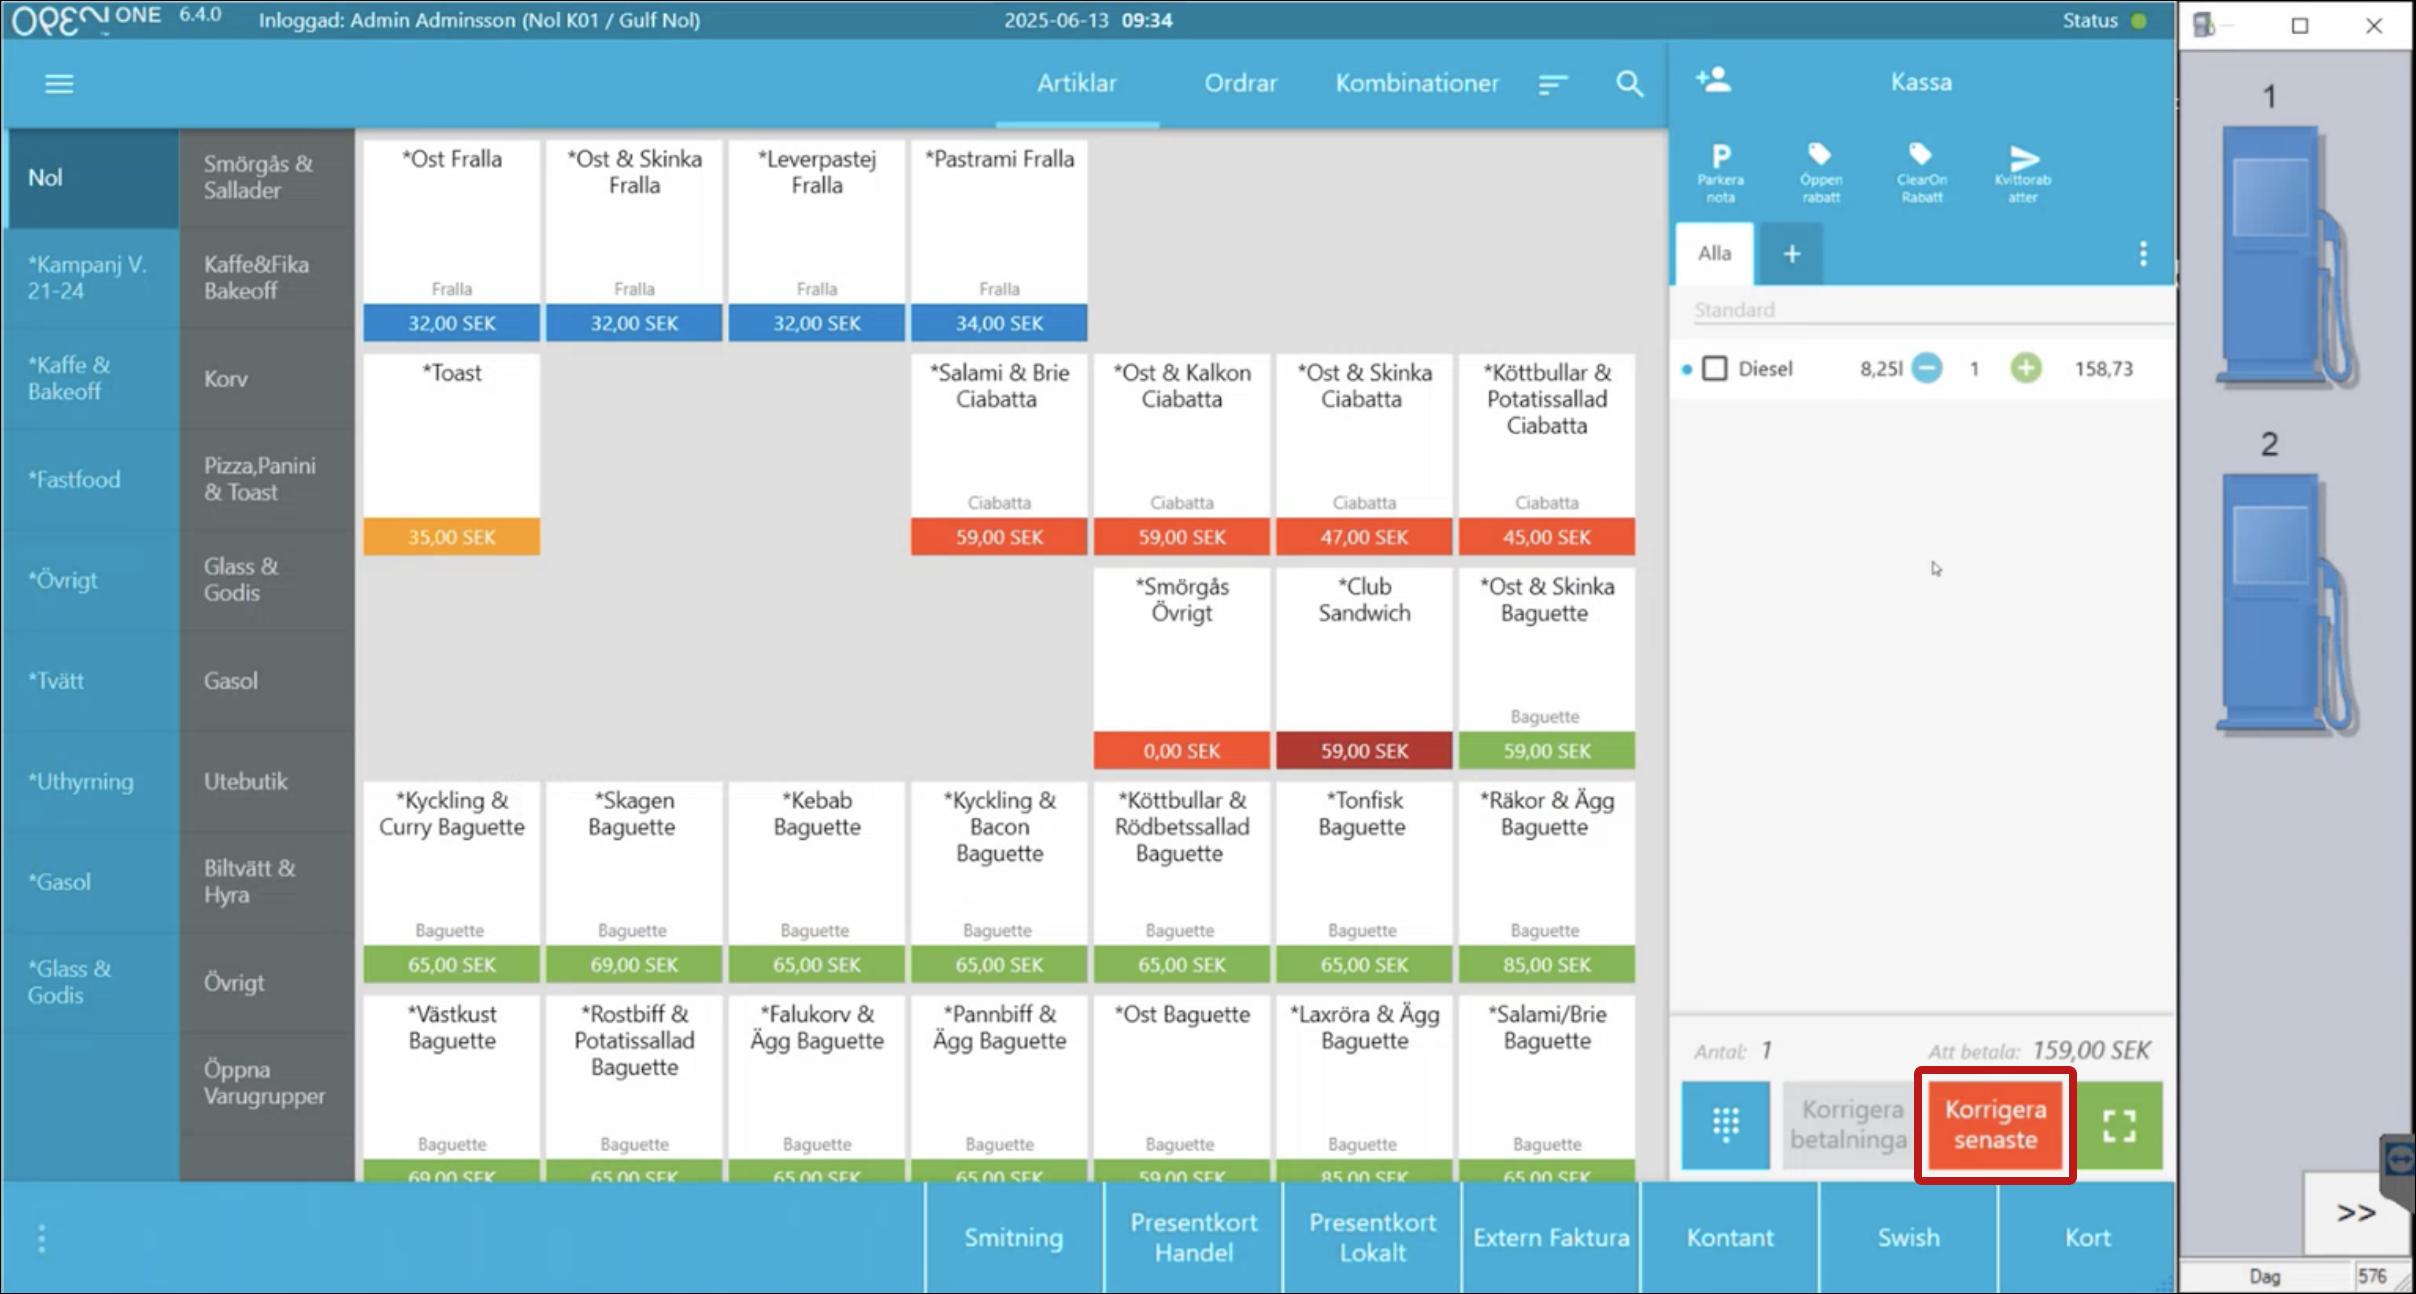
Confirm the removal in the popup.
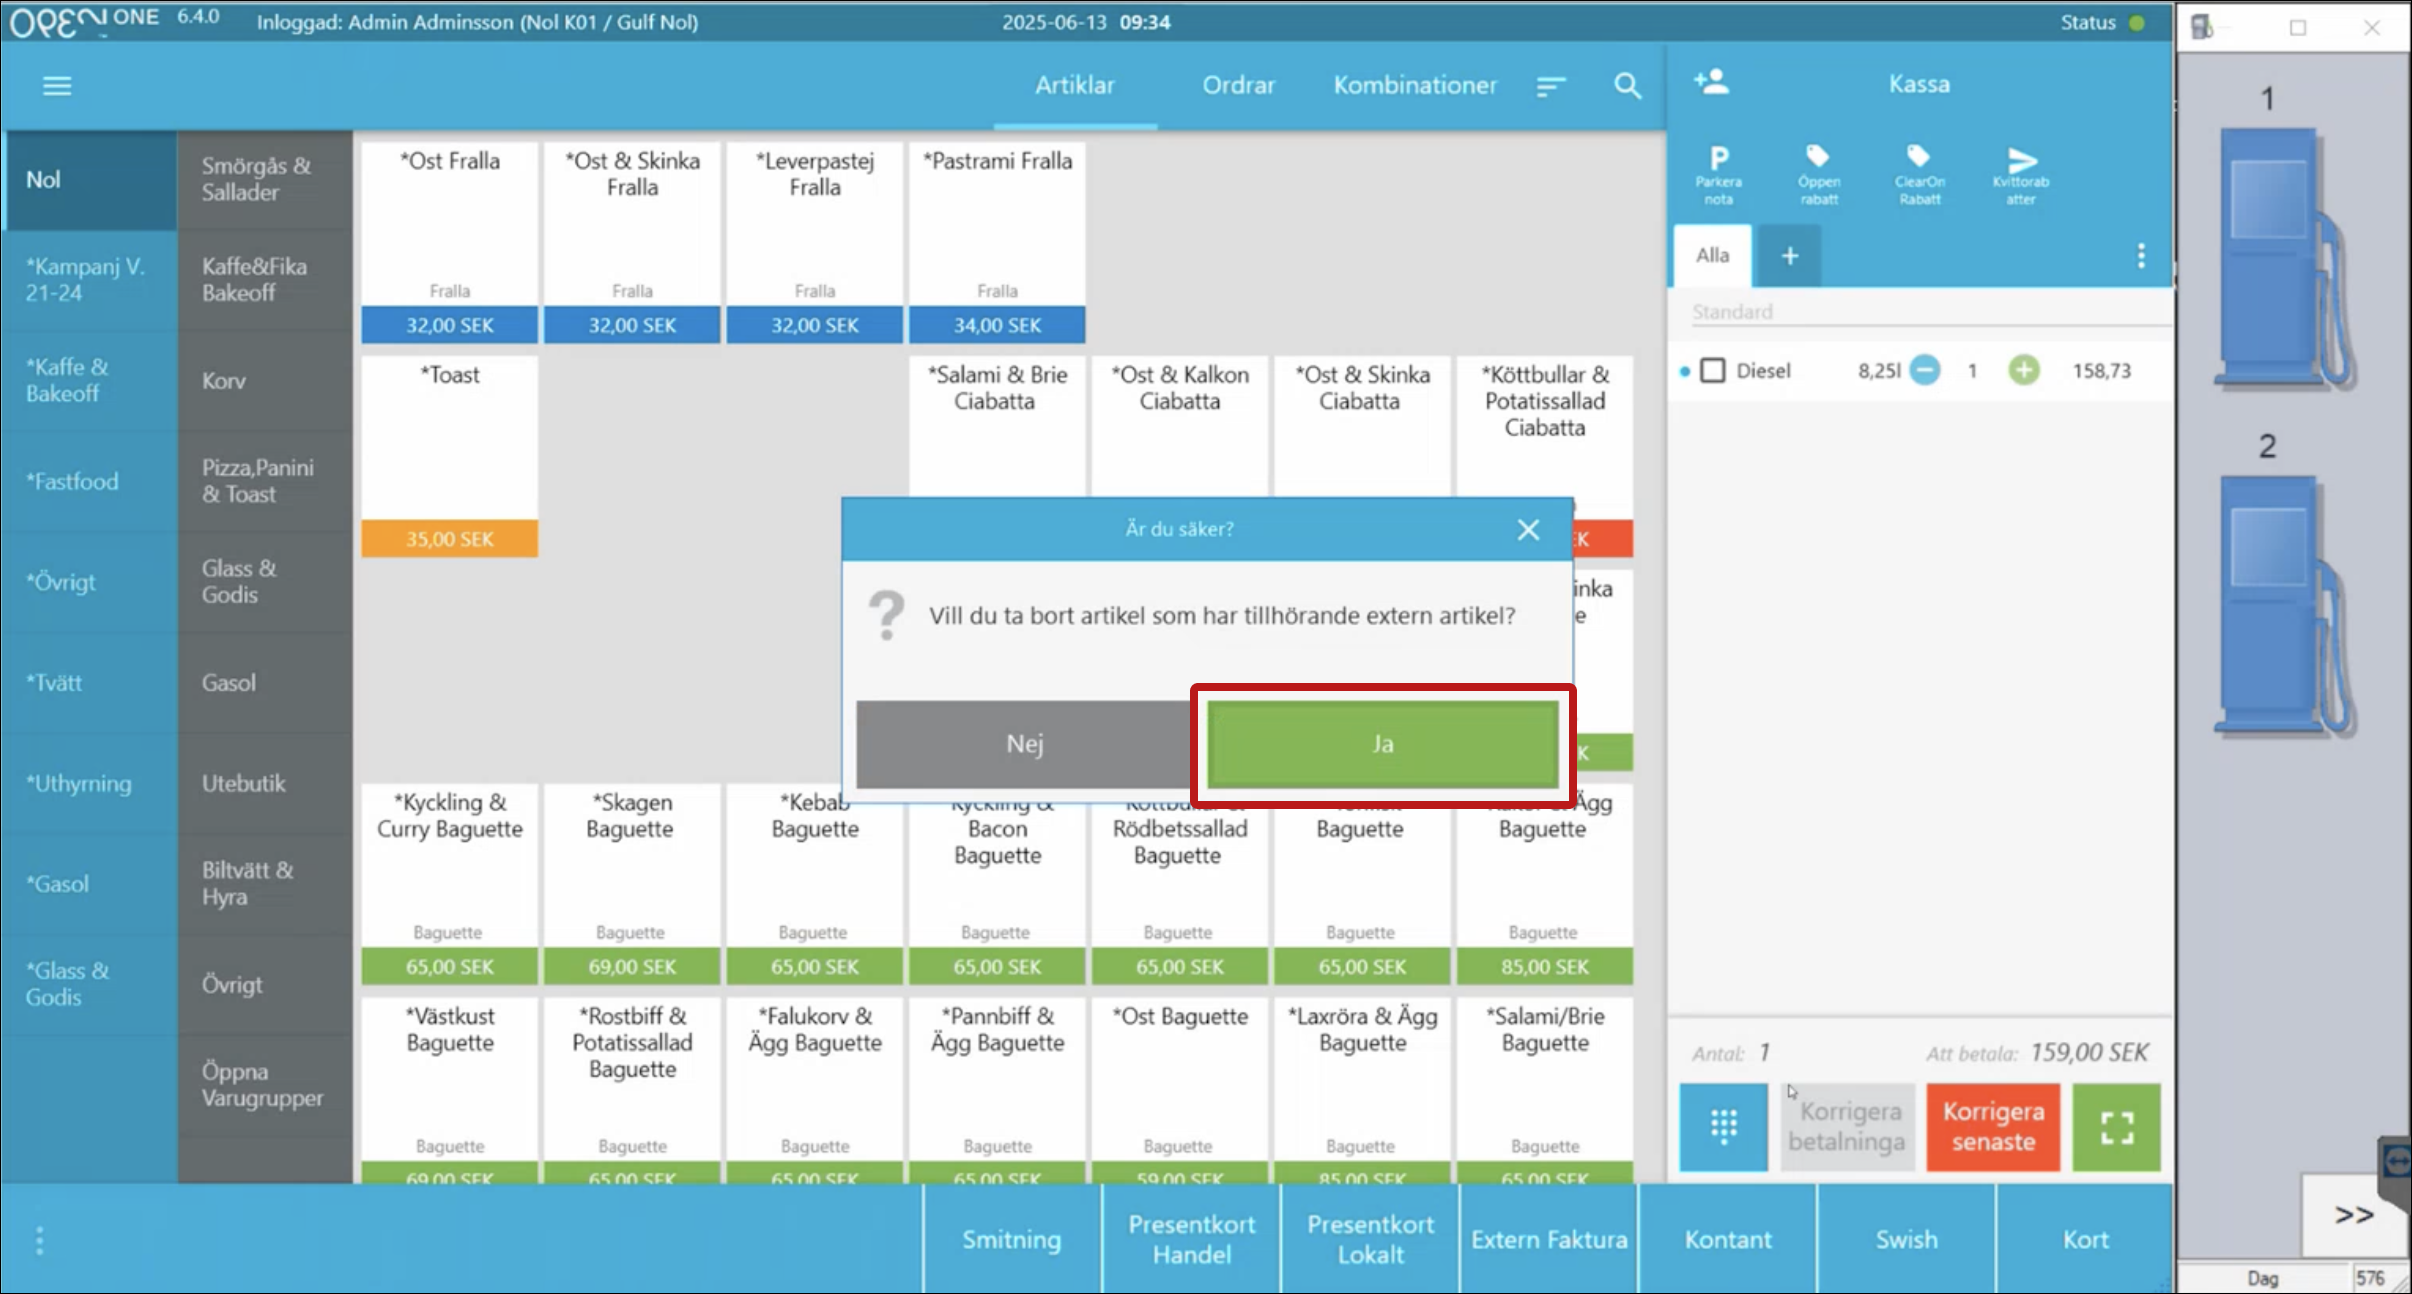
The fuel transaction is returned to the pump.


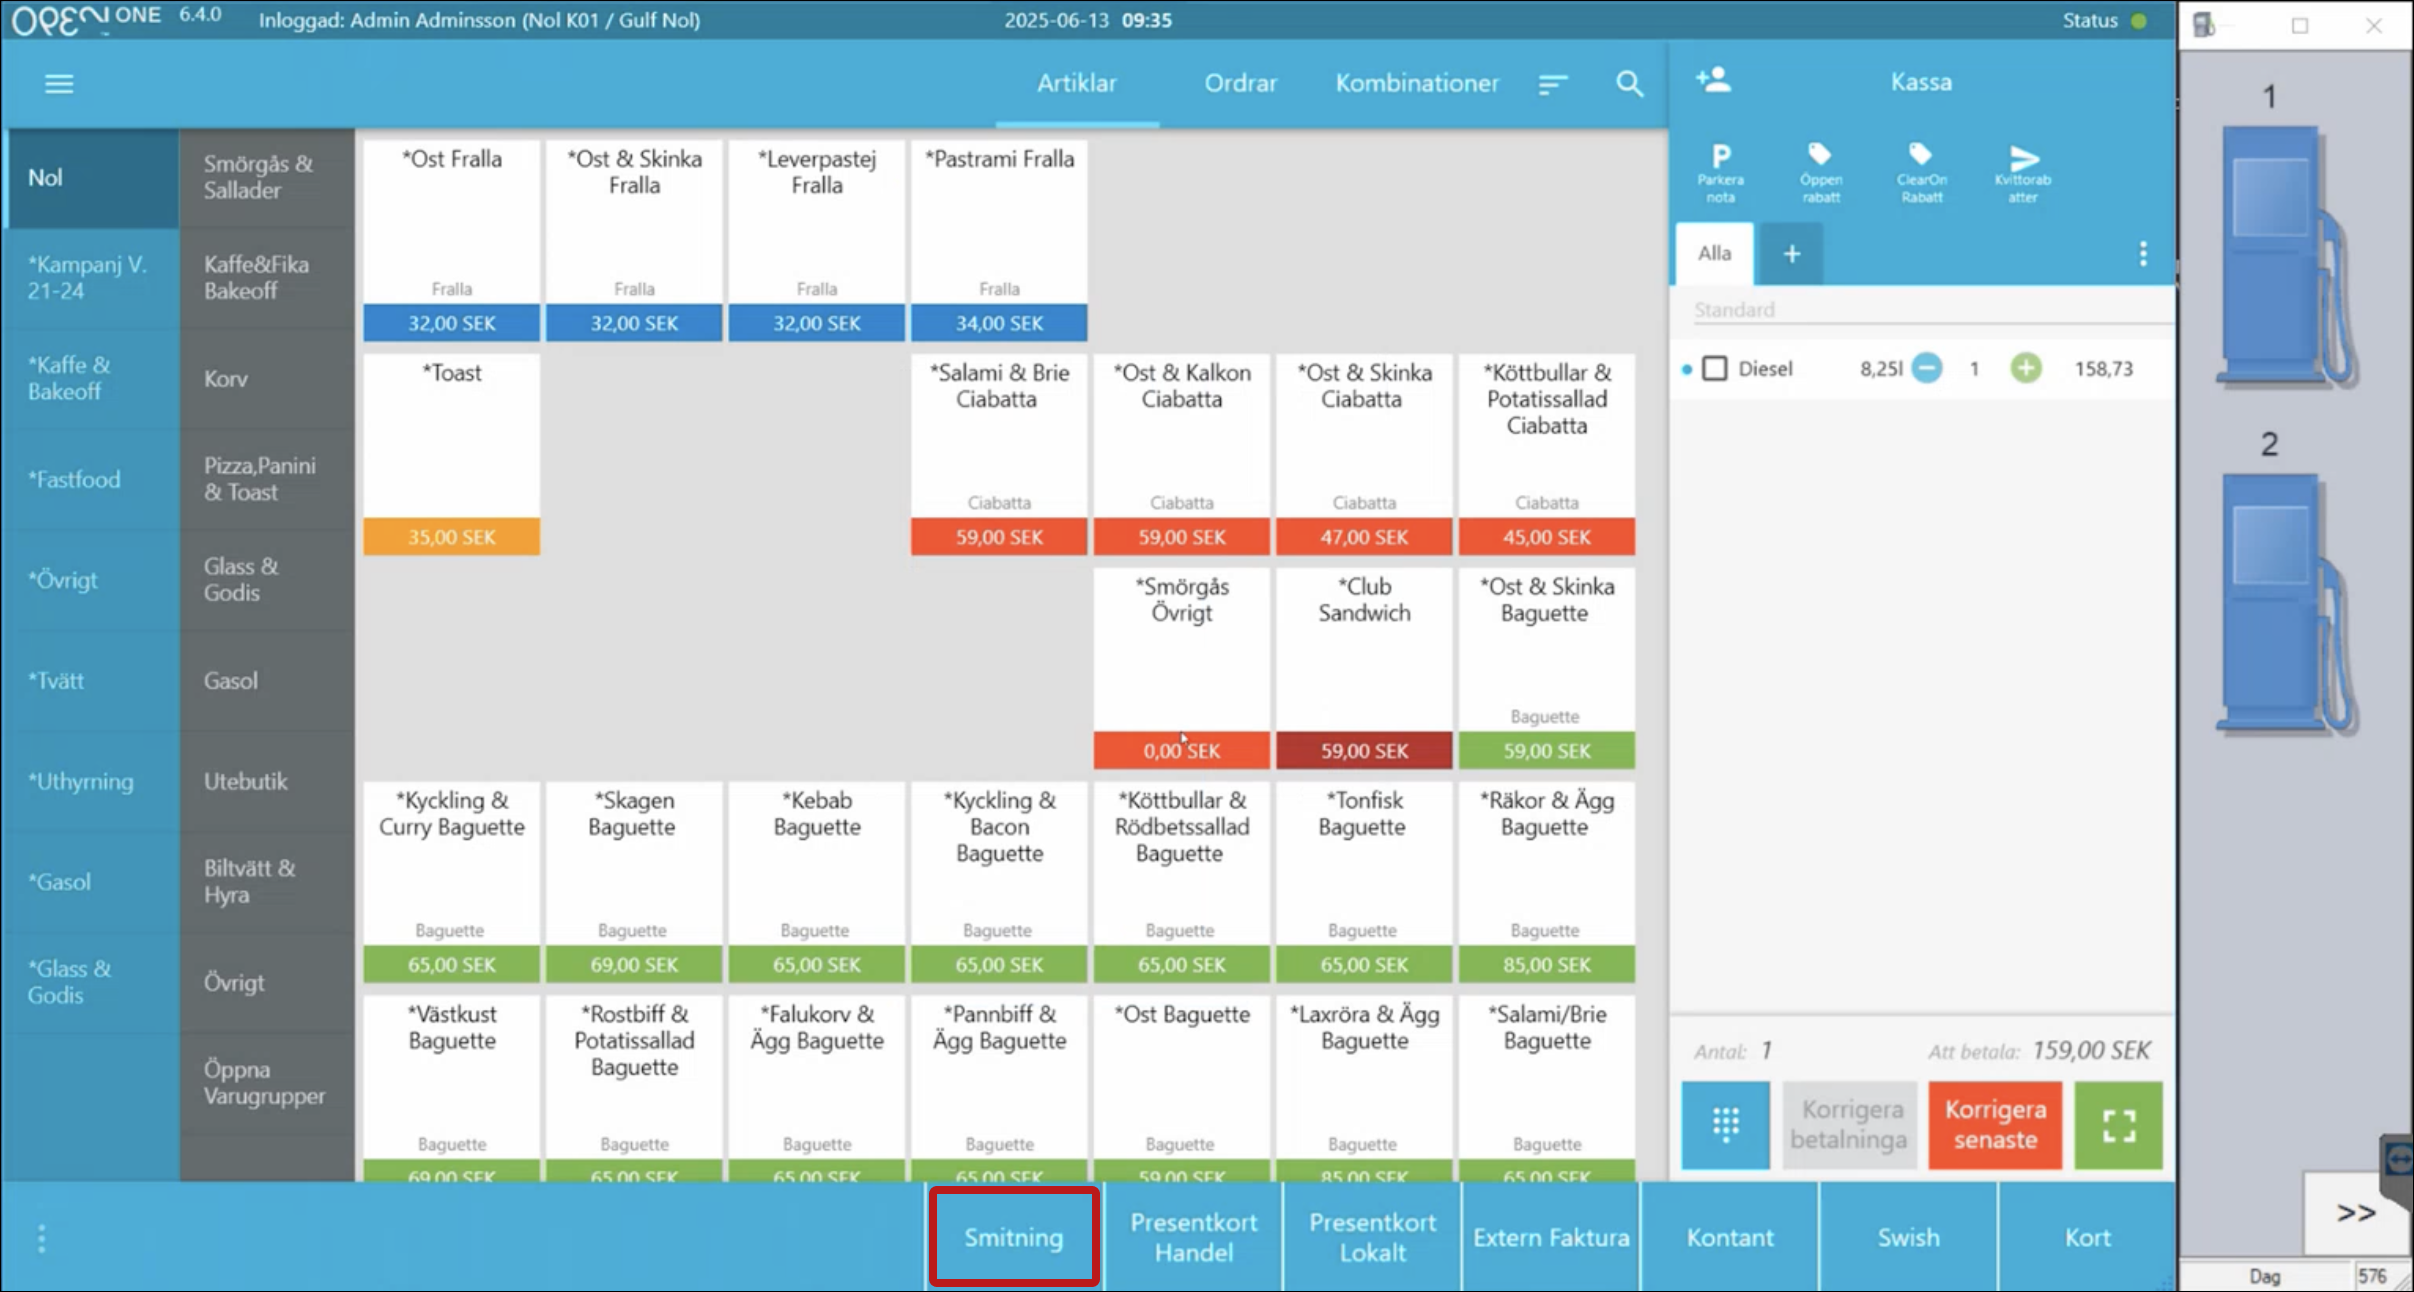
6.4 Handling a Drive-Off (Unpaid Fuel)
Select the pump in the right-hand column.

Select Fuel Transactions.

Select Drive-Off.
Confirm by pressing OK.
Complete the transaction using the Drive-Off payment method.


7. Combination menus
Combination menus are often used at gas stations for food and drink menus for example. In the cash register system, you can easily find these under the Combinations tab.

7.1 Find combination menus
- Go to the tab menu in the cash register system.
- Click on Combinations.
- Now you will see a list of all available combination menus.
7.2 Select combination menu
- Click on the menu the customer wants.
- A dialog box opens with the options.

- In the first step, you select, for example, what type of sausage menu the customer wants.
- Then click on the selected drink. You have two options:
- Scan the drink if the customer has already taken it.
- Click on the drink in the selection list if the drink has not yet been collected to the cash register.
8. External invoicing
In the External invoice tab they will find their customers. All customers will have a Fortnox connection or a Visma Ecom connection.

9. Svenska Spel
When paying, the lottery ticket is scanned and there will be a minus purchase if there are no other articles that the customer is going to buy in the shopping cart.

10. Deposit
Deposit is implemented. Not visible in the cash register system but it will be shown on the receipt.
BackOffice part
Below are guides for the BackOffice part in Open One.
11. Manage articles in BackOffice
Go to the Articles tab - Here you will find an overview of all articles in the system. You can see details and make changes if necessary. Here are some lines that explain what they mean:
11.1 Deposit
In the article information you can see if an article has a deposit. The deposit is automatically retrieved from the supplier. If you enter the article manually or if something is not correct → check/troubleshoot the deposit here.

11.2 Age limit
In the Age limit line you can set a specific age limit for the article. Example: 15 years for energy drinks.
Age limit in BackOffice: //Image// 

11.3 Receipt article name

11.4 Description
In the Description field you can add an extra explanation of the article. This text is displayed as a light gray “help text” on the article in the checkout view. Good for giving staff more info about the article.


12. article costs
Under article costs you will find all articles that have costs. You can add costs manually, but in all integrations we get costs from the supplier so there is nothing that needs to be done.

13. Mass editing price list entries
Mass editing price list entries is used to change prices for multiple articles at the same time. Instead of changing the price article by article.
- To mass edit a price for articles, go to articles and select Mass editing price list entries.

- To the left of the table that appears, you can filter by product groups or sales groups, and then choose to filter further by supplier, for example.
- When you have filtered out the desired articles, check all the articles. Click the change price button above the table on the right. You can then add, for example, 1 krona to all of them. The new price is displayed in a green column. You can also go in and change the price per row (manually).

- Then when you have made all the changes, click save all, which is above the table on the right.

14. Article import
At Article import, there are two views in BackOffice that will be used. Under functions, you will find Article import, then go to Prices (tab) and New articles (tab).

14.1 Prices
Under prices, you will find the articles that are already in the system and those that are already in their price list, but they have received updates. If there is a field that is marked yellow, it shows that something has changed.
Override price is the price that the customer will sell and Recommended price is the price that the supplier recommends that you take.

Then to update the price, select the row and press the Create button in the bottom right corner.

After that, you will be asked if you want to print a label. If you press Ok, if you have updated the price of, for example, two finished articles, those articles are automatically added to the Print labels tab, but you can also add multiple articles by clicking the add button above the rows on the right.


Then you print the articles by clicking Print. You can then choose which printer they should be printed on and what size the labels should be.

14.2 New articles
Under the New articles tab, which means that the articles either did not exist at all before or they are not in your price list. When the price is set, click create and they will be included.

14.2.1 Shortcut to mass edit prices (dialog box)
You can also mass edit the price from here, then click change price. A dialog box will appear and you can add, for example, one krona from the recommended price.
