Quick Guide: Cash register recovery & initial configuration
This guide helps technical support staff quickly and easily restore a cash register to its initial state using OS Recovery Tool. By following these steps, you ensure that a new, correct database is downloaded from the cloud and linked to the correct company – without complicated manual handling.
Important to know before you start:
This process must always be performed on Kassa 01 (main register).
- The guide takes you step by step through the entire recovery – from stopping necessary services, to restarting the register and ensuring synchronization is working.
- After these steps, the register will be ready for use, and everything will be set for normal operation.
After these steps, the register will be ready for use, and everything will be set for normal operation.
Step 1: Preparation – Stop Services
To restore the database, certain background services must first be stopped to avoid conflicts.
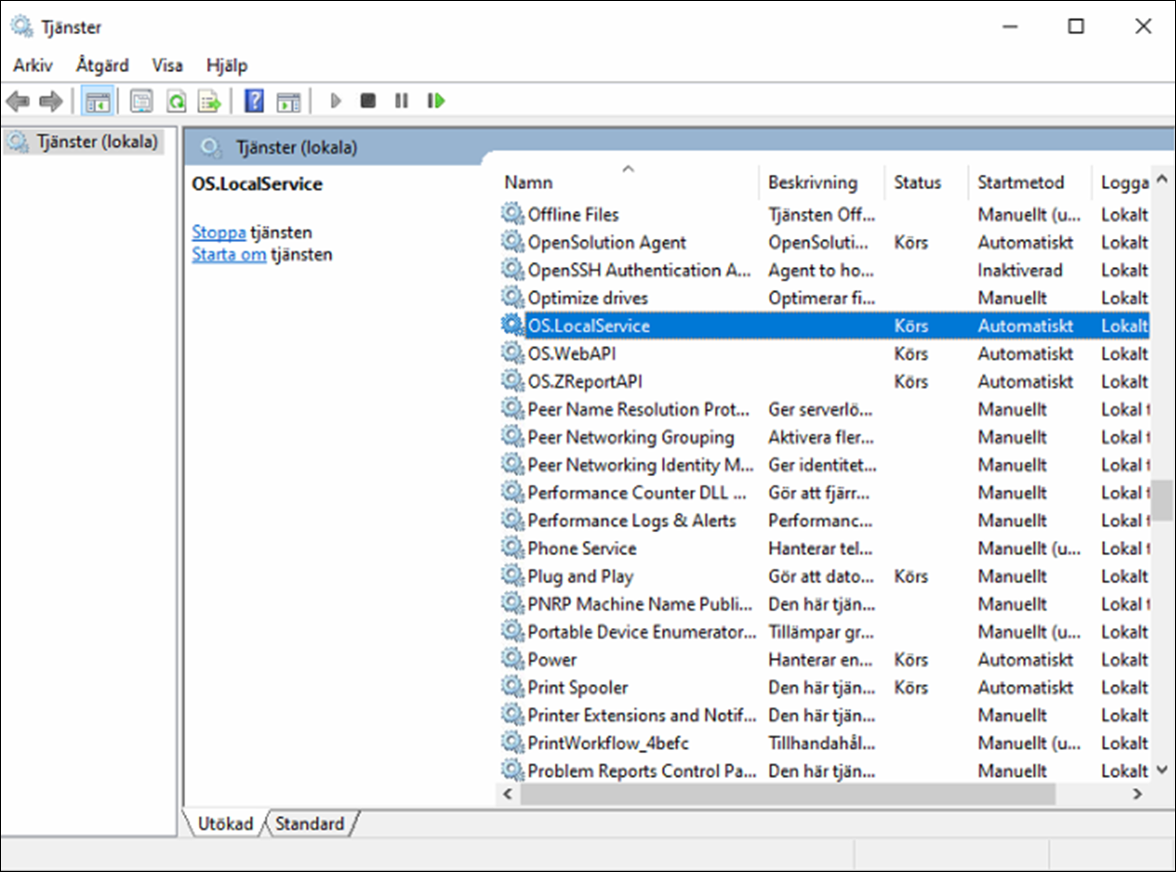
- Open Tjänster (search for services.msc in the Start menu and press Enter).
- Find the following services in the list. If any of them have the status "Körs", right-click it and select Stoppa:
- OS.LocalService
- OS.WebAPI
- OS.ZReportAPI

Step 2: Run OS Recovery Tool
- Navigate to the folder: C:\ProgramFiles\OPEN\Production\stable-recoverytool
- Right-click the file OS.RecoveryTool.exe and select Kör som administratör. This is necessary to give the tool sufficient permissions.
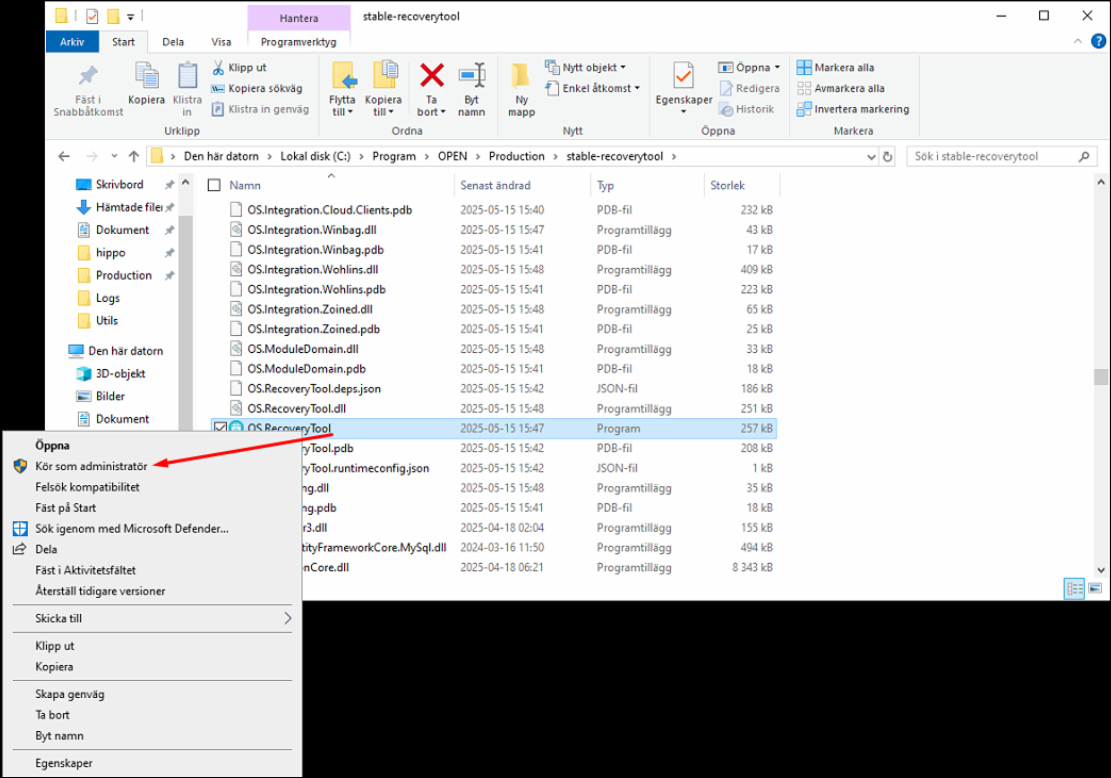

- If the tool is missing, download the latest version here: https://launcher.opensolution.se/openone/6.4.5/OS.RecoveryTool.zip
Step 3: Perform Database Recovery
Follow the steps in the tool carefully.
- Click Database Recovery in the main menu.
- Verify that the displayed login credentials are correct and click Continue.
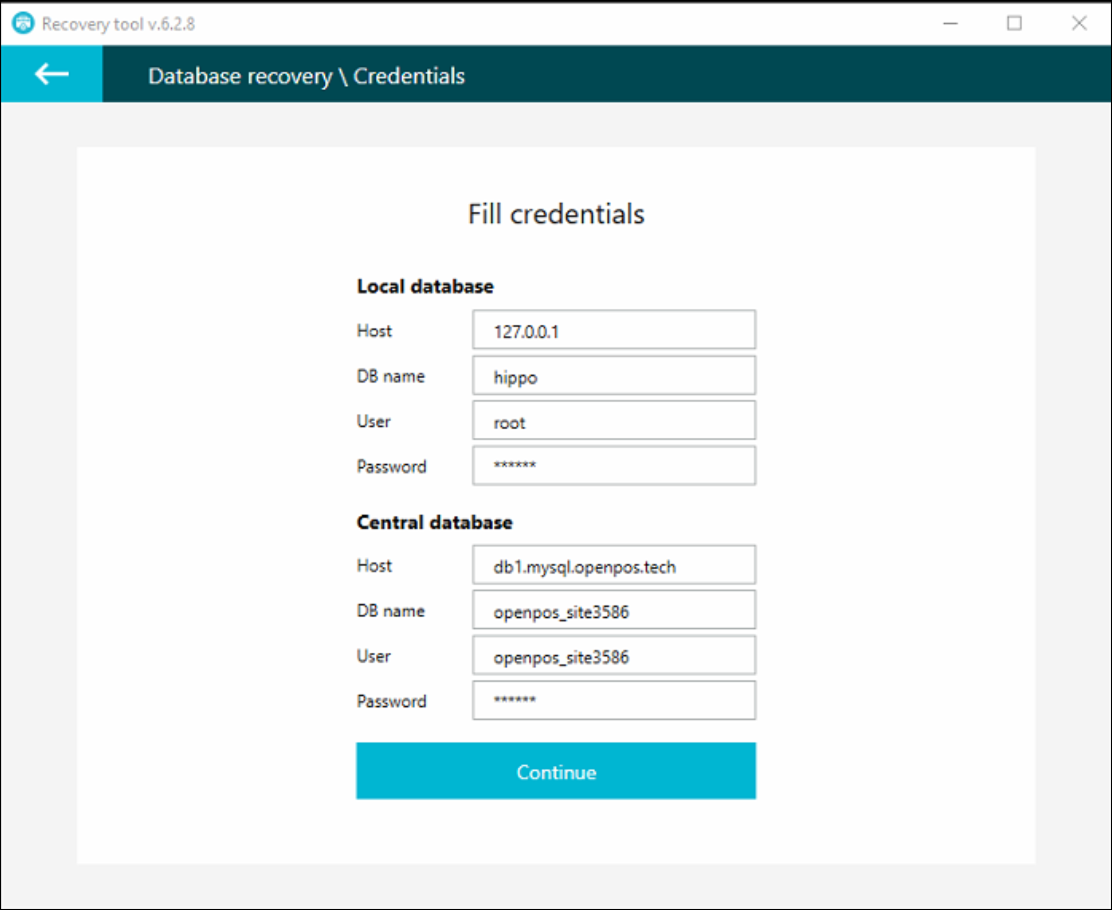
- Two important selections follow:
- Select the correct company from the list. This step is critical to restore the correct data.
- Choose option 2: Default database dump.
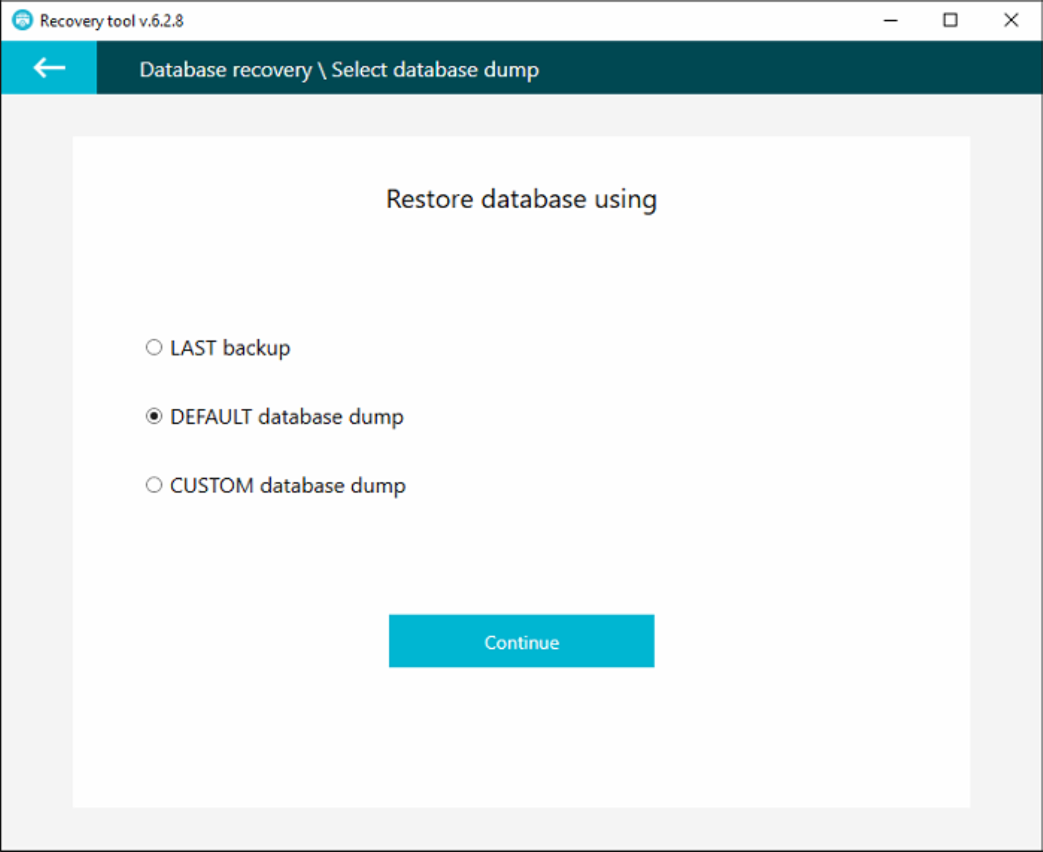
- Click Continue.
- Click Start Recovery to begin the process.
- Wait until the tool displays "Database recovery complete".
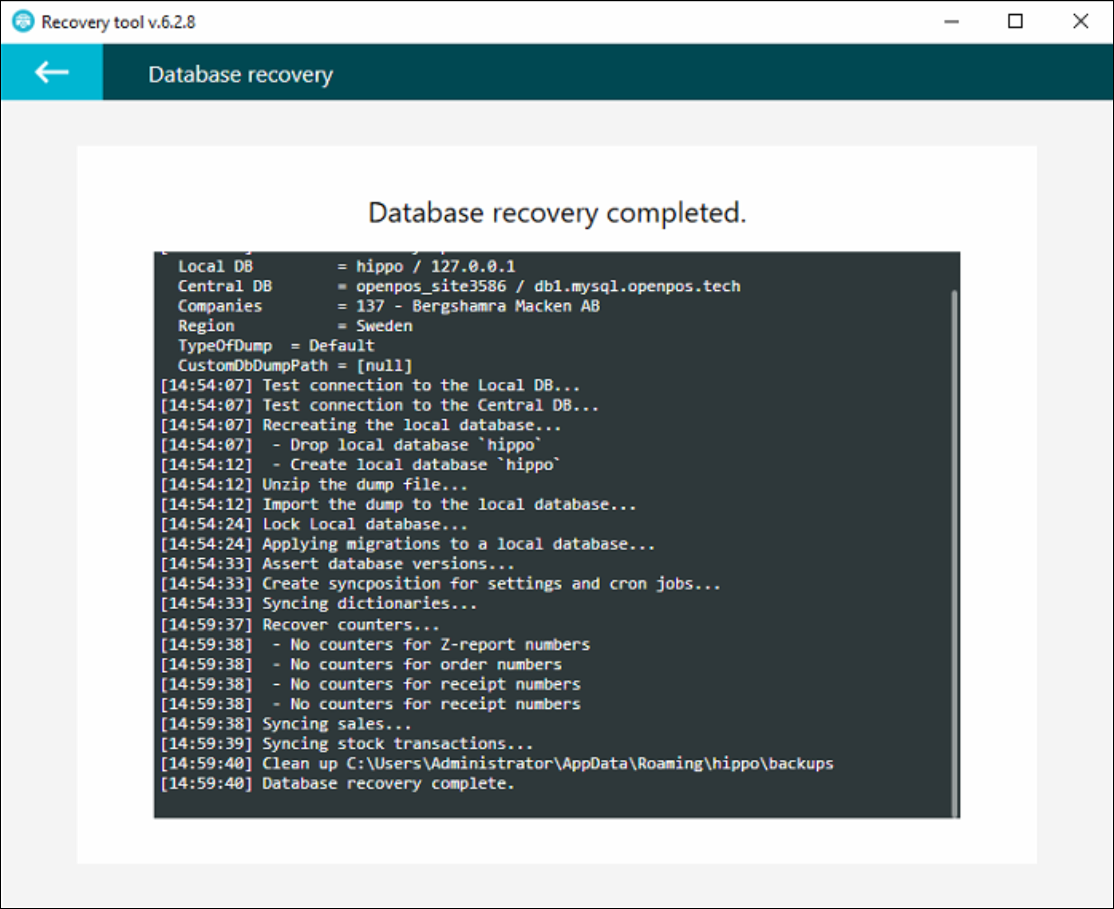
- You can now close OS Recovery Tool.


Step 4: Create First Transaction for Synchronization
After the recovery, you must create an initial transaction. This is a critical step to ensure data synchronization works.
- Start the cash register program (Open One).
- If Windows Firewall prompts you, allow access.
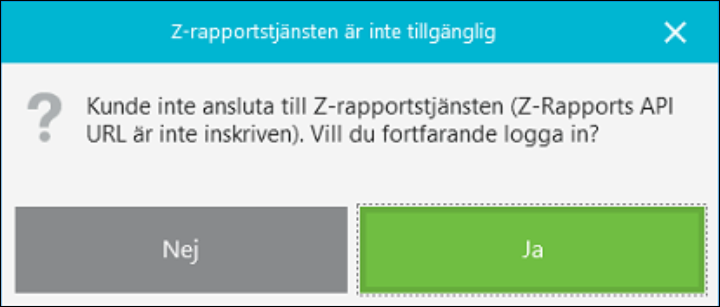
- Log in with your personal code.
- An error message about the Z-rapport service will appear. This is normal. Select Ja to continue.
- Perform a zero transaction (cash purchase):
- Why this is important: This transaction creates the first order in the new database. The synchronization service uses this order to identify which företags-ID (Company ID) to use for all future data. Without this step, synchronization will not start.
- How to do it: In the cash register view, without adding any items, click the payment button Kontant. (Other payment methods also work.)
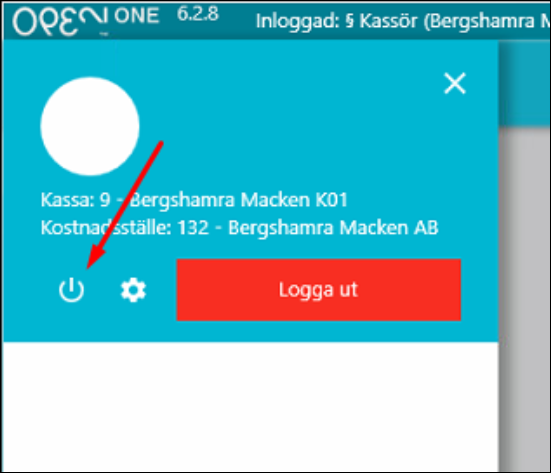
- Close the cash register program: Go to the menu and select Avsluta.


Step 5: Restore System Addresses
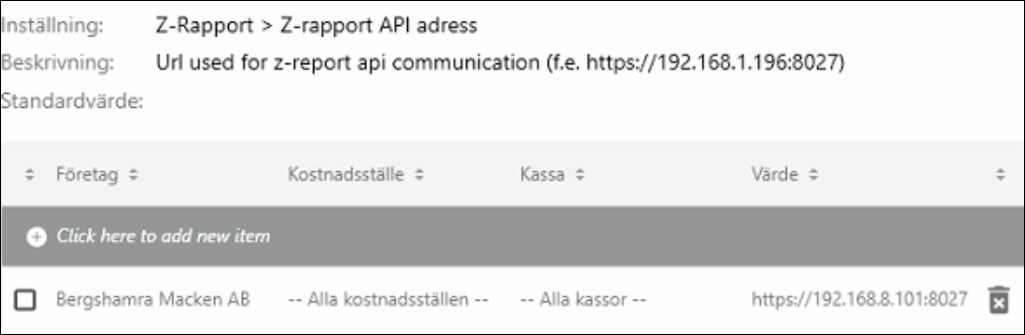
- Set Z-rapport API address:
- Go to Settings and locate "Z-rapport API address".
- Click "Click here to add a new item".
- Select the correct company from the list.
- Enter the address using the format: https://[K01_IP-ADRESS]:8027 (Replace [K01_IP-ADRESS] with the fixed IP address for Kassa 01, e.g., https://192.168.1.100:8027). Save.
- Set Local Service address:
- Locate the setting "Lokal service adress".
- Click "Click here to add a new item".
- Select the correct company from the list.
- Enter the address using the format: [K01_IP-ADRESS] (Only the fixed IP address for Kassa 01, e.g., 192.168.1.100). Save.

Step 6: Finalization – Start Services
Now that everything is configured, you can start the services again and synchronization should work.
- Return to the Tjänster window (services.msc).
- Right-click each of the following services and select Starta:
- OS.LocalService
- OS.WebAPI
- OS.ZReportAPI
The process is now complete, and the cash register is ready for use.