Orders in OPEN Two
Depending on whether you work in the cash register or in the BackOffice, there are different ways to handle orders, and the most comprehensive management occurs in the BackOffice. An order can have four different statuses: Requested, Processing, Finalized, and Canceled.


When an order is created, it receives the status Requested, and as soon as someone from the supplier storage has accepted that they can send the order, it receives the status Processing.
Note that if the supplier storage has enabled the setting "Auto-accept orders," the order is automatically accepted, meaning the order receives the Processing status directly.
When the order has the status Processing, you can print a picking list. As soon as the order has been picked, you indicate this in BackOffice, and by pressing Deliver, the order receives the final status Completed. This means that the handling of the order is completed.
In BackOffice, you can choose to reject an order both when it has the status Requested and Processing, in this way it receives the status Canceled.
Good to know about orders
Especially for Enterprise companies or internal orders
Making orders is particularly useful if your company has an Enterprise structure, to be able to order goods from your external Ongoing storage, or if you need to move goods between your internal storages. For small business owners who order goods from various suppliers outside of OPEN Two, we recommend using inbound deliveries to bring the goods into your storage.
Greater control over orders in BackOffice
In BackOffice, you have more control over orders and generally more flexibility compared to when you work at the cash register.
One consequence of this is that if your storage functions as a point of sale, meaning there is a cash register connected to the storage, you can only have one supplier for that storage. This means you can only order goods from one other storage. However, if the storage does not have a cash register connected to it, you can have multiple suppliers for the same storage.
This is because the cash register's functions are more limited than in BackOffice, where you can choose between multiple suppliers when ordering goods. This is important to keep in mind if your storages need to be able to order goods from different sources.
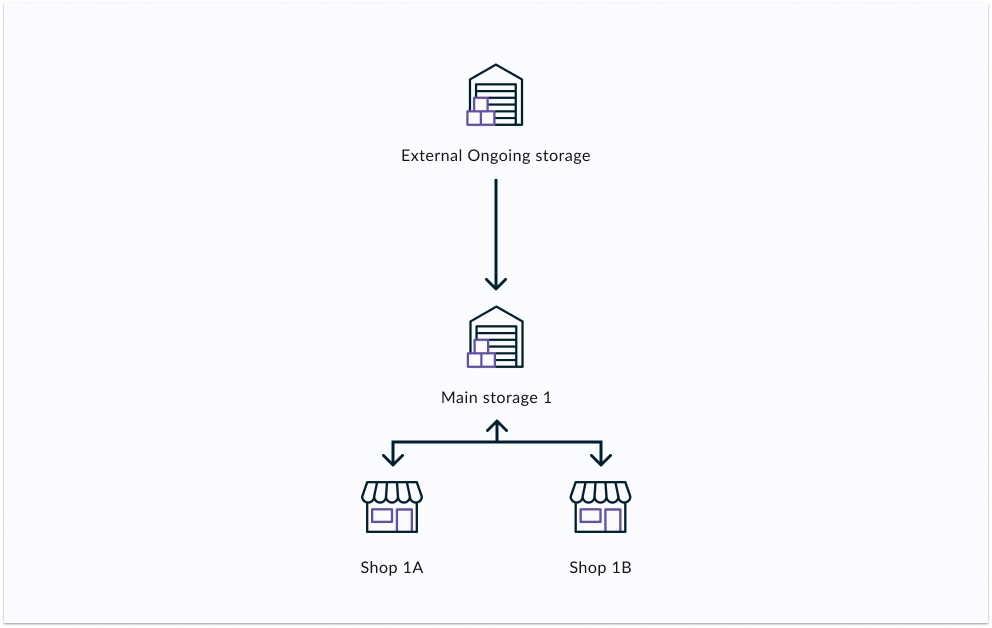
See the example below where the Main Storage can order goods from an external Ongoing storage and send and receive goods from Shop 1A and Shop 1B. The Main Storage thus has three suppliers. On the other hand, the shops only have one supplier each, which means they can only order goods from the Main Storage. The shops are points of sale and have cash registers connected to them (which the Main Storage does not have). This means that if you need to move goods between Shop 1A and Shop 1B, you must first move them to the Main Storage and then on to their final destination.
Price update upon delivery
The price of the order is based on the current price at the time of delivery instead of at the time of ordering. Any price changes between ordering and delivery will reflect the new price.
Currently, this is in place for internal orders, and soon we will have the same functionality when ordering goods from an external Ongoing storage.
Stock package quantity is retrieved from supplier storage
When placing an order, you can choose between specifying the quantity of articles in whole stock packages or in individual customer packages (= 1 article).
To ensure that the specified quantity in the order matches the actual available quantity at the supplier, the stock package quantity is retrieved from the supplier storage. This reduces the risk of errors and ensures that the order is accurate.
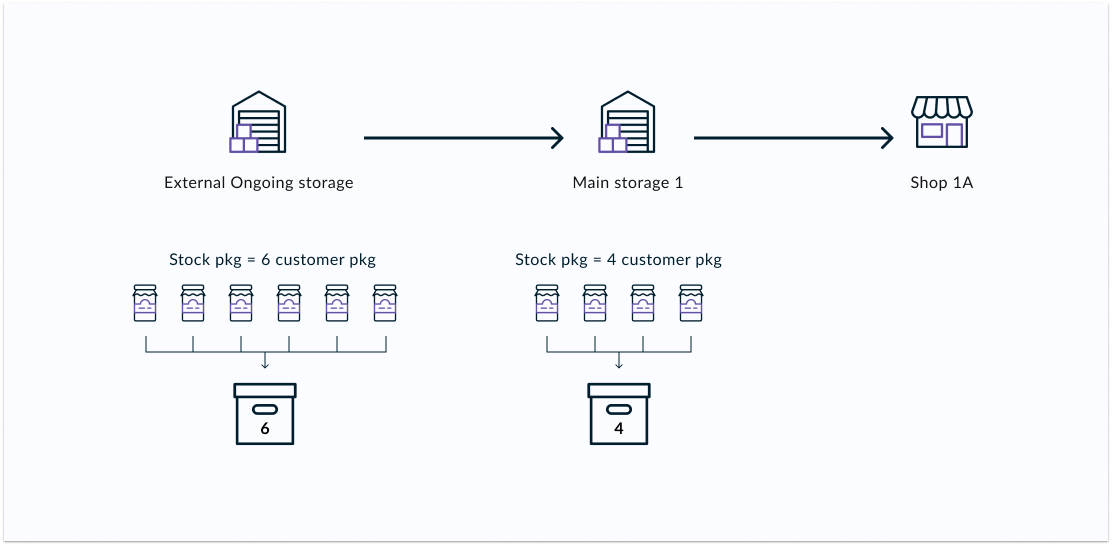
For example, if you order goods from an external Ongoing storage where the number of articles per stock package has recently changed from 4 to 6, this will be displayed when you place your order. When moving goods from your main storage to a smaller storage, the stock package quantity you have specified for the articles in the main storage applies. This way, you can use up all the stock packages with 4 articles per package before changing to 6, ensuring that your order matches the actual stock packages being picked.
BackOffice: Create and Mmnage orders for all storages
In BackOffice, you can easily create and manage orders for all your storages. Whether you're ordering goods from a storage internally or externally via Ongoing, the process is largely the same. The main difference lies in how the handling of the order occurs after it's placed.
When ordering from an external Ongoing storage, you can track your order in BackOffice, but the actual processing happens at the supplier. This means you can't change or cancel your order after it's been sent. If any changes are needed, you must contact your supplier directly.
When ordering from an internal storage, you can manage the entire process in BackOffice. You can accept the order, mark when it's been picked and delivered. As long as the order hasn't been finalized, you have the option to cancel or edit it directly in BackOffice.
Create order
To be able to order goods from a specific storage, you need to have selected that storage as the supplier. You manage this in the settings for the destination storage, in the "Ordering from" section.
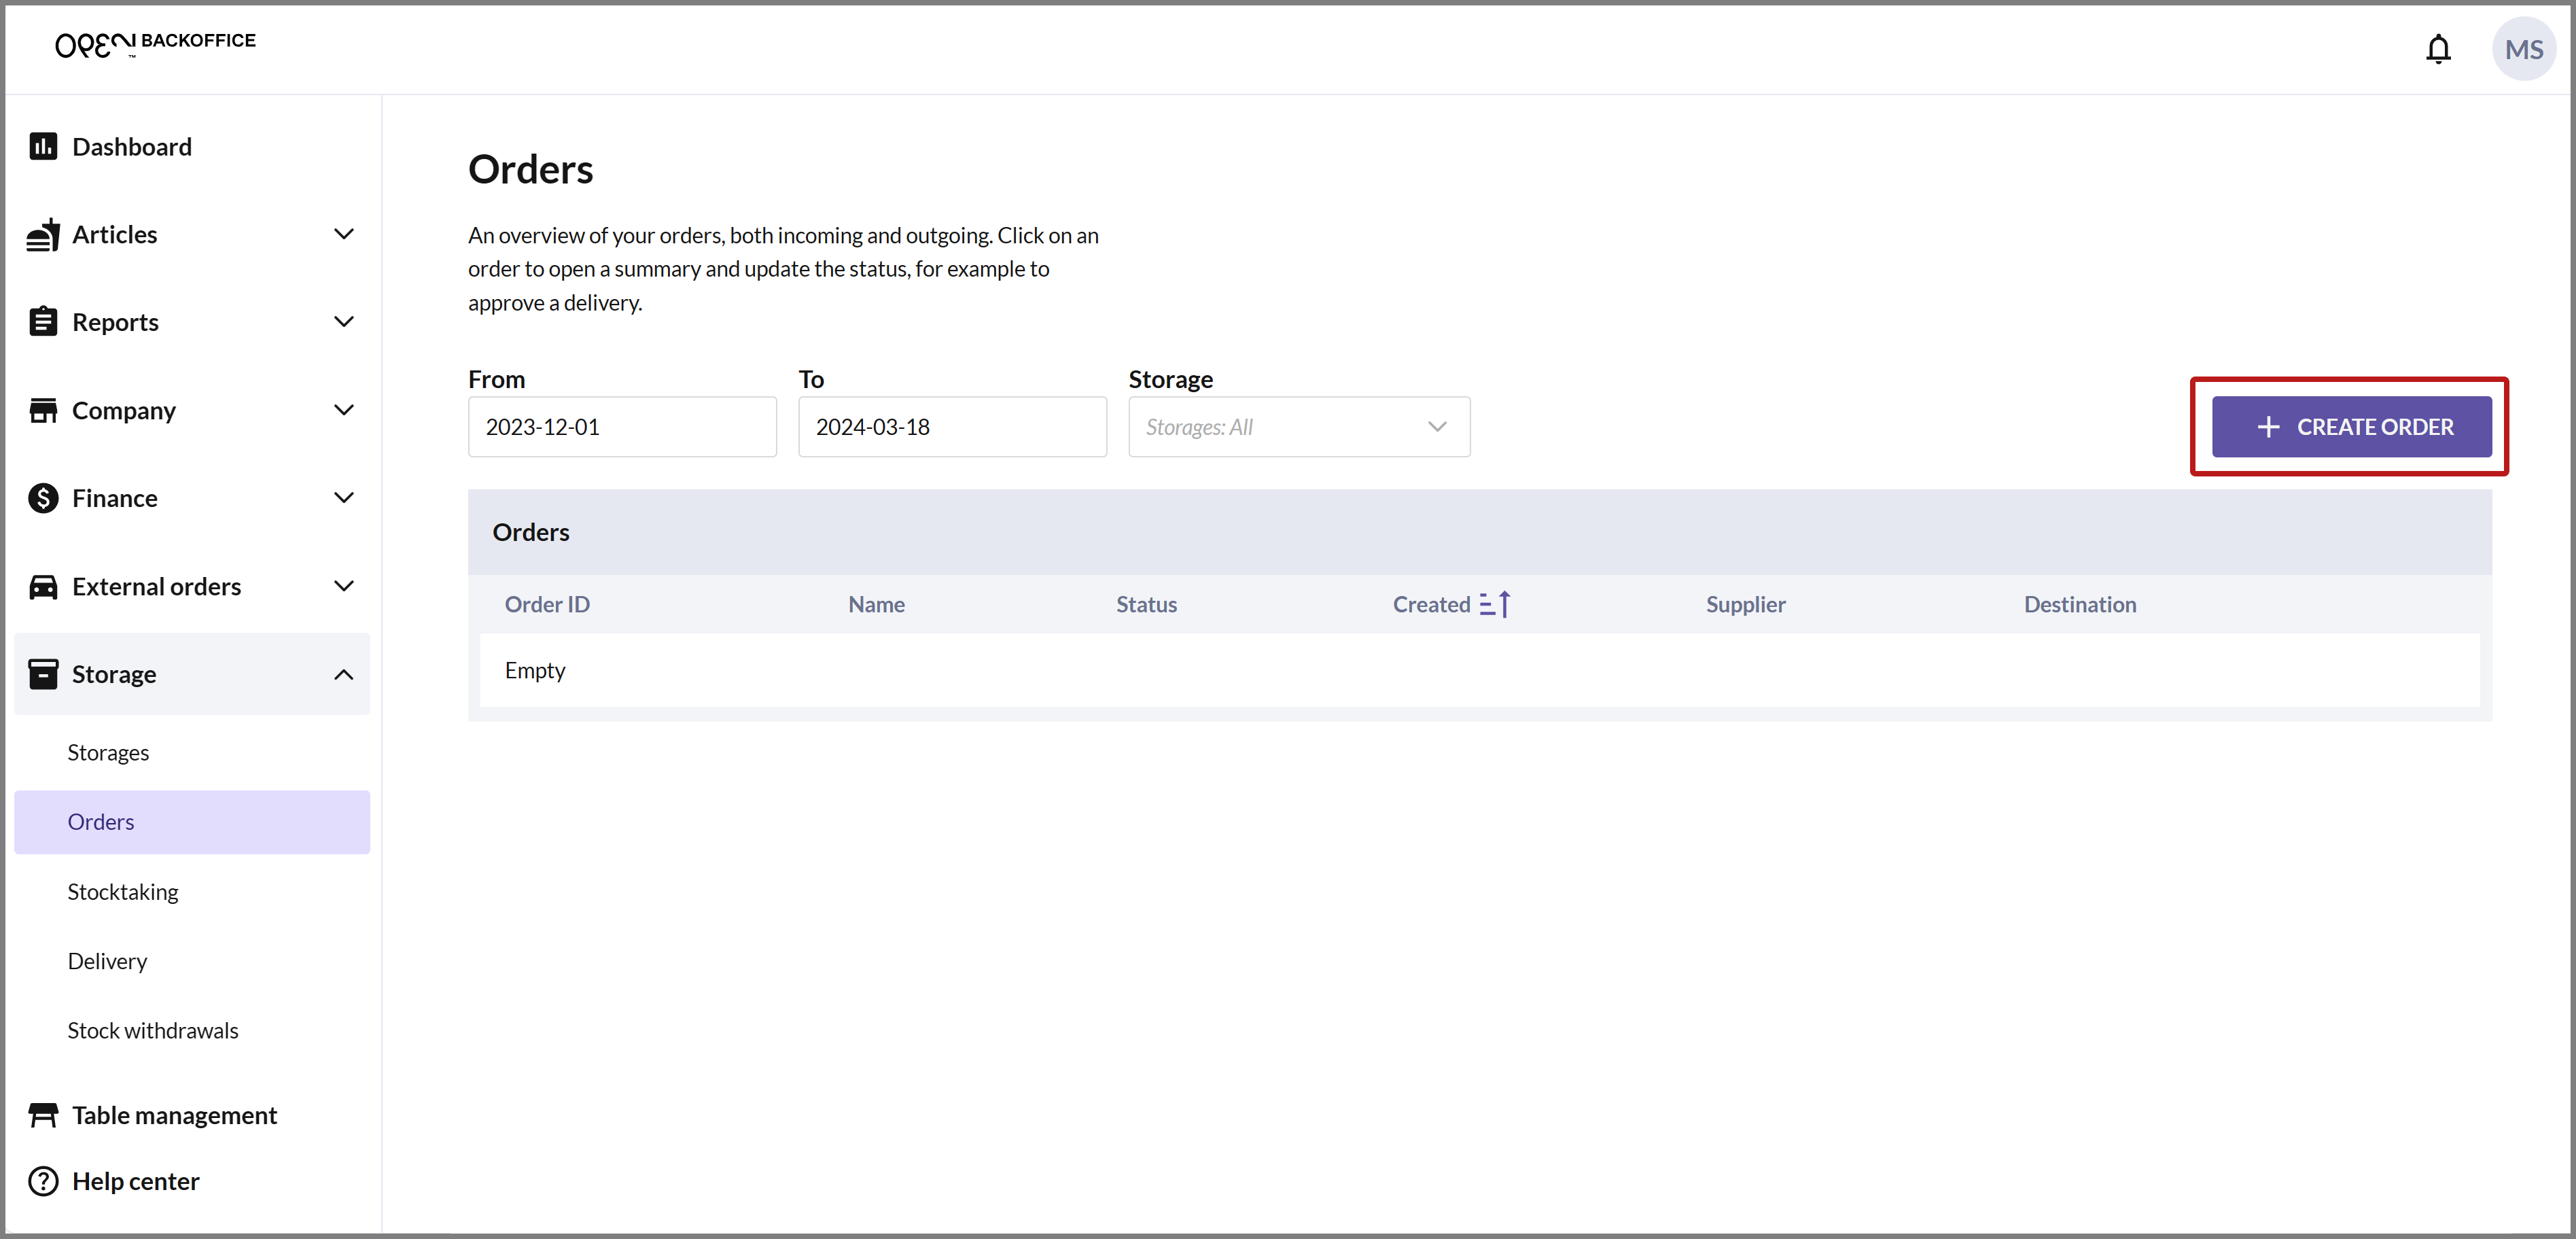
Select STORAGE in the menu and navigate to ORDERS.
Here you will see the orders for all your storages. You can choose to filter by one or multiple storages. You can also set a specific time period to, for example, only see the orders for the past month.
Click on the CREATE ORDER button in the upper right corner.
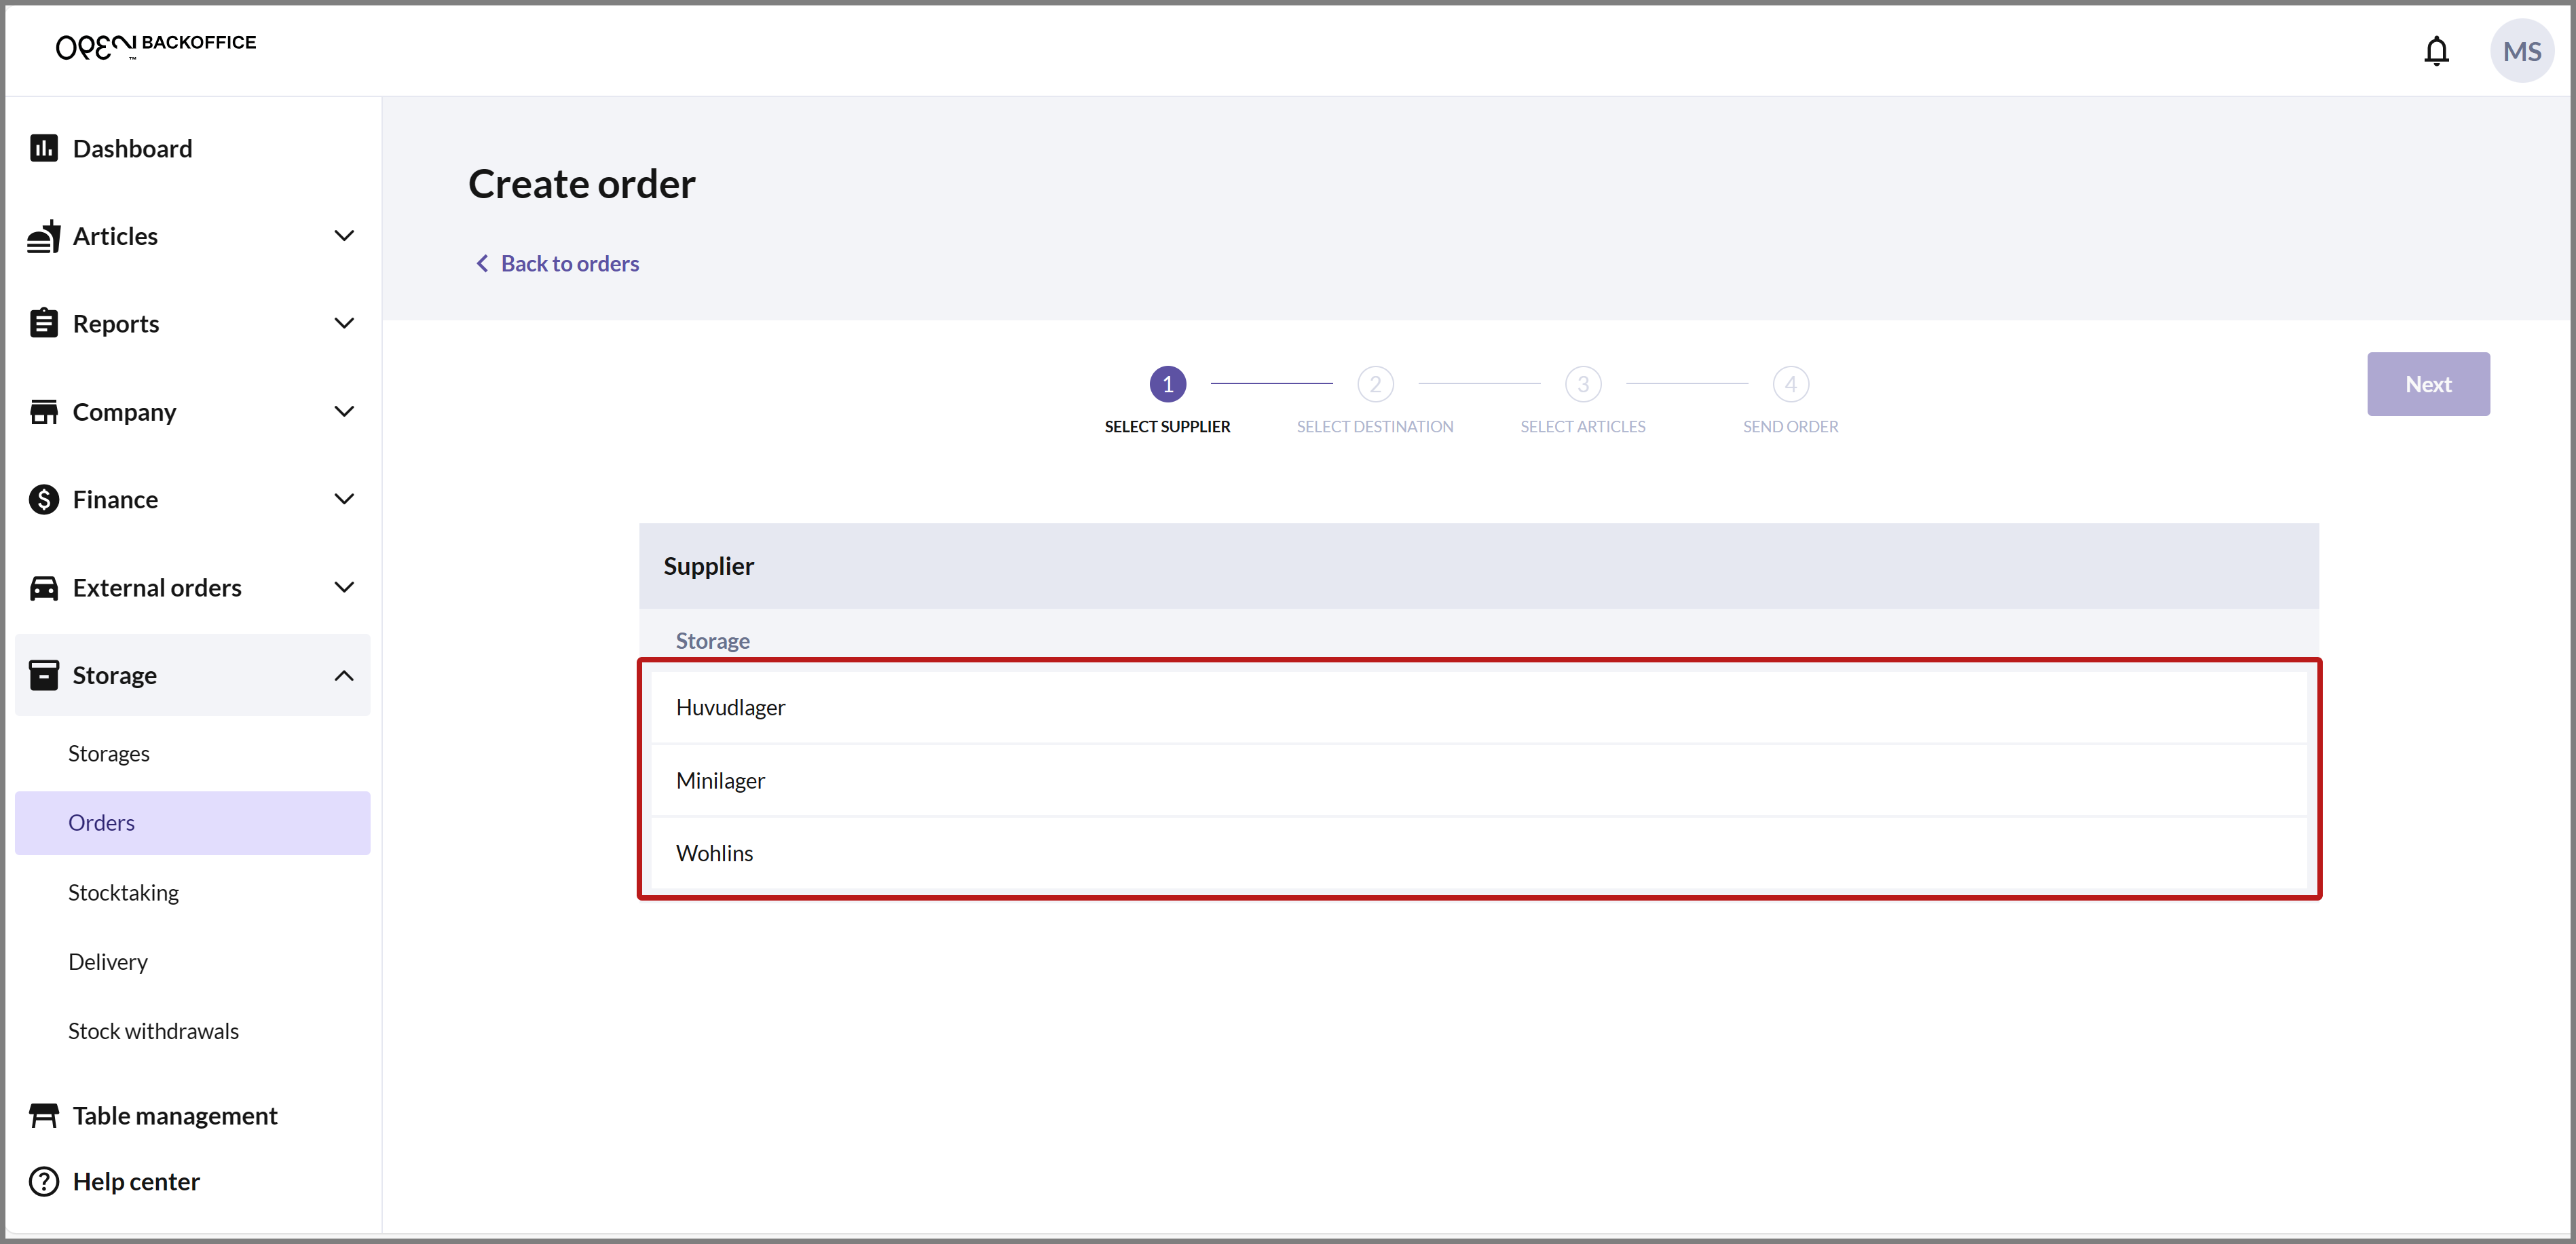
SELECT SUPPLIER
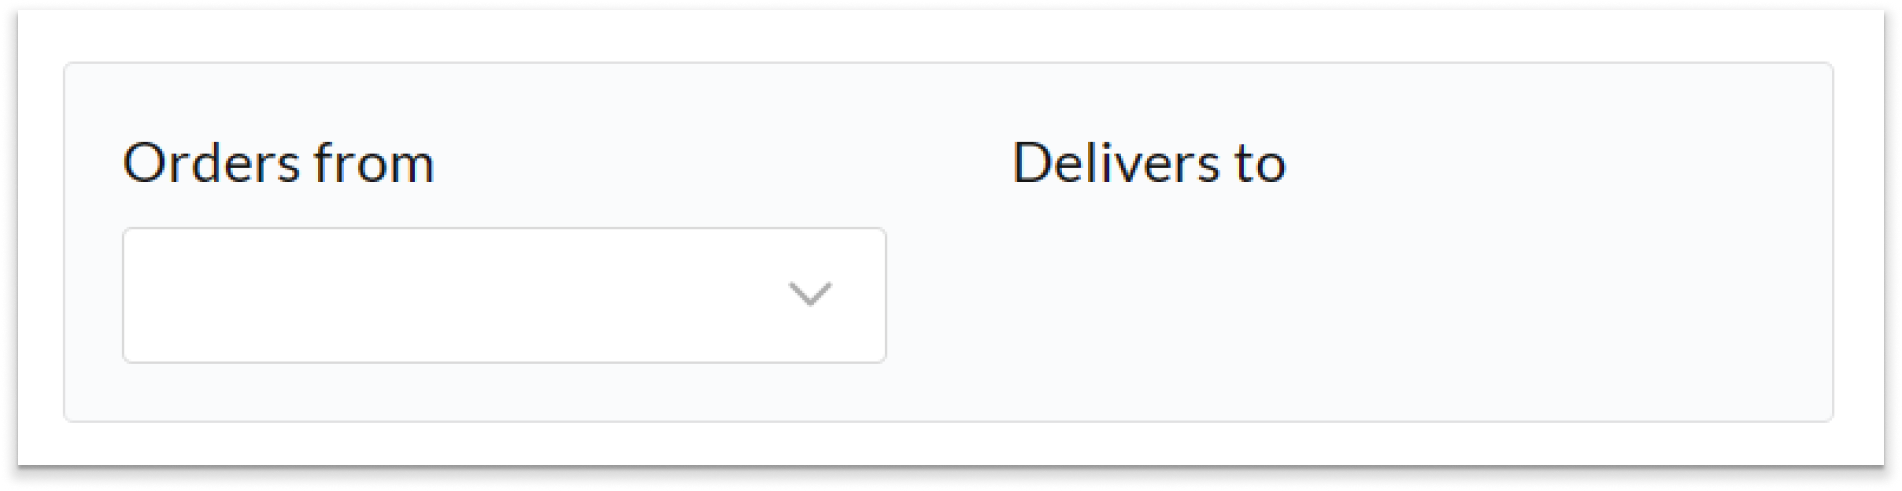
Choose the storage that will be the supplier (i.e., the storage from which the goods will be shipped). Once you've selected a storage, you'll be automatically taken to the next step.
SELECT DESTINATION
Choose the storage that will be the destination (i.e., the storage that will receive the goods). Once you've selected a storage, you'll be automatically taken to the next step.

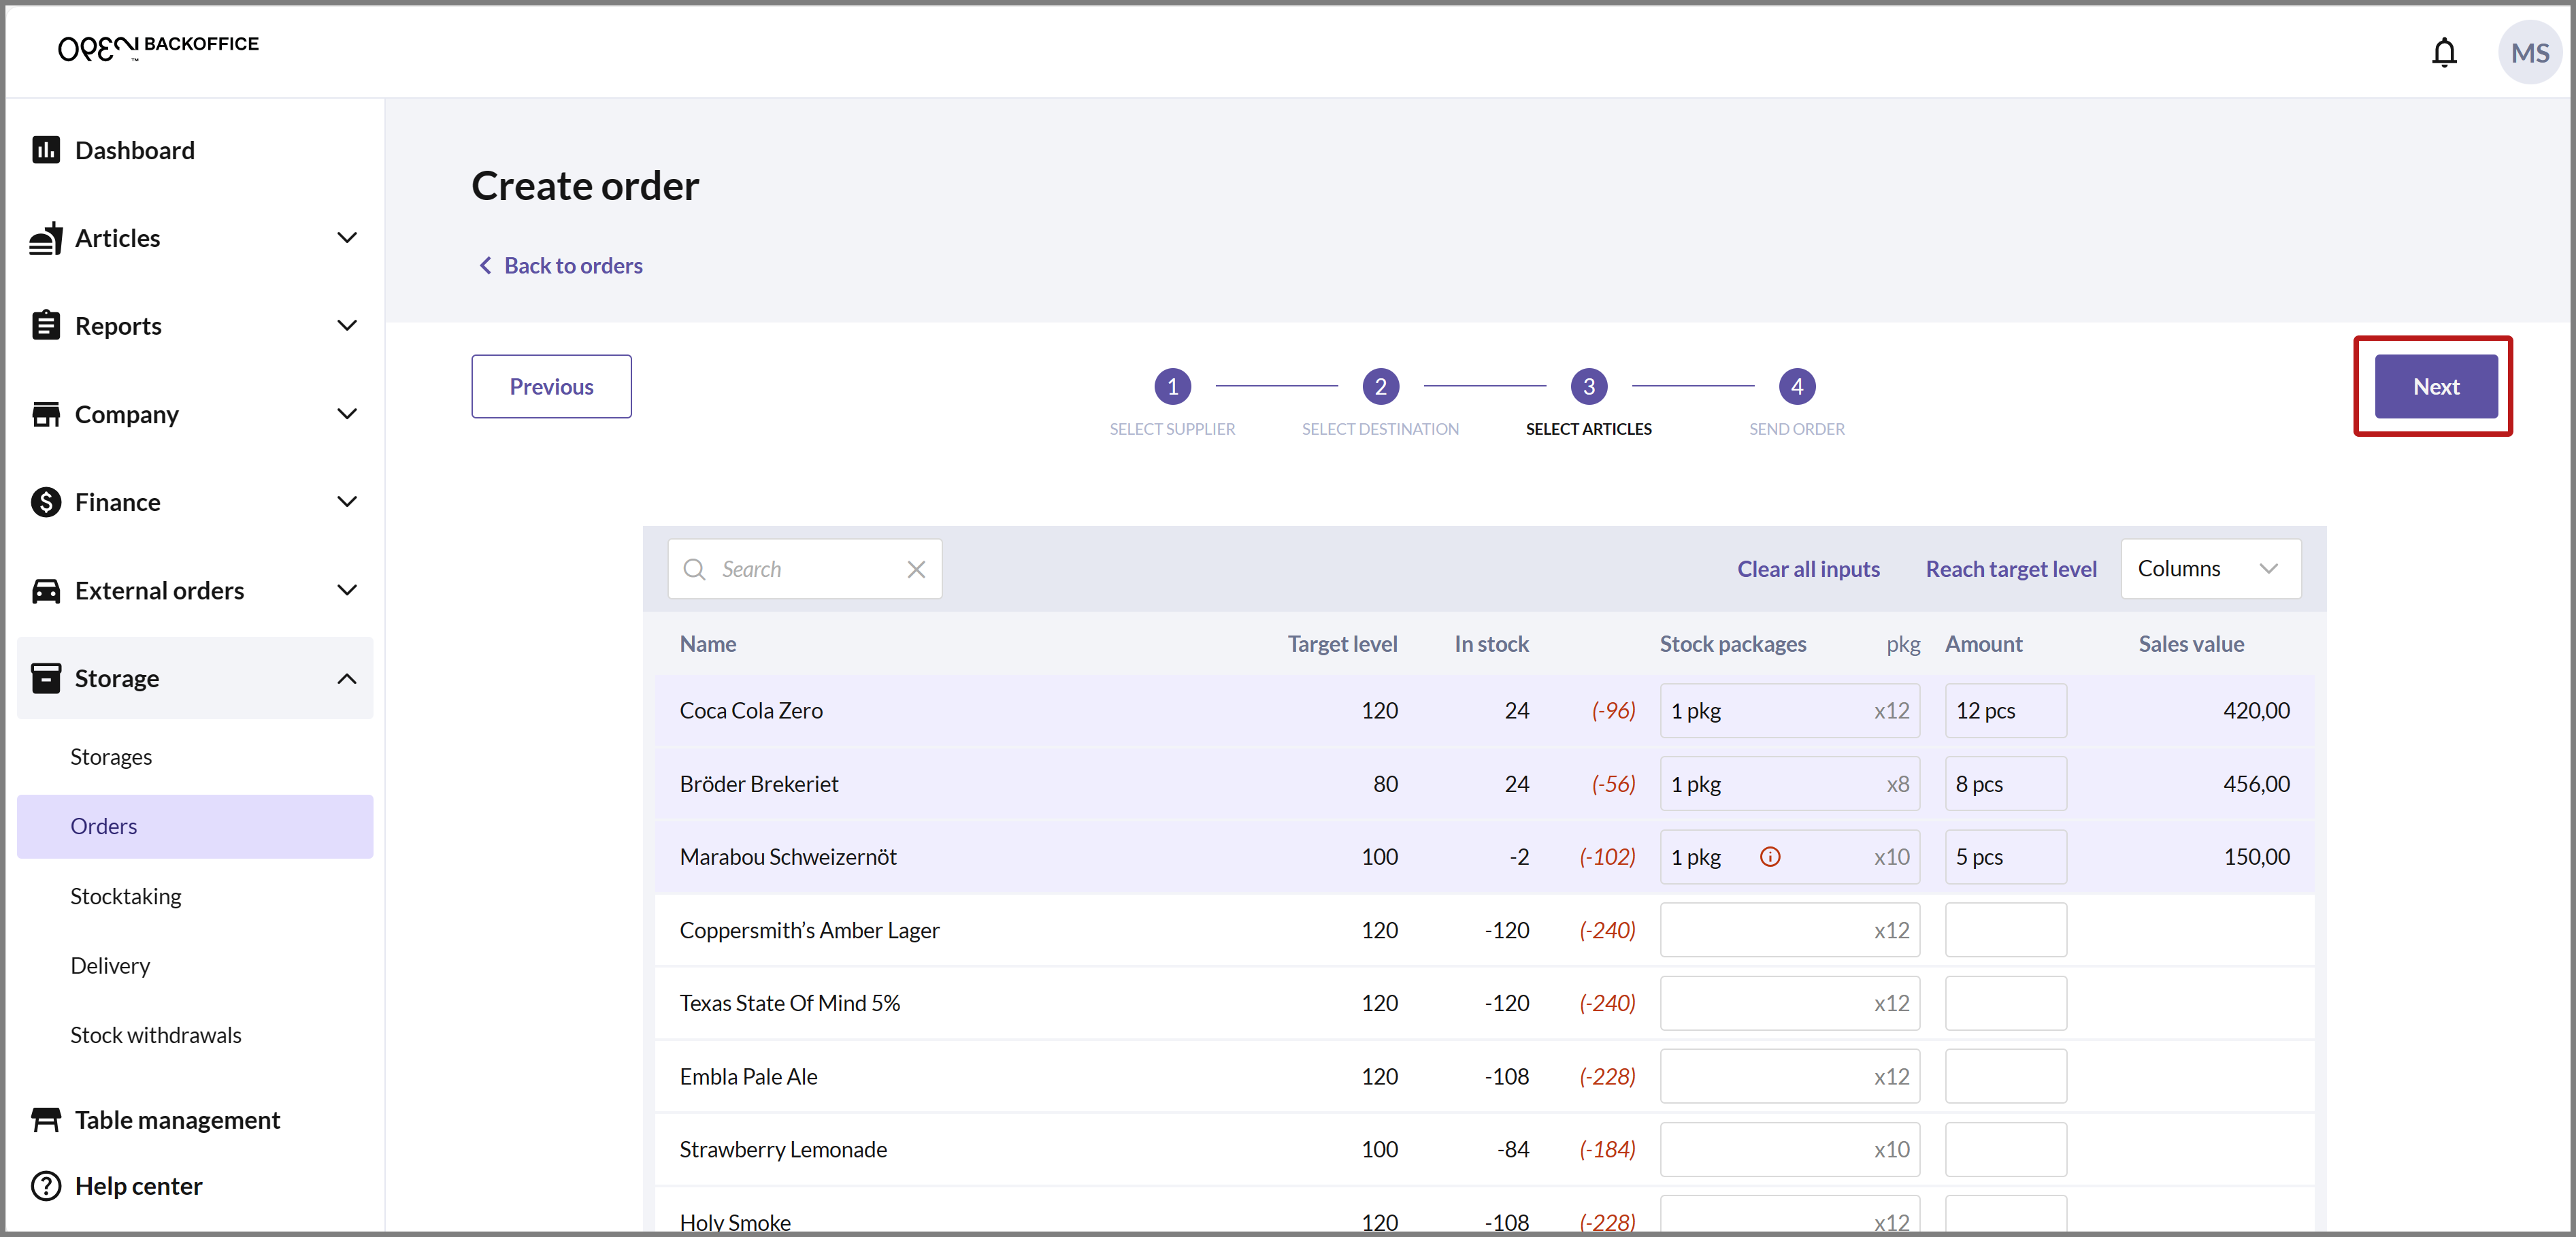
SELECT ARTICLES
Choose articles by specifying the quantity you want to order for the respective articles.
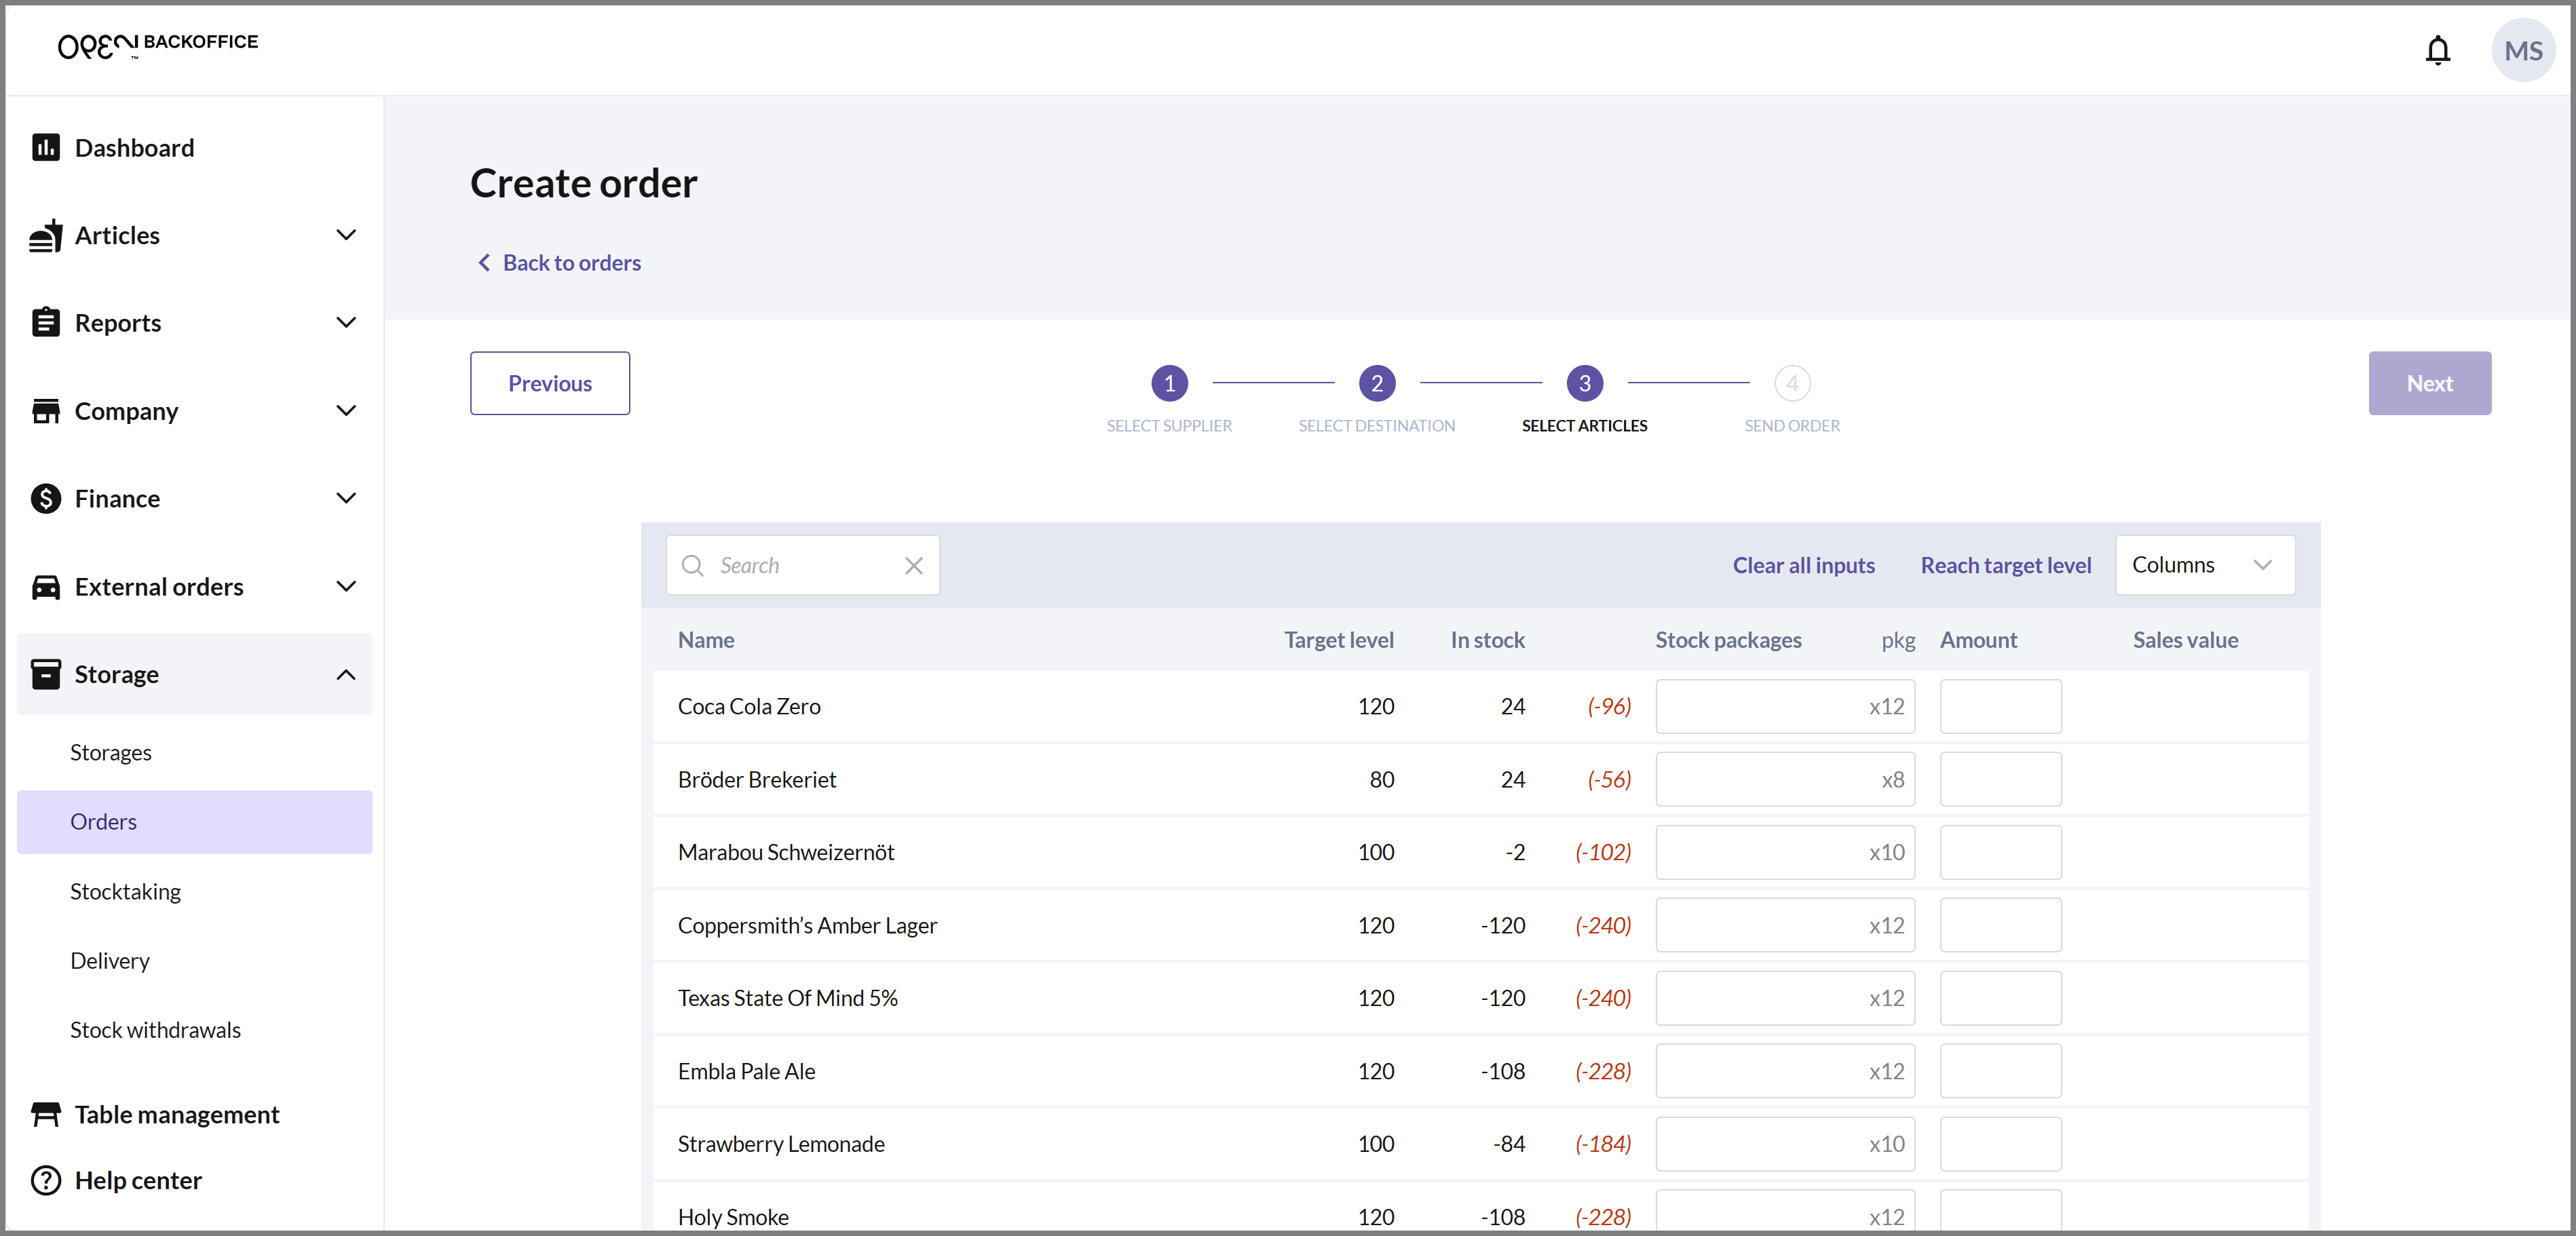
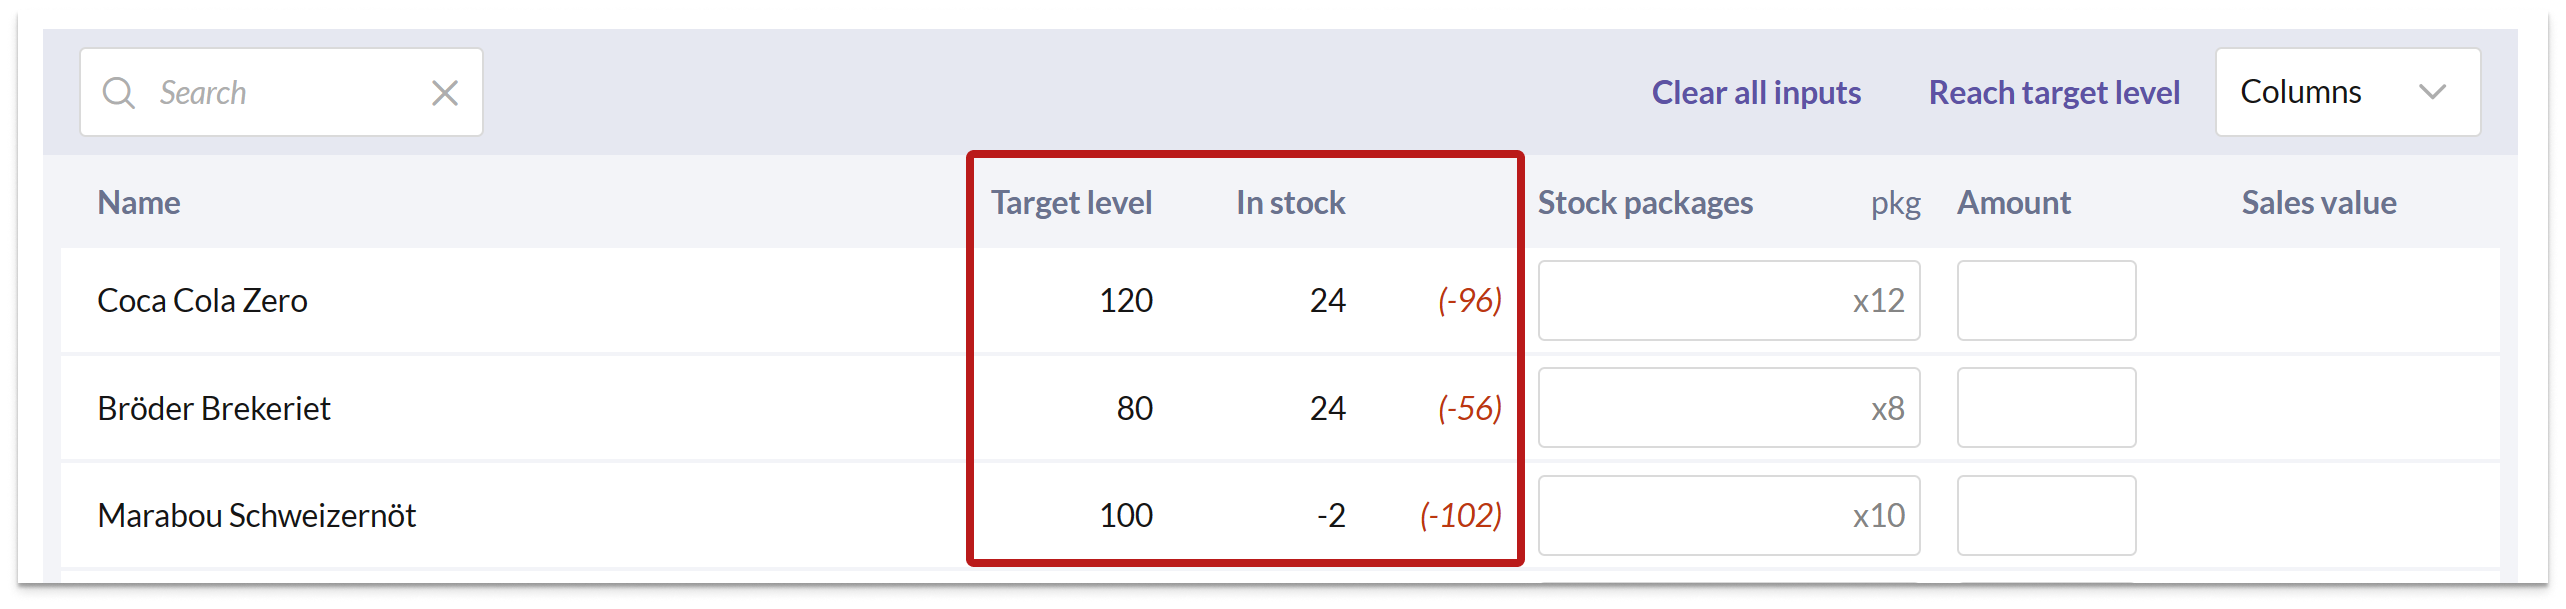
By comparing the columns Target level and In stock, you can easily see which products need to be replenished in the storage.
In these columns, the desired stock level and the actual quantity available in the destination storage are displayed. Any deviation, meaning the difference between the desired stock level and the actual stock balance, is marked with red italic text to clearly indicate what is missing to achieve the desired stock level.
With just a few clicks, you can create an order where all articles are replenished according to the target stock level. Simply press the "Reach target level" button in the upper right corner.

In the dialog that opens, you can choose whether the target level should be reached for all items, or only for those items whose stock balance is lower than the ordering point.

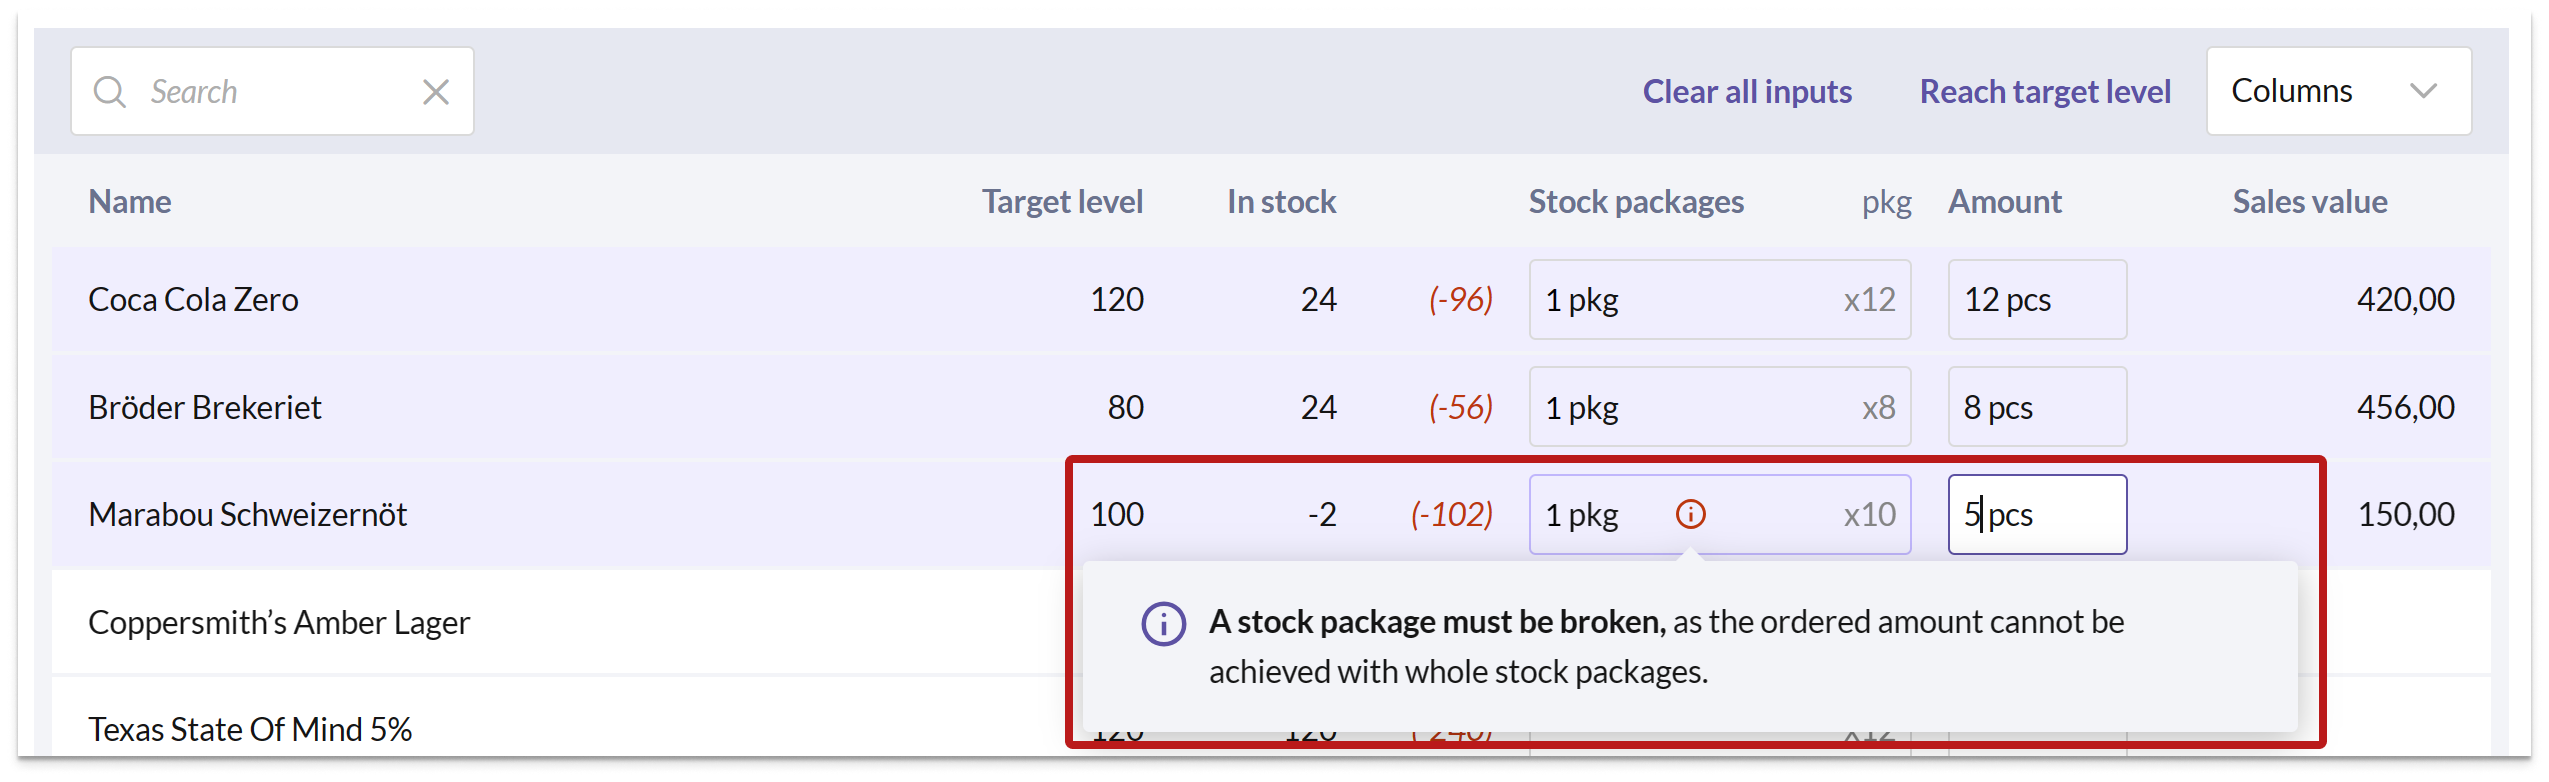
You can choose to order in the quantity of stock packages or in amount (= customer packages, i.e., the packaging unit sold to the customer).
If you enter 1 in the Stock packages column, the Amount column will automatically be filled with the corresponding customer package units.

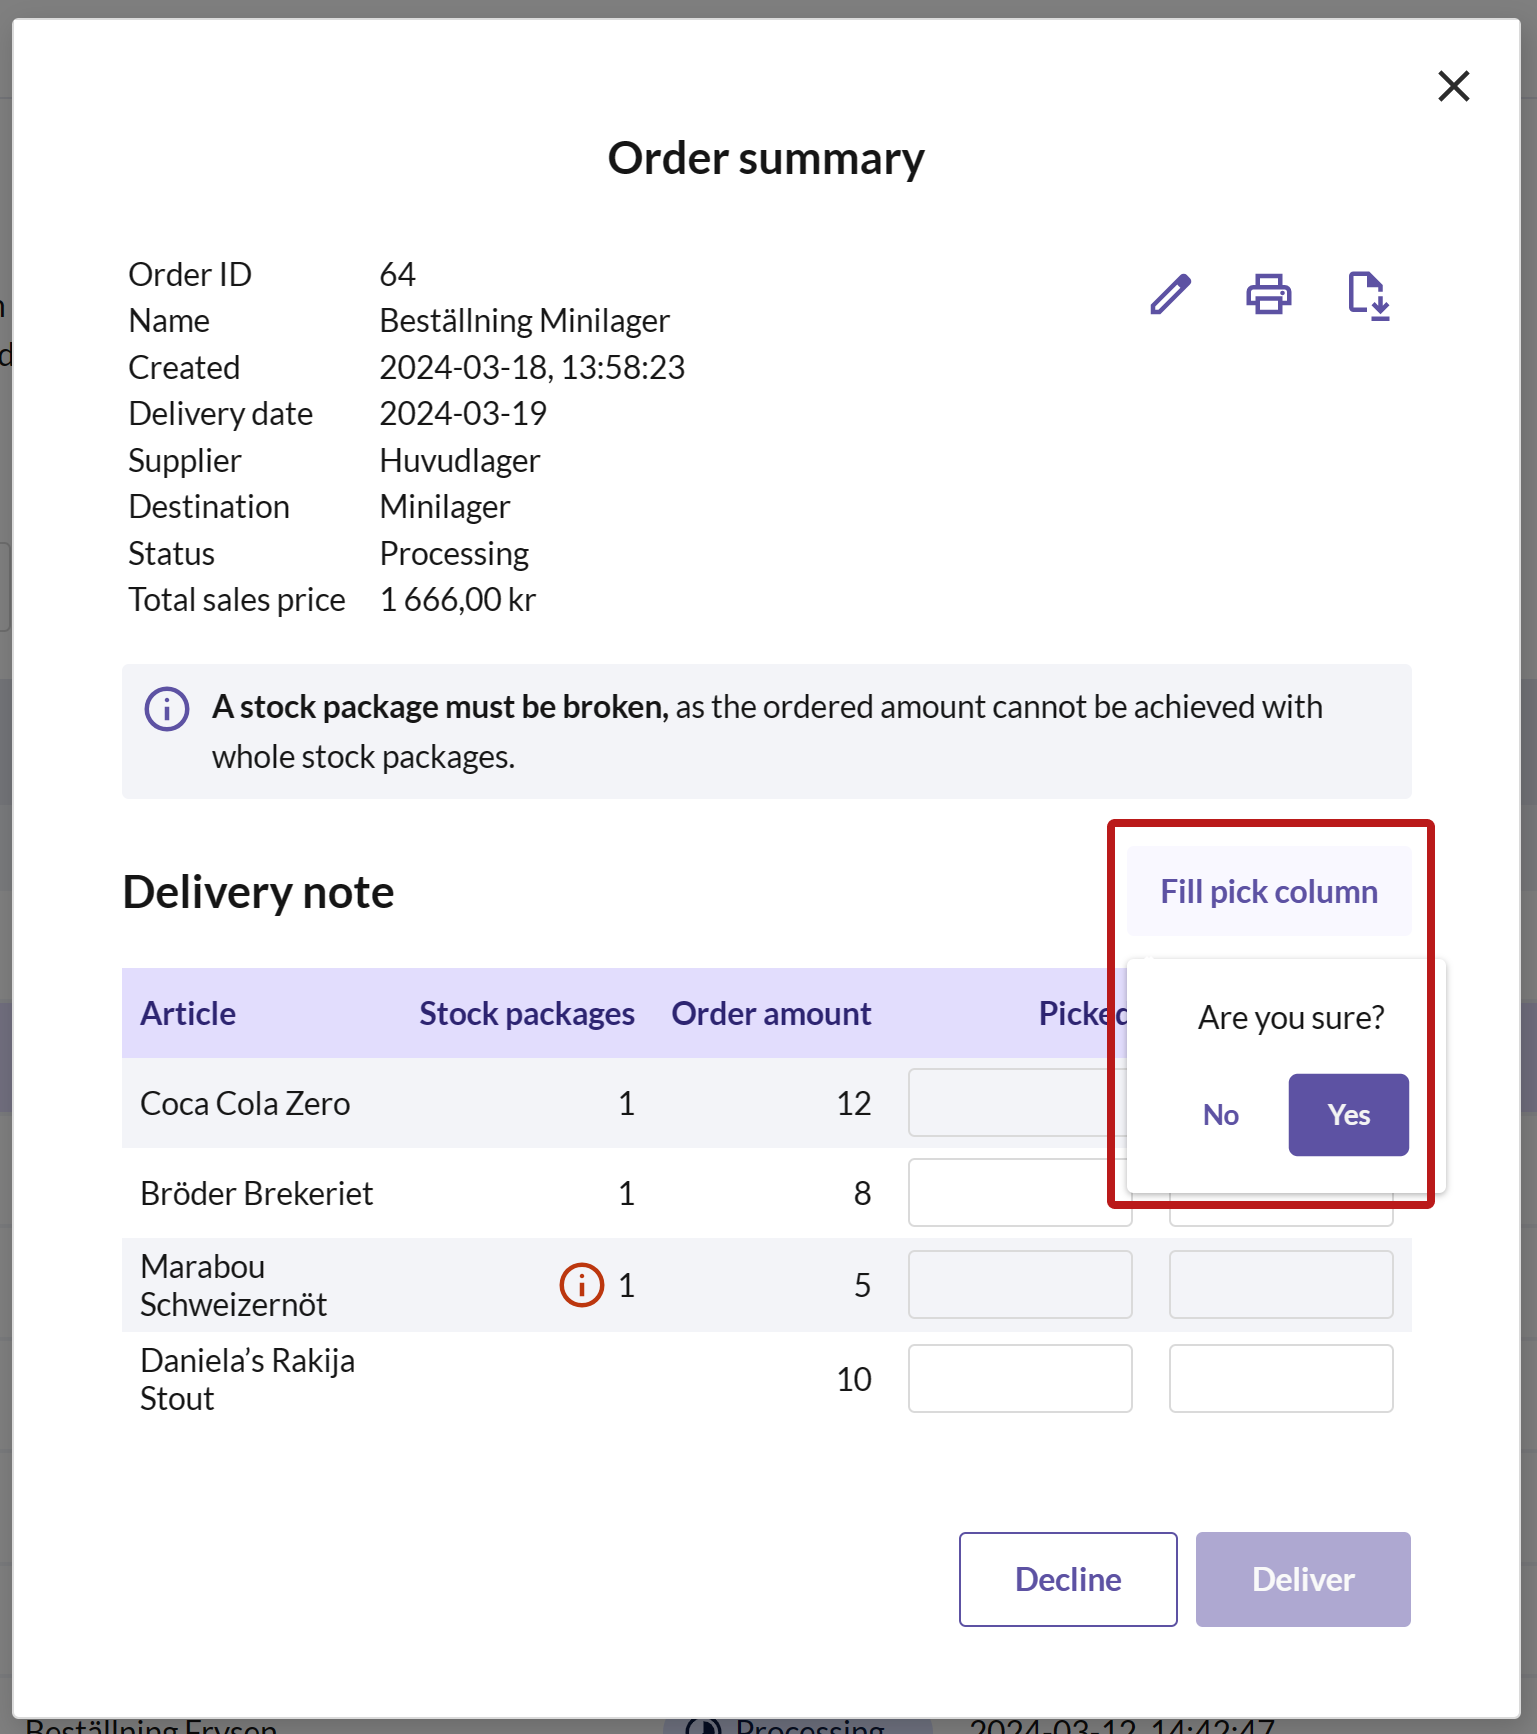
If you enter a quantity that doesn't evenly divide into whole stock packages, the Stock packages column will be rounded up. The order line will be marked with a red information icon. If you hover over the icon, an information box will appear, informing you that a stock package needs to be broken because the ordered quantity cannot be achieved with whole stock packages.
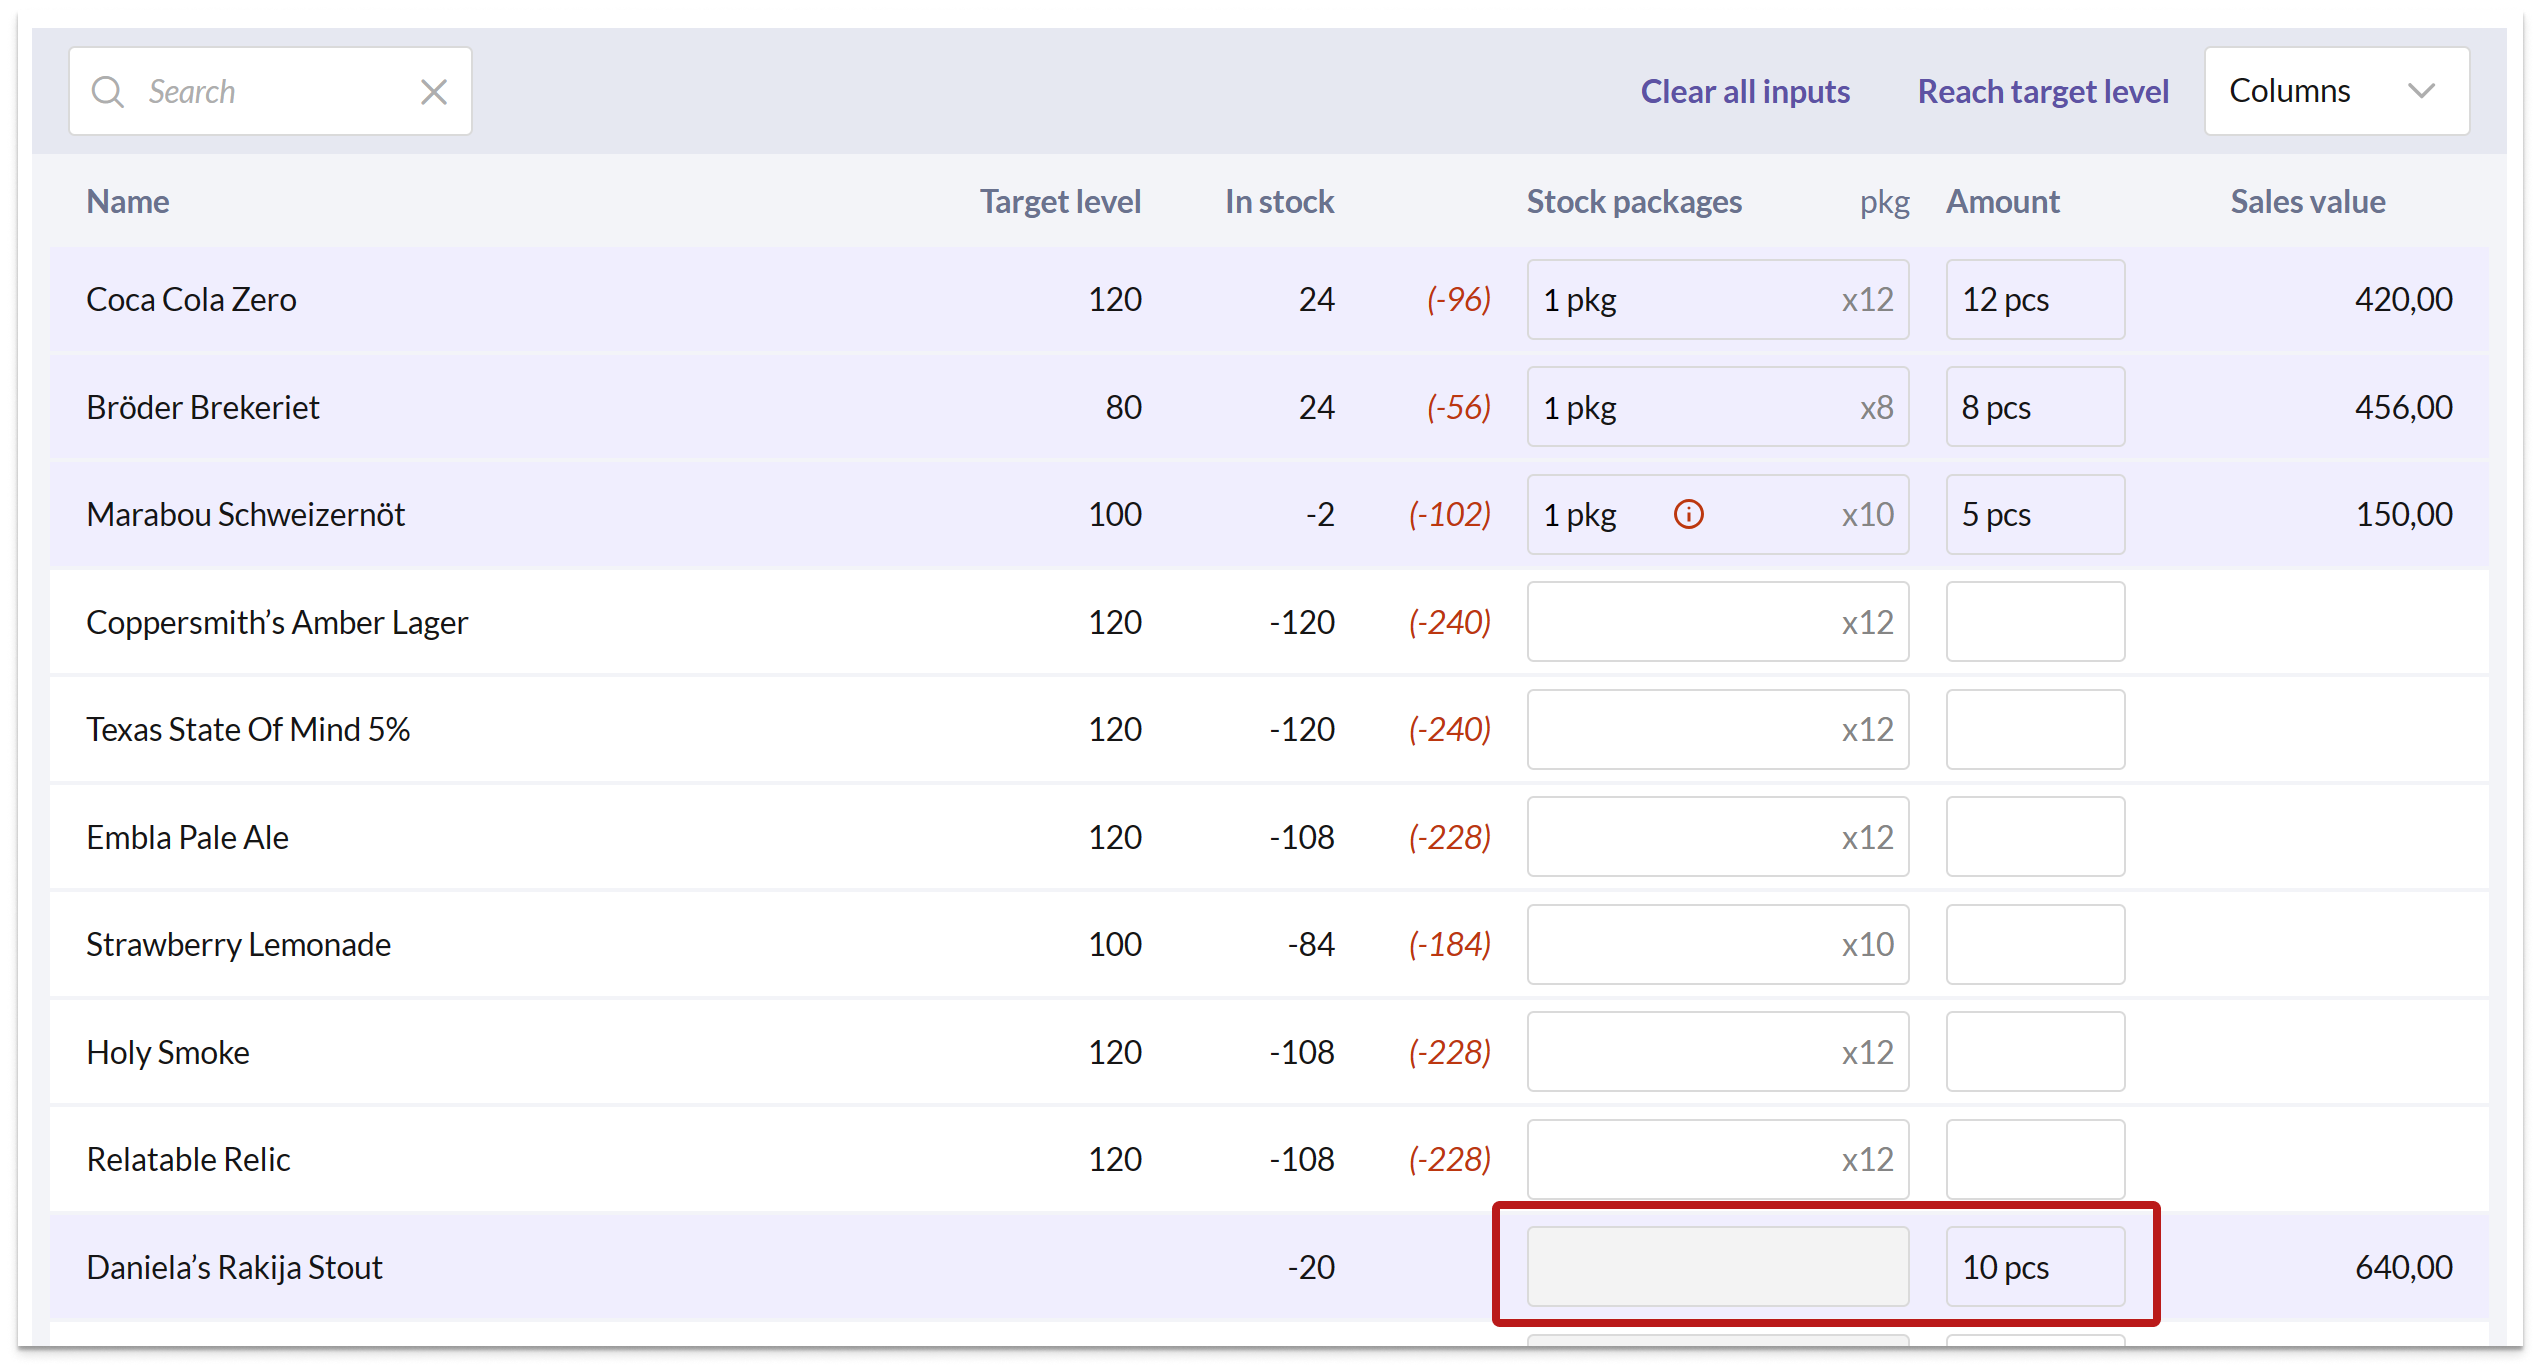
If the Stock packages column is empty, it means that the stock package quantity is not specified for the article in the supplier storage. In this case, you should specify how many individual articles you want to order in the Amount column instead.
- You can also see a purchase value or sales value per order line, depending on whether you are ordering internally or from your external Ongoing storage. Internal orders display a sales value, and external orders display a purchase value (provided the articles have a purchase price in BackOffice).

Once you've selected the articles and quantities to order, click NEXT to proceed.
SEND ORDER
In the final step, you'll see a summary of your order.
The order will automatically be assigned a name according to "Order destination storage", but you can change it if you wish.
You can also see the order's total value. Depending on whether you're ordering from an internal or external storage, the order value is based on sales price or purchase price. Internal orders show a sales value, and external orders show a purchase value (provided the articles have a purchase price in BackOffice).
Click the PLACE ORDER button to send the order. You'll then be taken to the overview of your orders.

You can now see that the order has been created. Depending on whether you've enabled the "Auto-accept orders" setting on the supplier storage, the order will either have the status Requested or Processing.

Pick and deliver order
- ACCEPT ORDER

- A new order with status Requested needs to be accepted before it can be picked. Click on the order in the list, then select ACCEPT in the dialog that opens.
- If the "auto-accept orders" setting is enabled on the supplier storage, the order is accepted automatically. This means the order will immediately have the status Processing, and you can pick the order right away.
PICK ORDER
When the order status is "Processing," you can pick it. Click on the order to open the order summary.
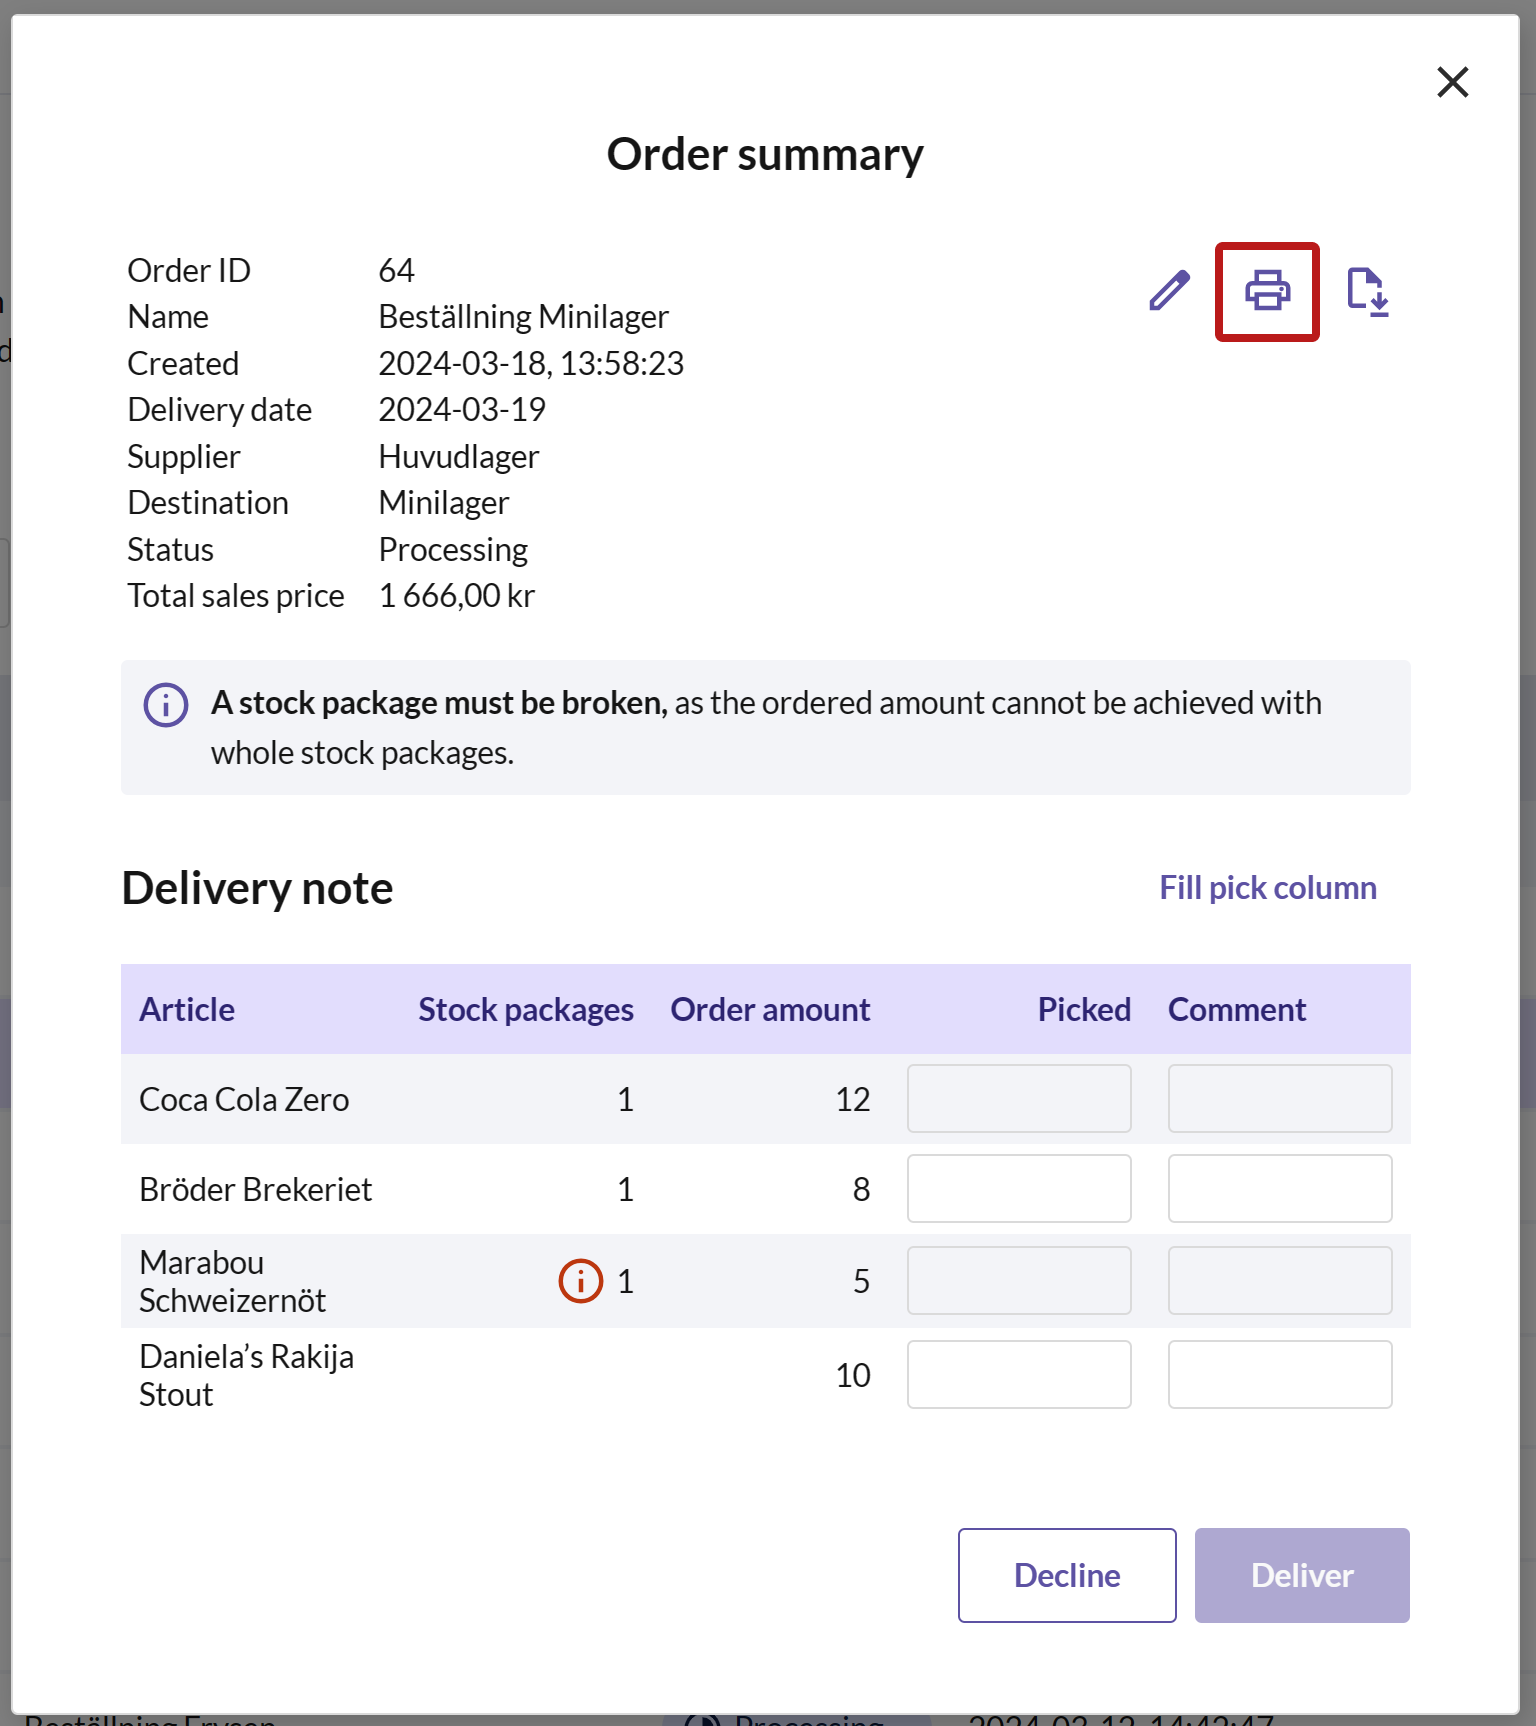
Print Pick List
Press the PRINTER in the top right corner to print the pick list as a PDF.
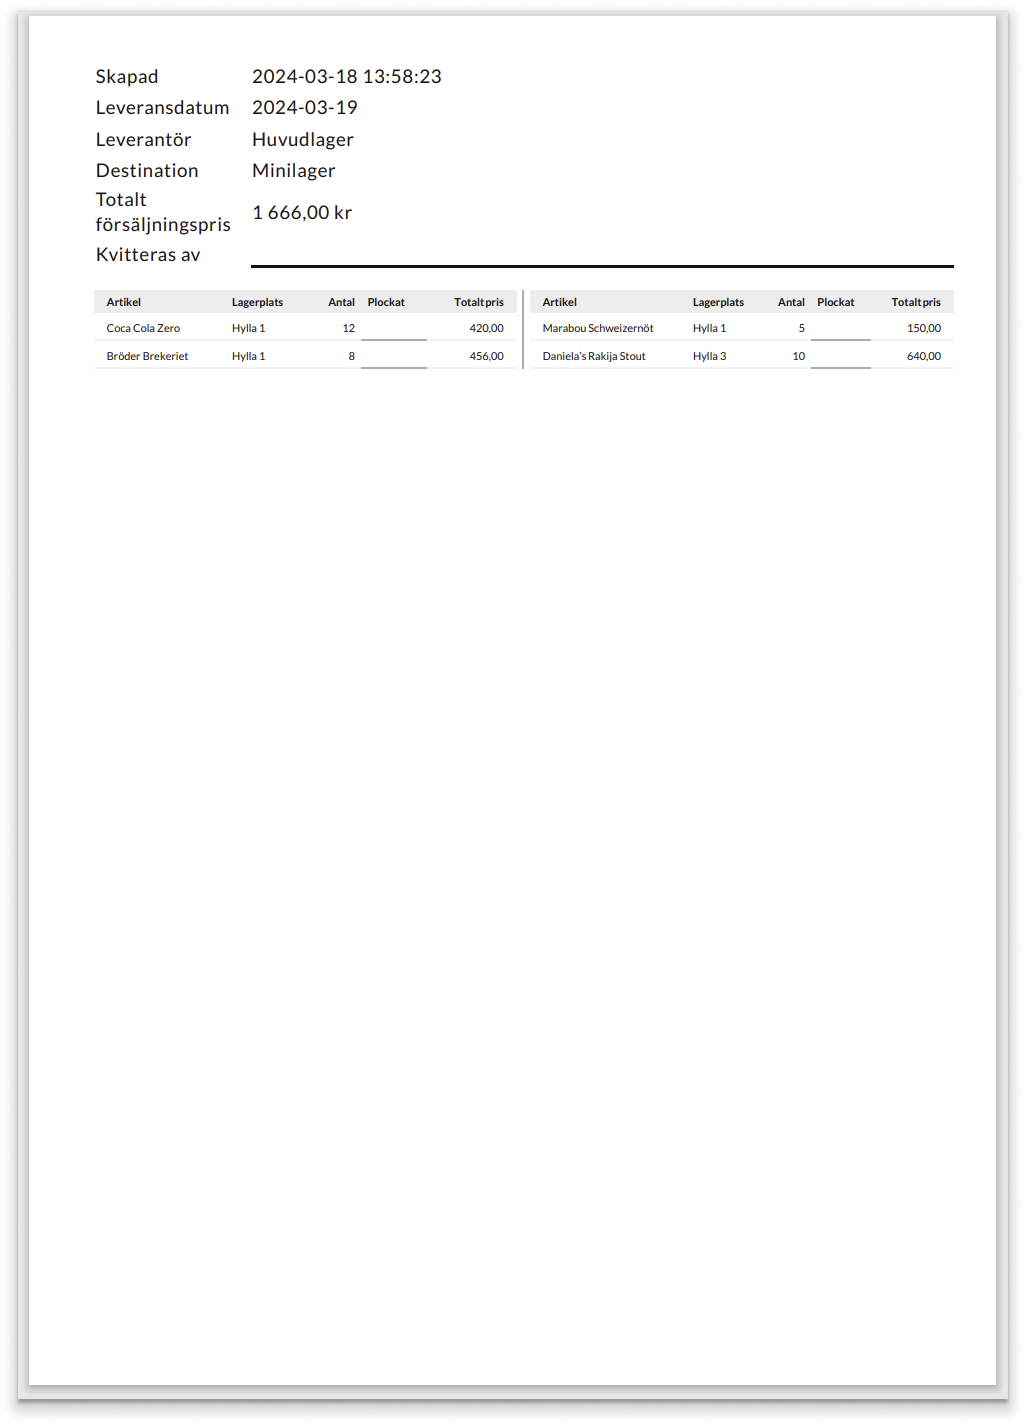
An example of the pick list is shown on the right.
- Fill in the Pick List
After the order has been picked in the storage, you also need to indicate this in BackOffice.
If you want to auto-fill the pick list with everything that has been ordered, press FILL PICK COLUMN and confirm by pressing YES.

DELIVER AND COMPLETE ORDER
Once the pick list is filled in, press the DELIVER button to complete the order. The order will then be marked as Completed, and you can deliver the goods to the destination storage.
Edit Order
Users with BackOffice permissions have the ability to modify orders before they are delivered (i.e., orders with status Requested and Processing). To add/remove items or change the quantity for an order, follow these steps:
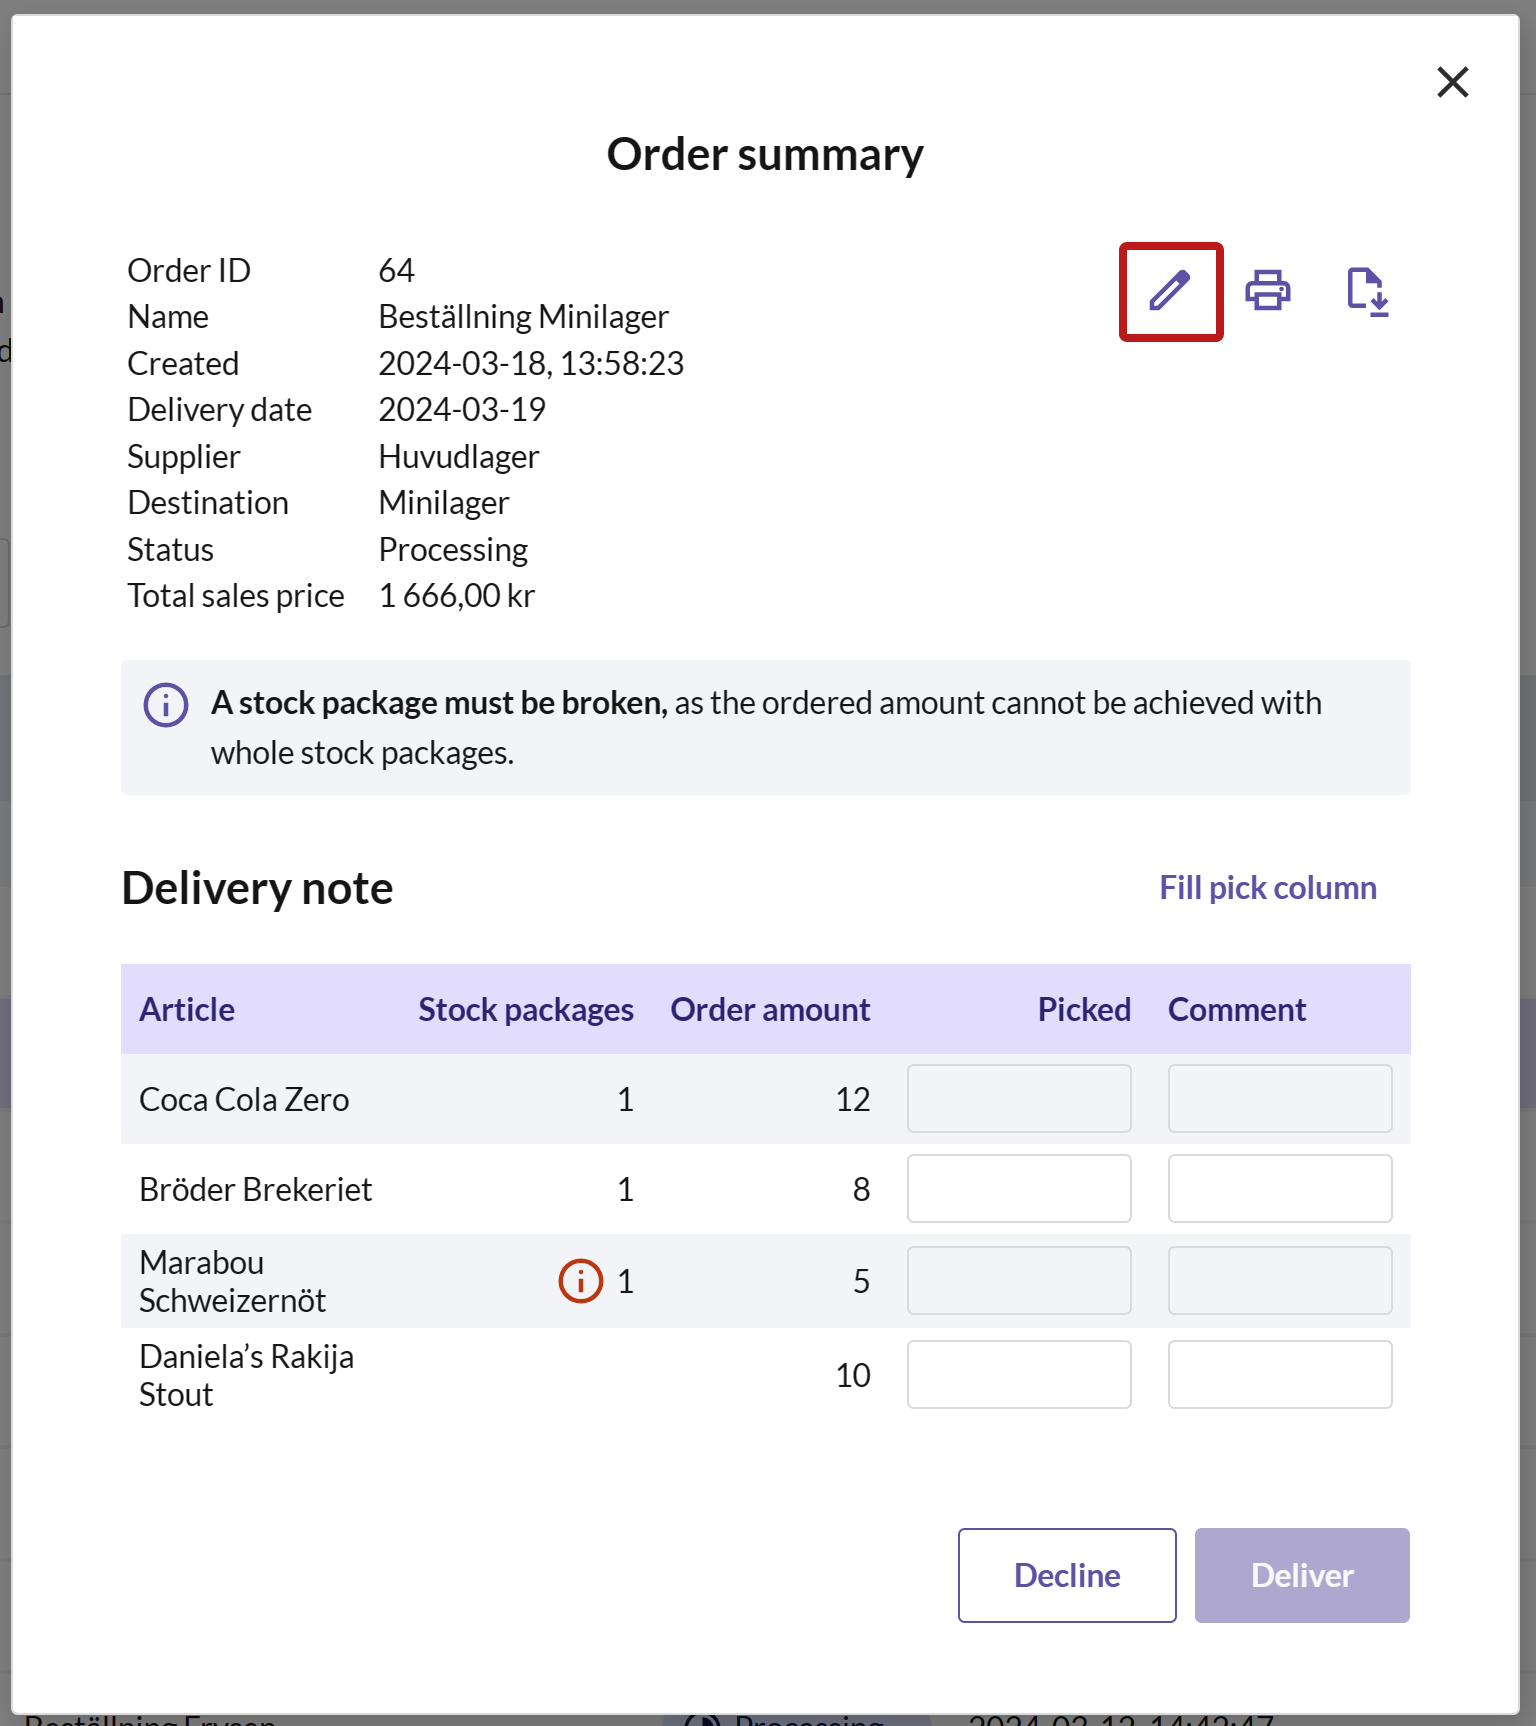
Click on the relevant order in the list to open a dialog with an order summary.
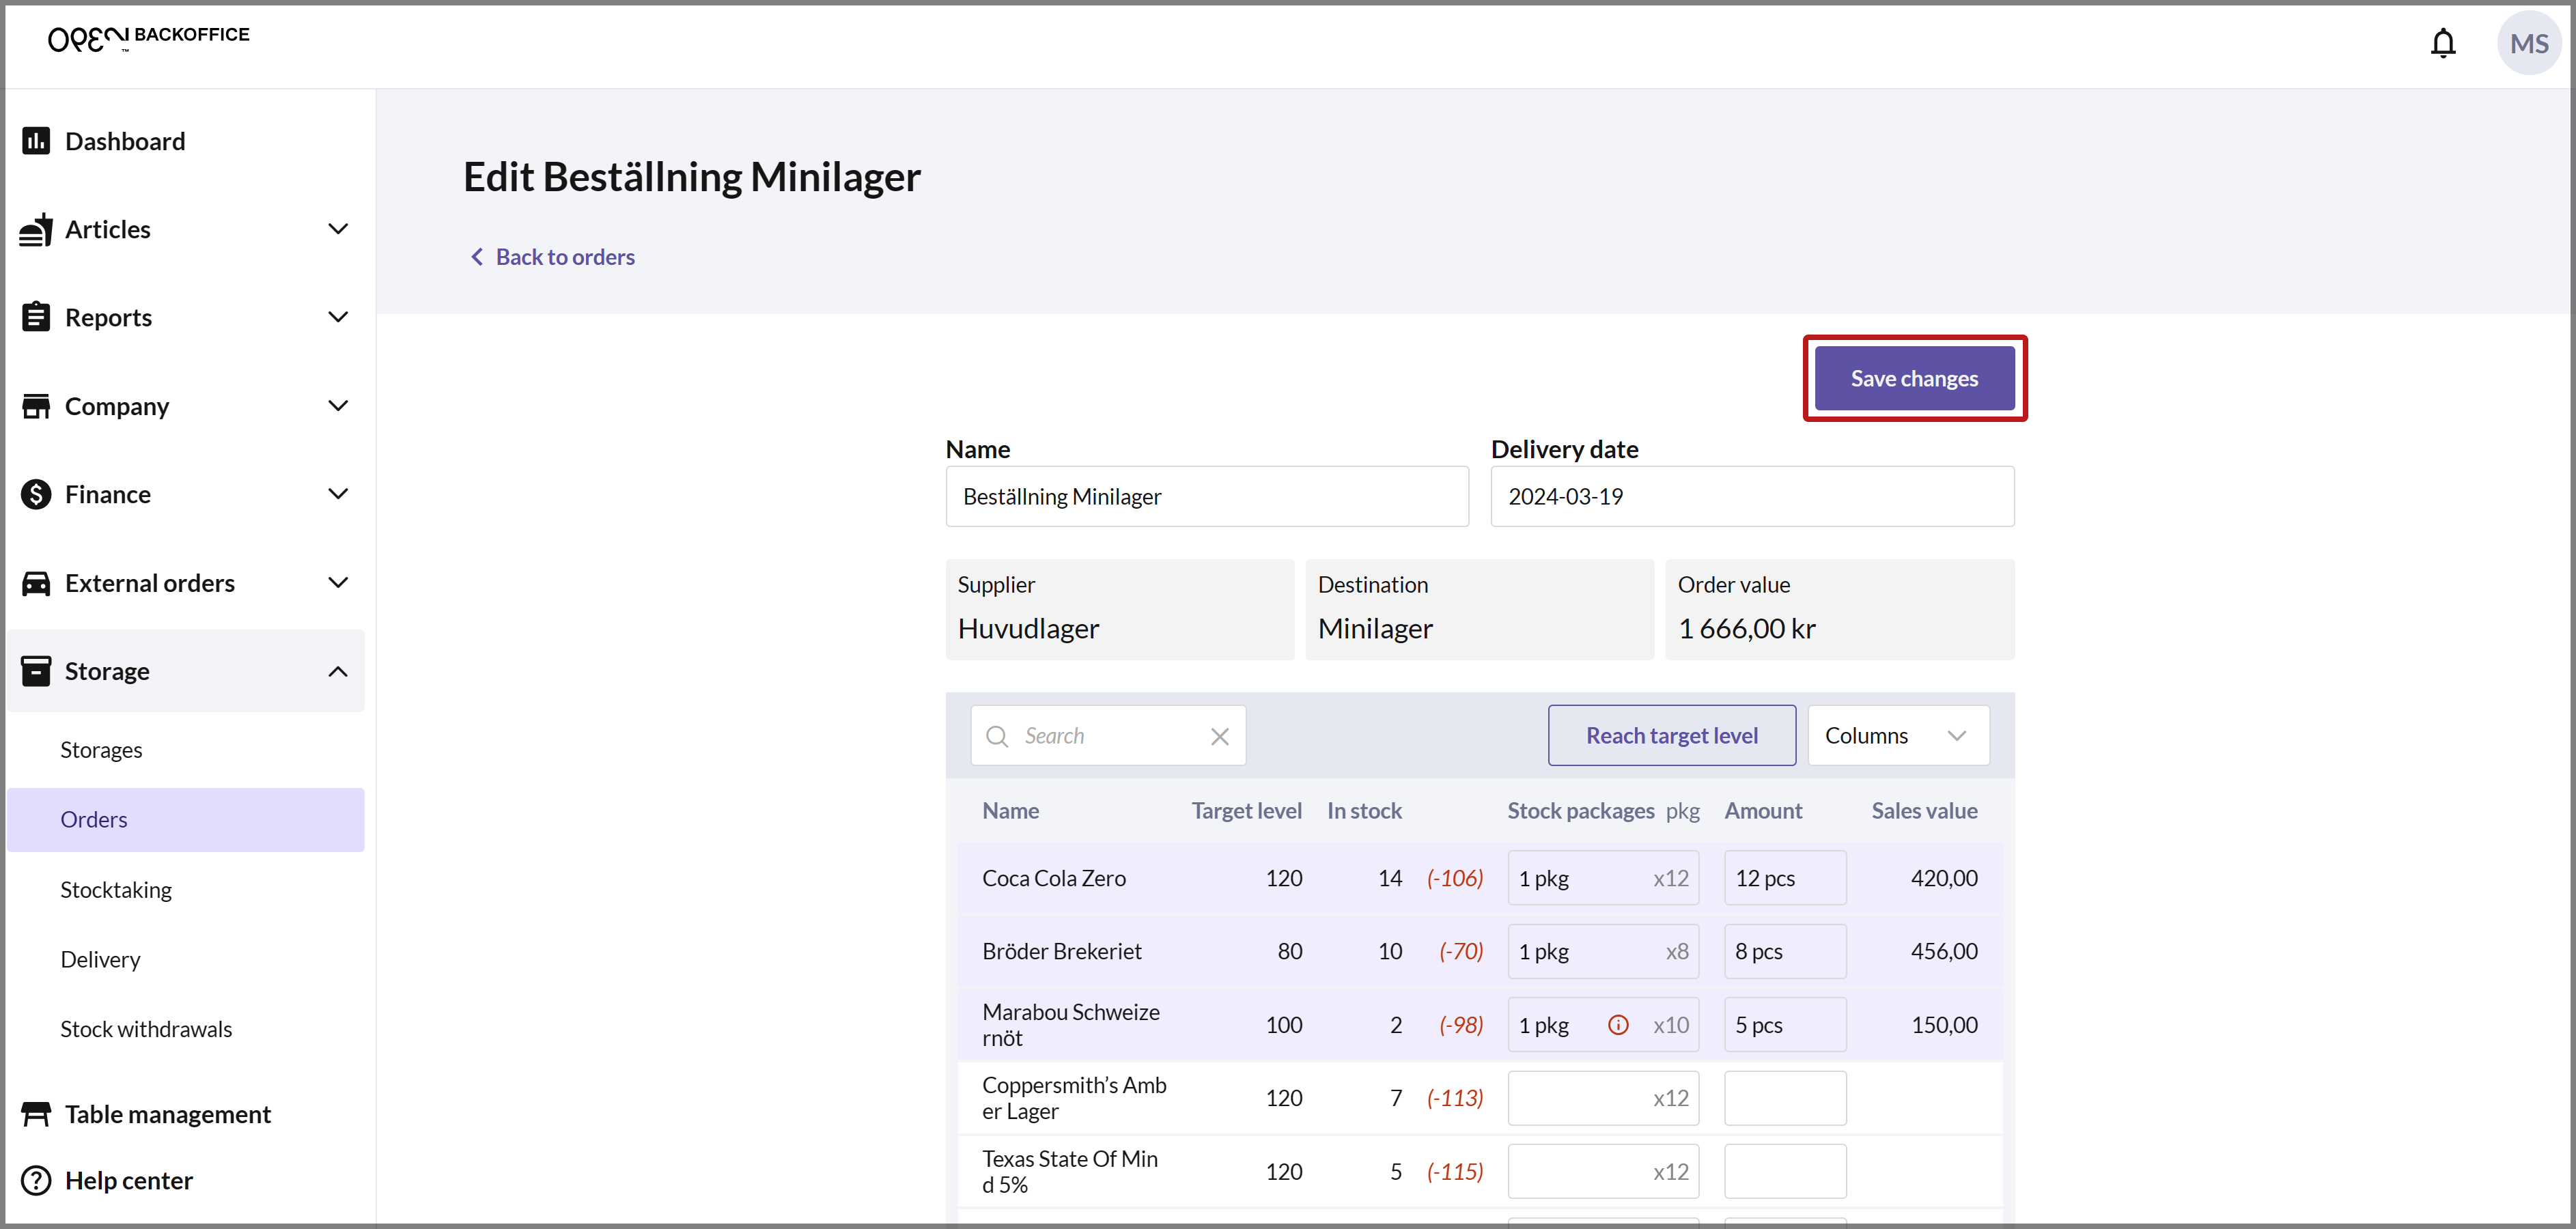
Press the PEN ICON in the upper right corner. This will allow you to edit which items to order and in what quantity.
- Make the changes and then press SAVE CHANGES.
Cancel order
Users with BackOffice permissions have the ability to cancel orders before they are delivered (i.e., orders with status Requested and Processing).
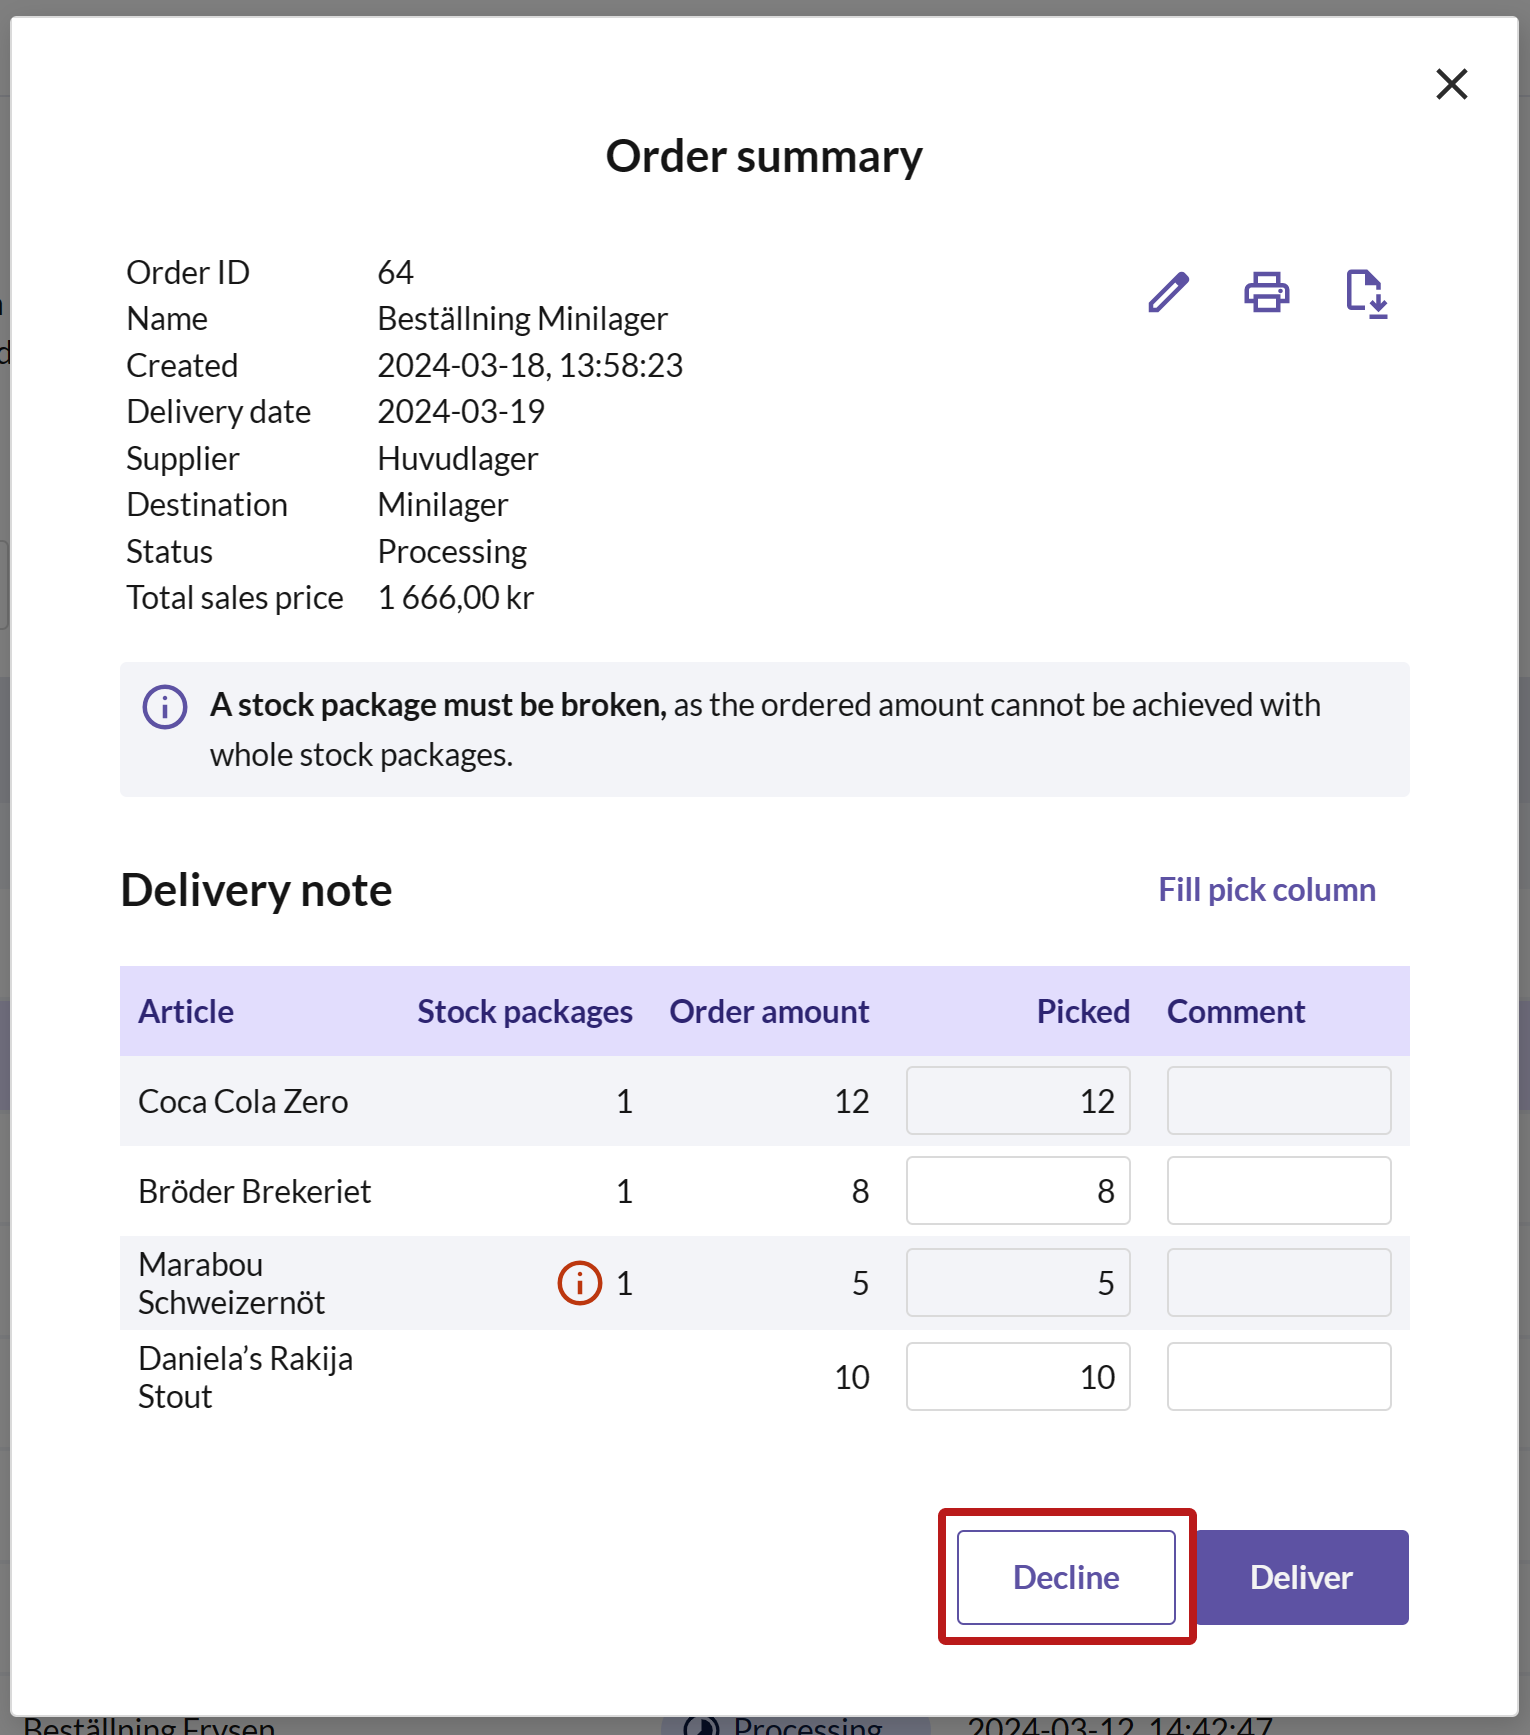
Click on the relevant order in the list to open a dialog with an order summary.
Press DECLINE.
Cash register: sreate orders for own storage
If one of your storages is linked to the same cost center as the cash register, you can create orders directly from the cash register. You can only order articles from another storage to your own storage from the cash register. To do this, there must be a supplier for the cash register's storage, which can be easily managed in BackOffice, under the settings for the cash register's storage.
In summary, to be able to create orders from the cash register, ensure the following requirements are met:
- There is a storage linked to the same cost center as the cash register.
- The current storage has a selected supplier, which means another storage is selected in the "Ordering from" section in the storage settings. Note that you can only have one supplier for a storage linked to a cash register.
Create Order
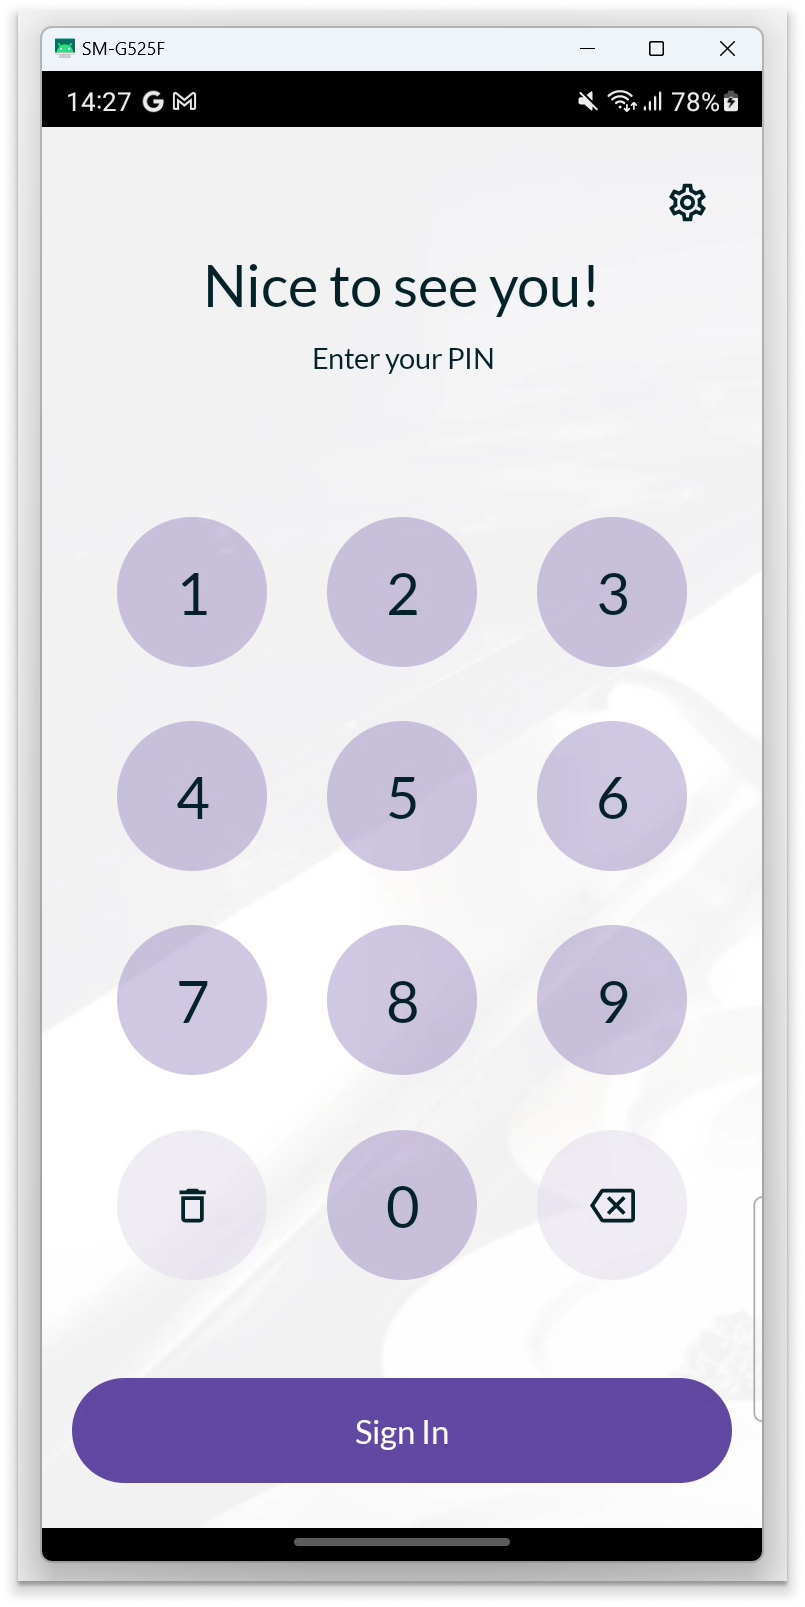
- Enter your PIN to log in to OPEN Two.

- Press the Menu button and navigate to STORAGE. Then open ORDERS.
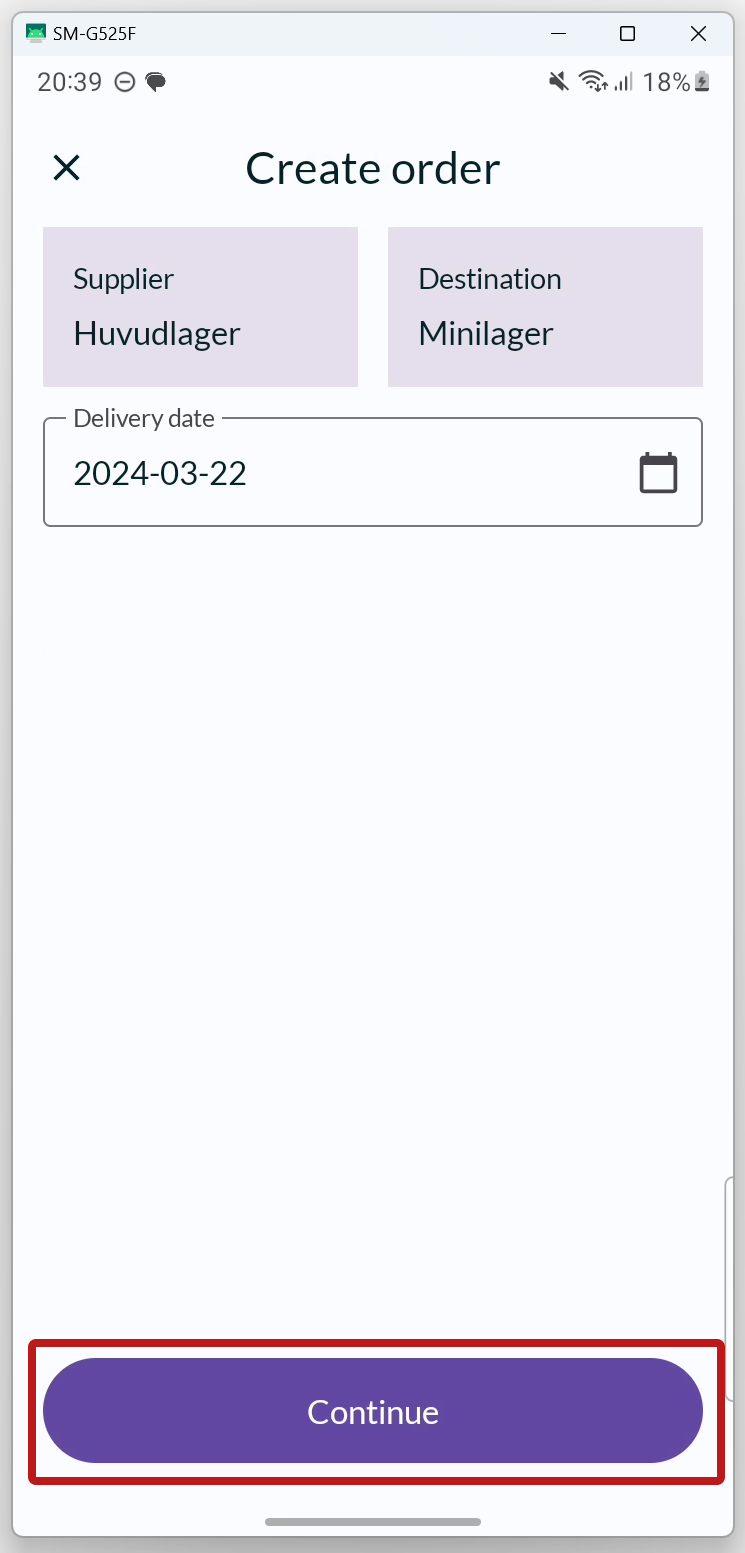

- Press CREATE ORDER. If you want, you can change the delivery date. Press CONTINUE.
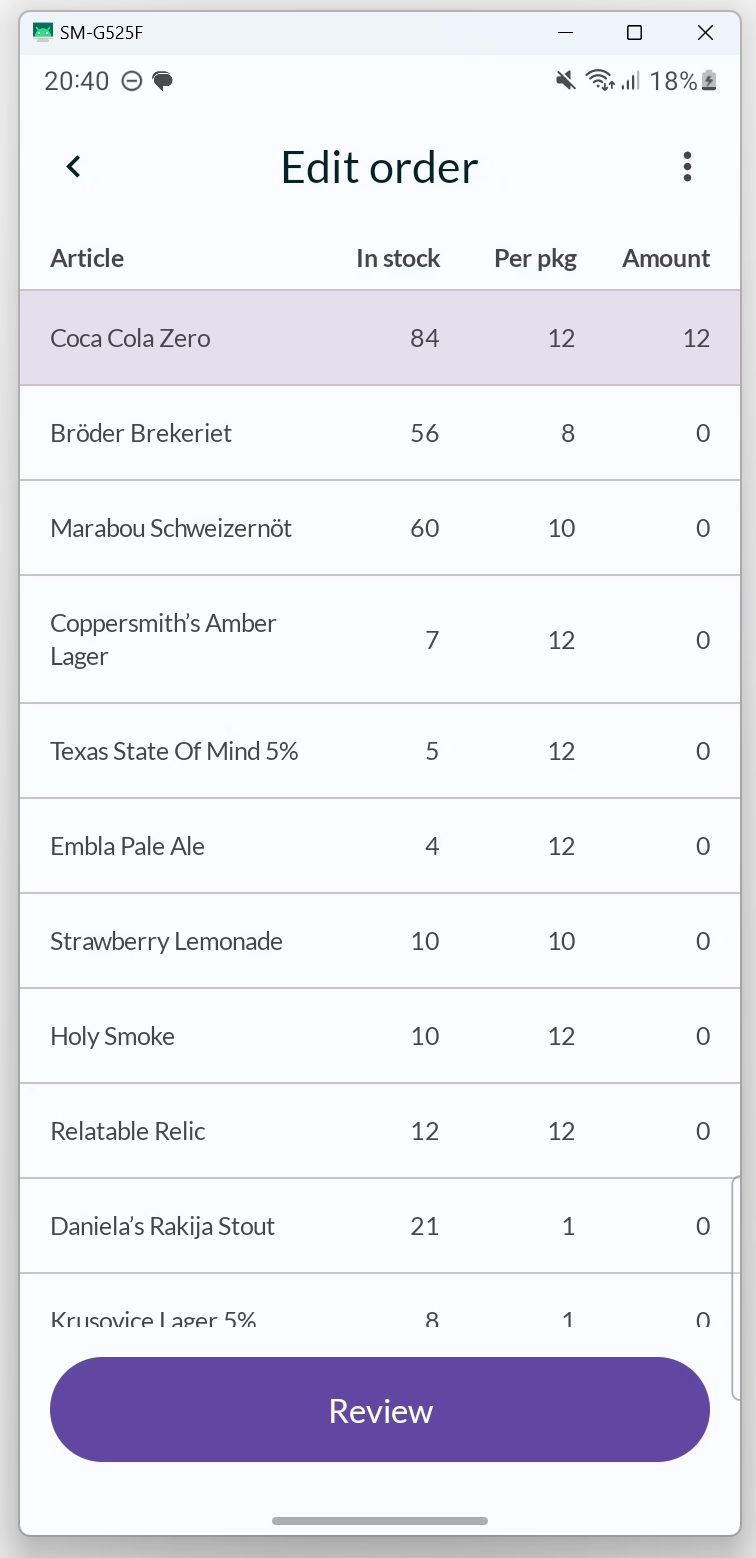
EDIT ORDER
Select articles by entering the quantity you want to order for the respective articles.
Increase/Ddecrease number of stock packages
By pressing on an article, the quantity is increased by 1 stock package, equivalent to the number of articles in a stock package. If it is not specified how many article are included in a stock package, the quantity is increased by 1 customer package (= 1 article).
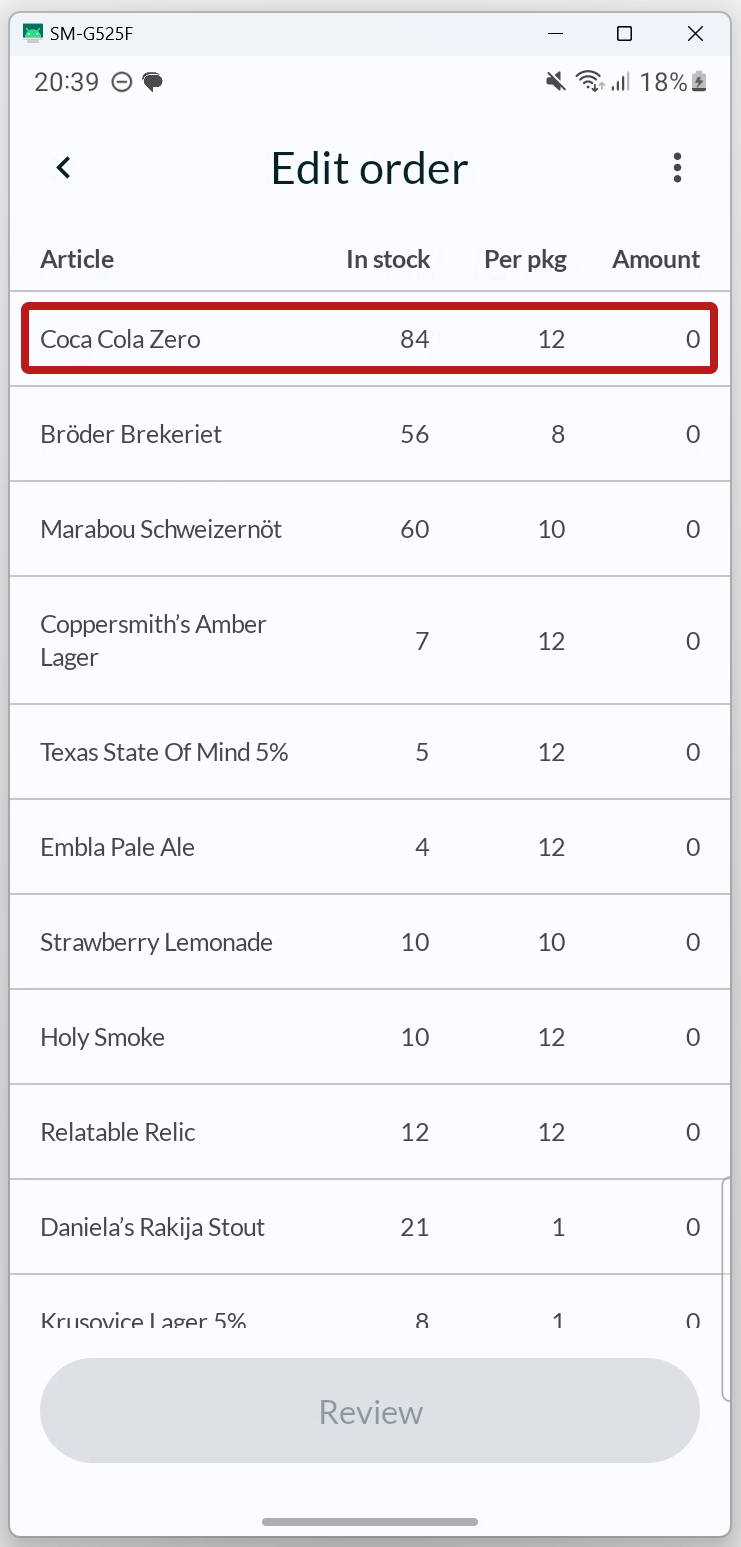
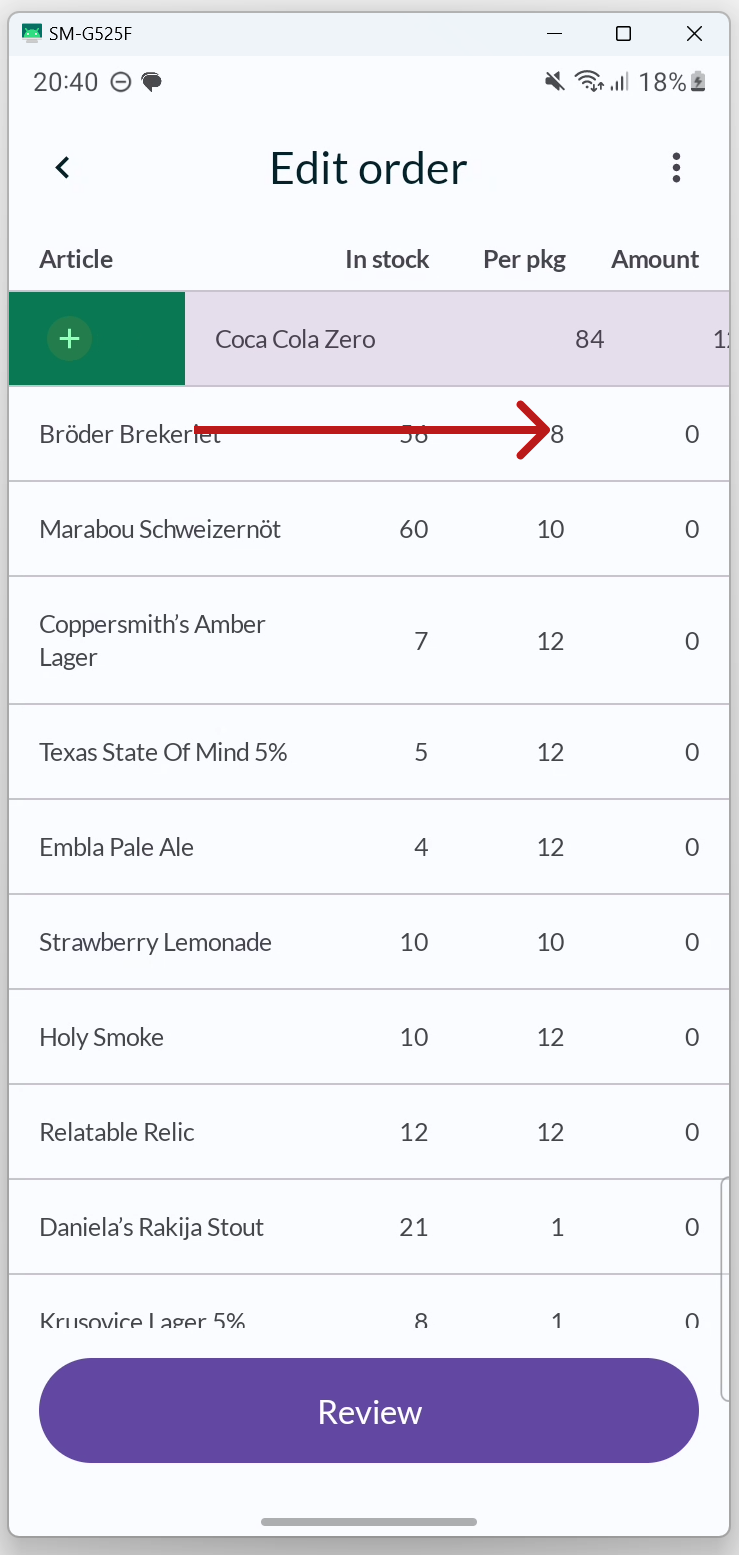
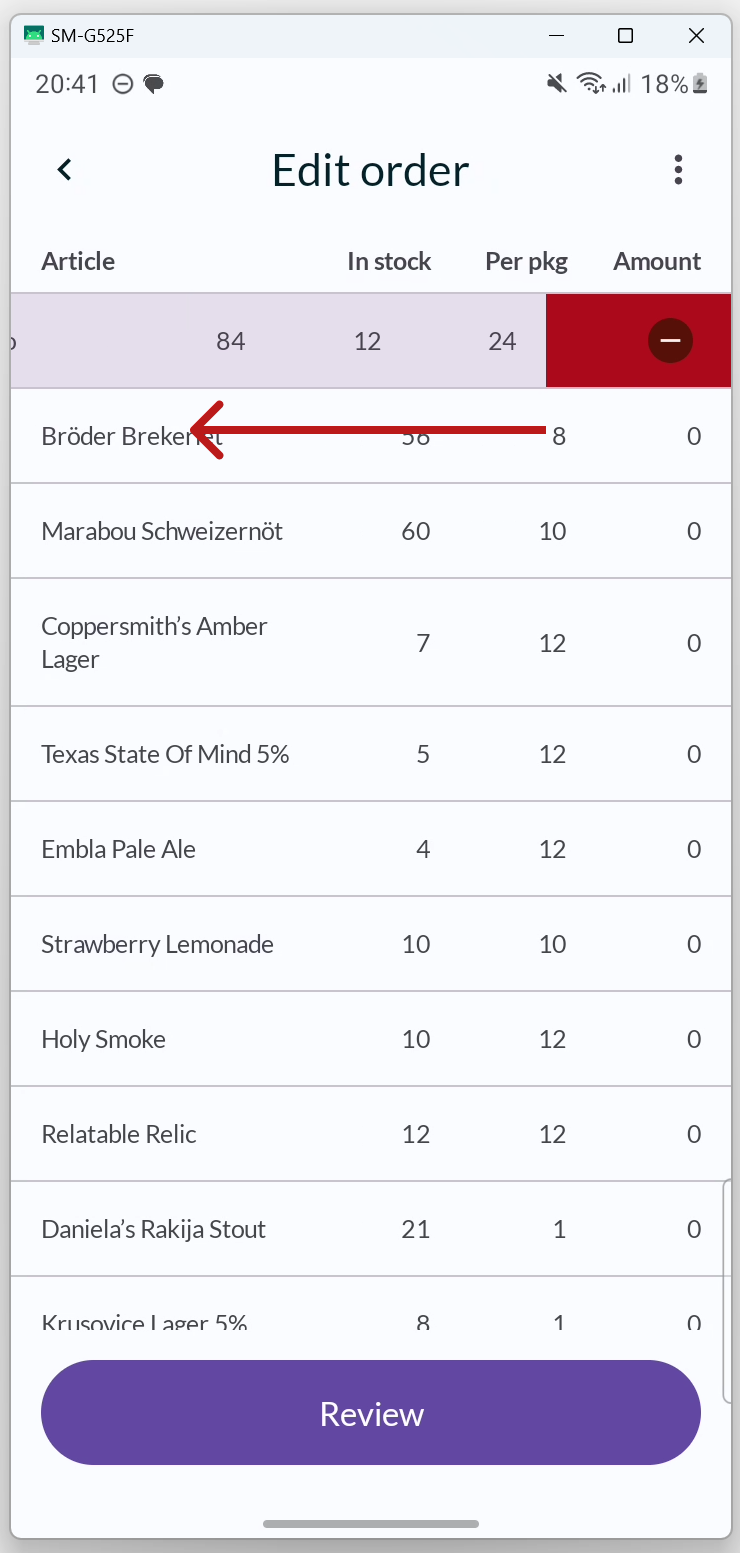
You can swipe right to increase the quantity by 1 stock package, or swipe left to decrease the quantity by 1 stock package.
Increase/decrease number of customer packages
If you prefer to specify the quantity in customer packages instead, press and hold your finger on an article to open a menu. Select CUSTOM.

In the view that opens, you can swipe up and down to increase/decrease the quantity of articles one at a time. Pull down the view to return to all articles.

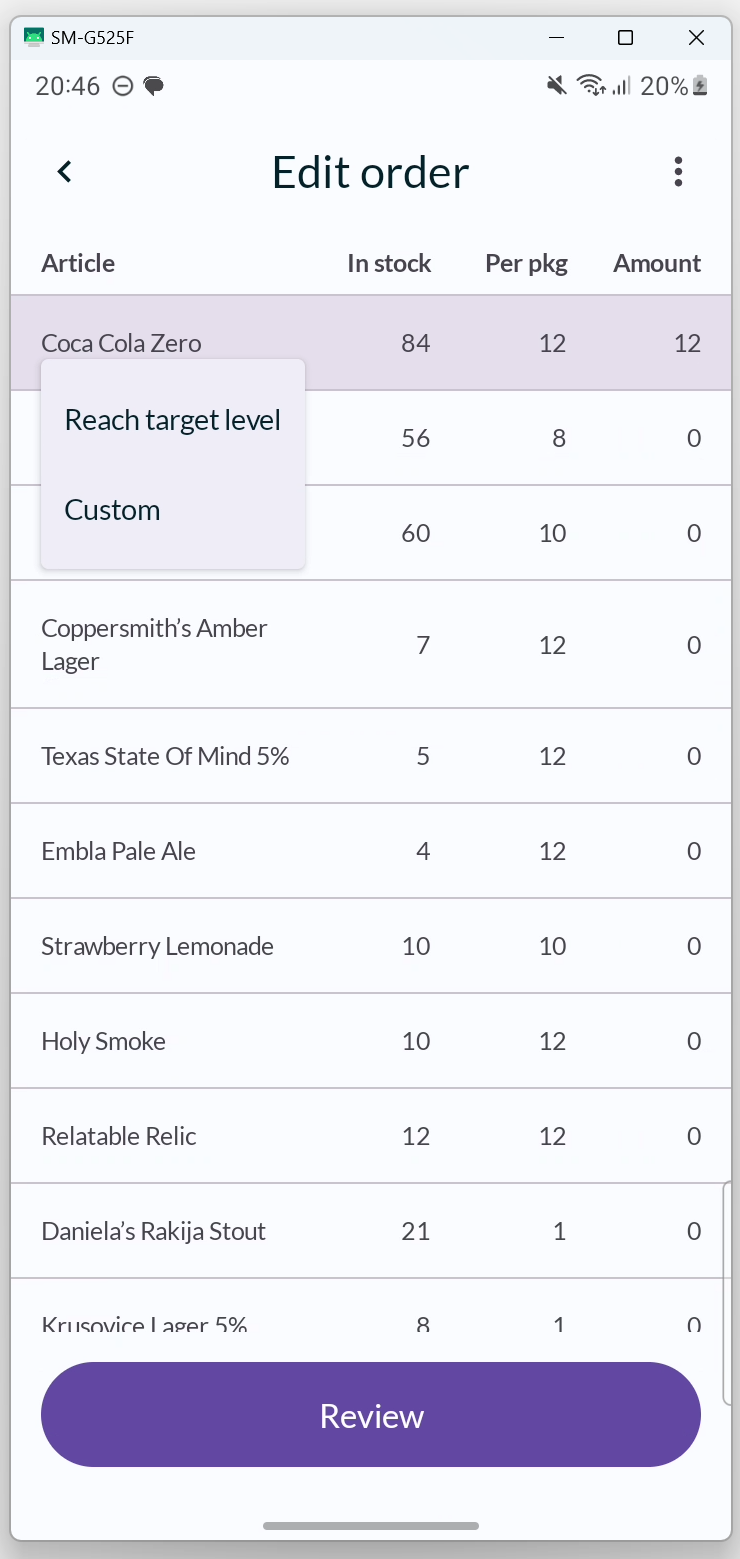
Reach target level
You can easily create an order where the target level is achieved for all articles. Press the 3-DOT MENU in the upper right corner and select REACH TARGET LEVEL.

You will now see a dialog where you can choose whether the target level should be achieved for all articles or only for the articles whose stock level is lower than the ordering point.
If you only want to achieve the target level for a single article, press and hold your finger on the article, then select REACH TARGET LEVEL from the menu that appears.
Clear Inputs
If you want to clear all inputs, i.e., reset the order, press the 3-DOT MENU in the upper right corner and select CLEAR ALL INPUTS.

Once you have added the articles and the quantity you want to order, press REVIEW.

FINALIZE ORDER
When you are satisfied with the order, press PLACE ORDER.

ORDER SUMMARY
You will now see a summary of the order. Press OK to close the dialog.
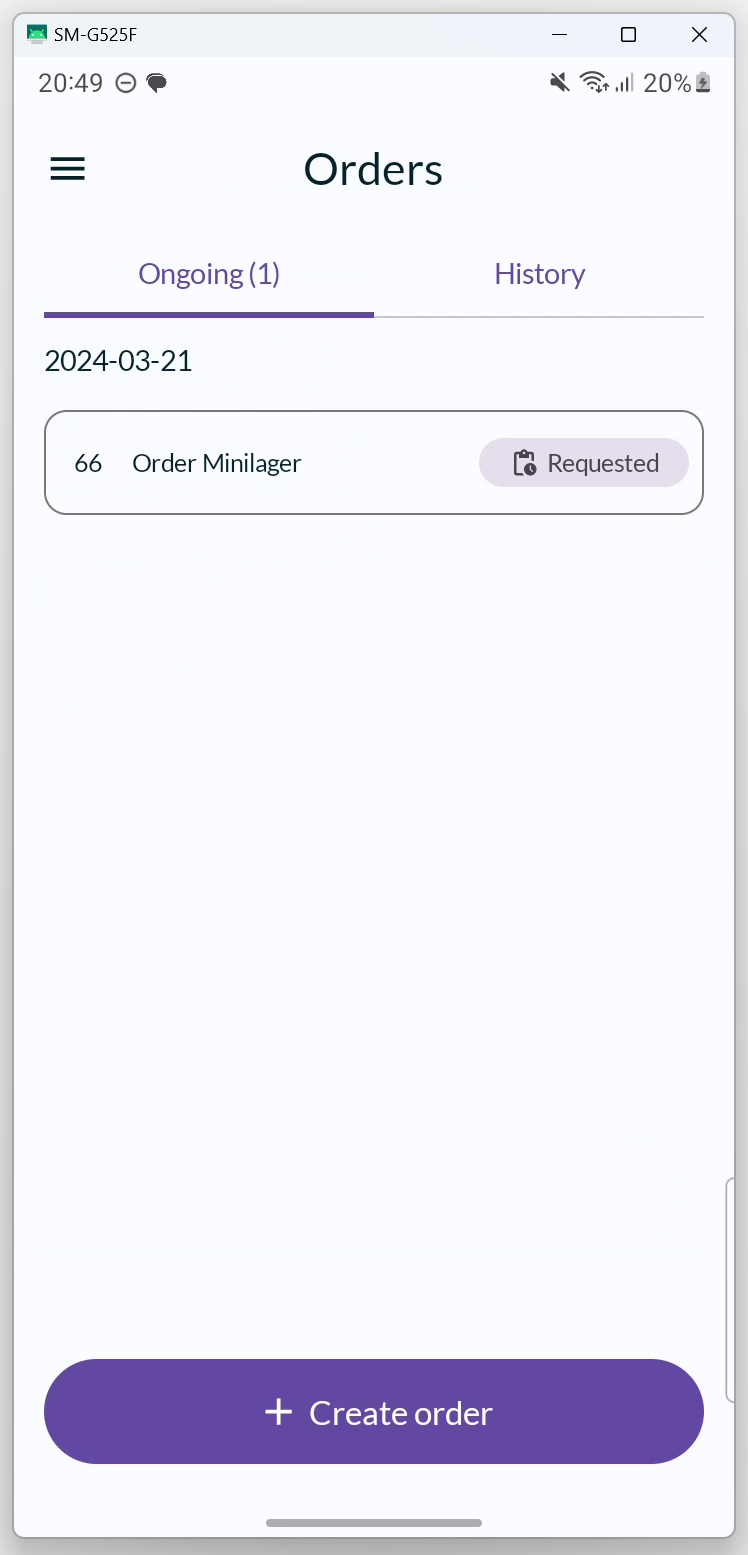
Now you can see the order under the ONGOING tab. It will only move to the HISTORY tab after it has been picked and marked as delivered from BackOffice.
If you press the card for the order, the order summary will open.
Error messages
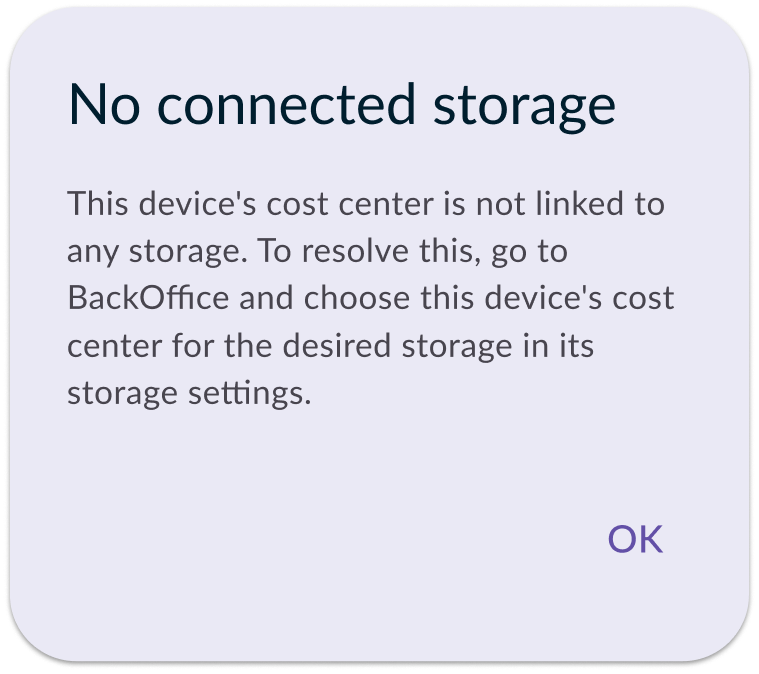
No connected storage
This message appears when there is no storage associated with the same cost center as the cash register. To resolve this, go to the BackOffice and select the cash register's cost center for the desired storage in the storage settings.
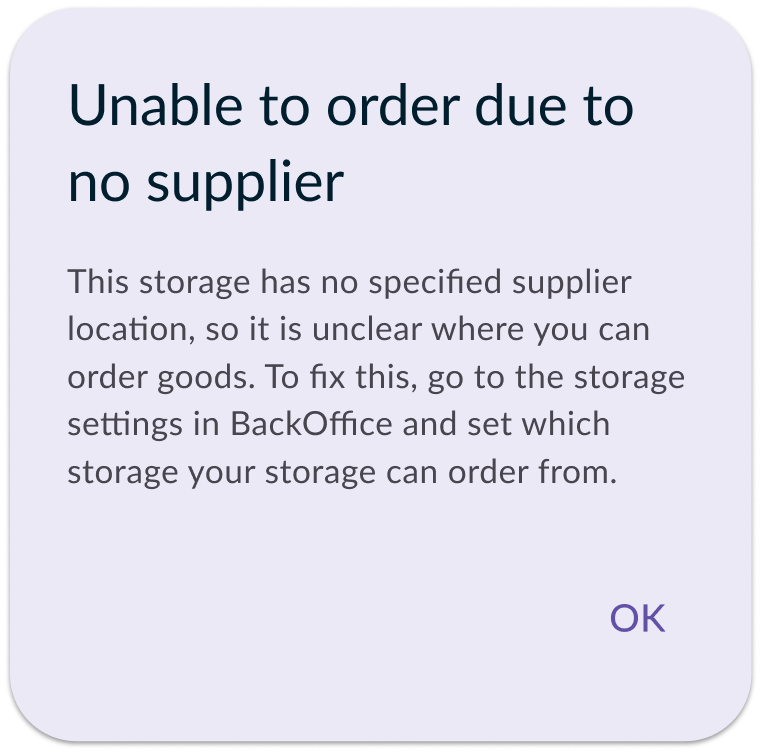
Unable to order due to no supplier
This error message appears when attempting to create an order without a supplier's storage linked to the storage associated with the cash register. To resolve this, navigate to the storage settings for the cash register in the BackOffice and select a supplier's storage in the "Ordering from" section.