Kitchen tickets
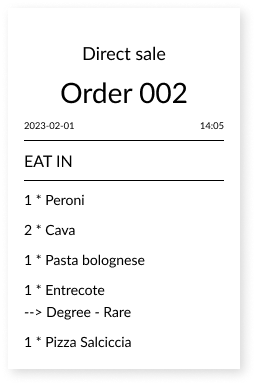
In this guide, we will go through how you can customize kitchen tickets to suit your needs, both for direct sales and table orders.
Table of contents
If you're looking for guides on how to install a kitchen printer, see the guides Standalone kitchen printer and Combined kitchen & receipt printer.
General kitchen ticket settings
Here you will learn how to customize the layout and manage settings for your kitchen tickets.
Customize the layout of the kitchen tickets
To adjust the layout of your kitchen tickets, follow these steps:
In BackOffice, select COMPANY from the menu and navigate to the SETTINGS page.
Choose the KITCHEN TICKET tab.
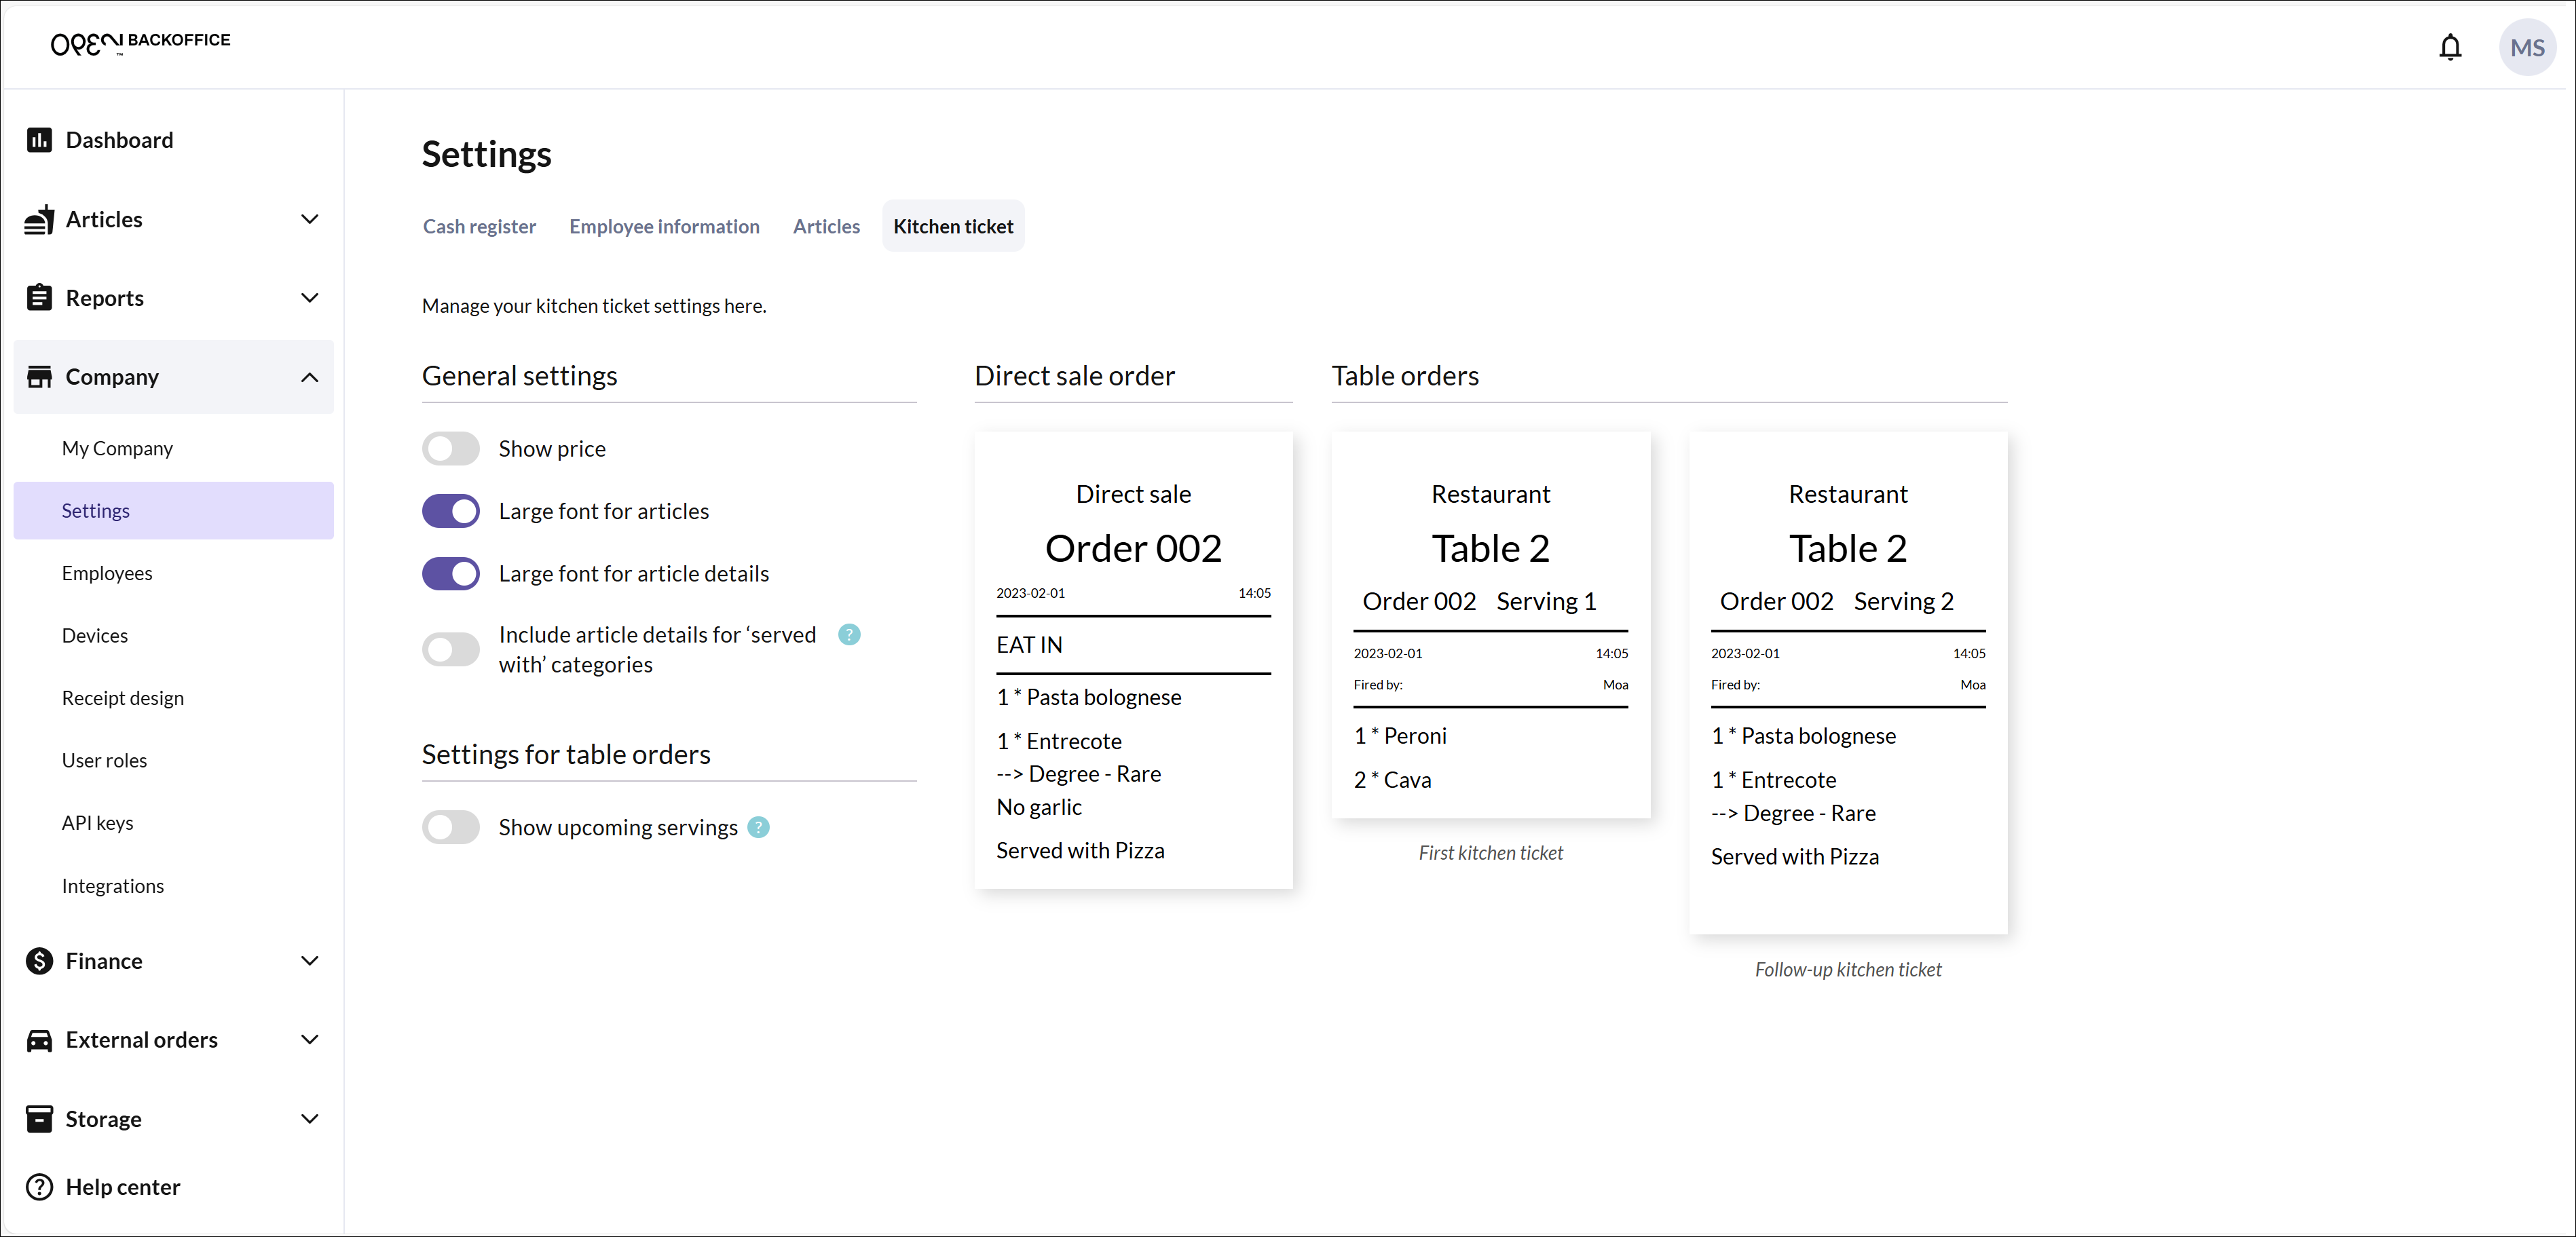
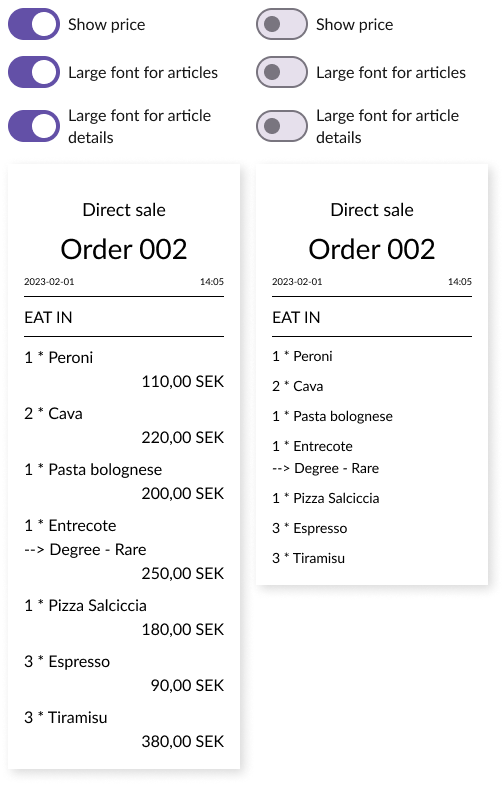
- Here, you can customize the layout by choosing to display prices for each article, adjusting the font size for articles and article details, and other settings that suit your needs.
Multiple kitchen areas - firing different articles to different locations
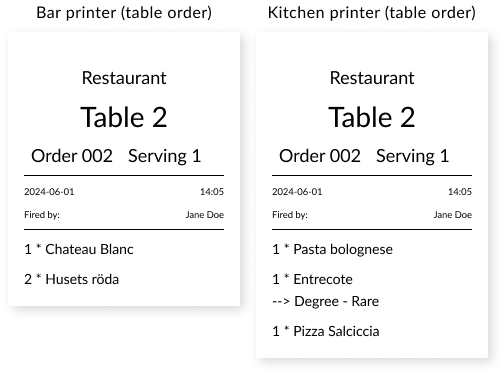
Use printer categories to send the right articles to the correct kitchen stations. For example, you can have separate tickets for the hot kitchen and cold kitchen with relevant orders. This applies whether you have multiple kitchen printers or a shared kitchen printer for multiple stations.
Go to COMPANY > DEVICES > KITCHEN PRINTERS to configure your printer categories and printers.
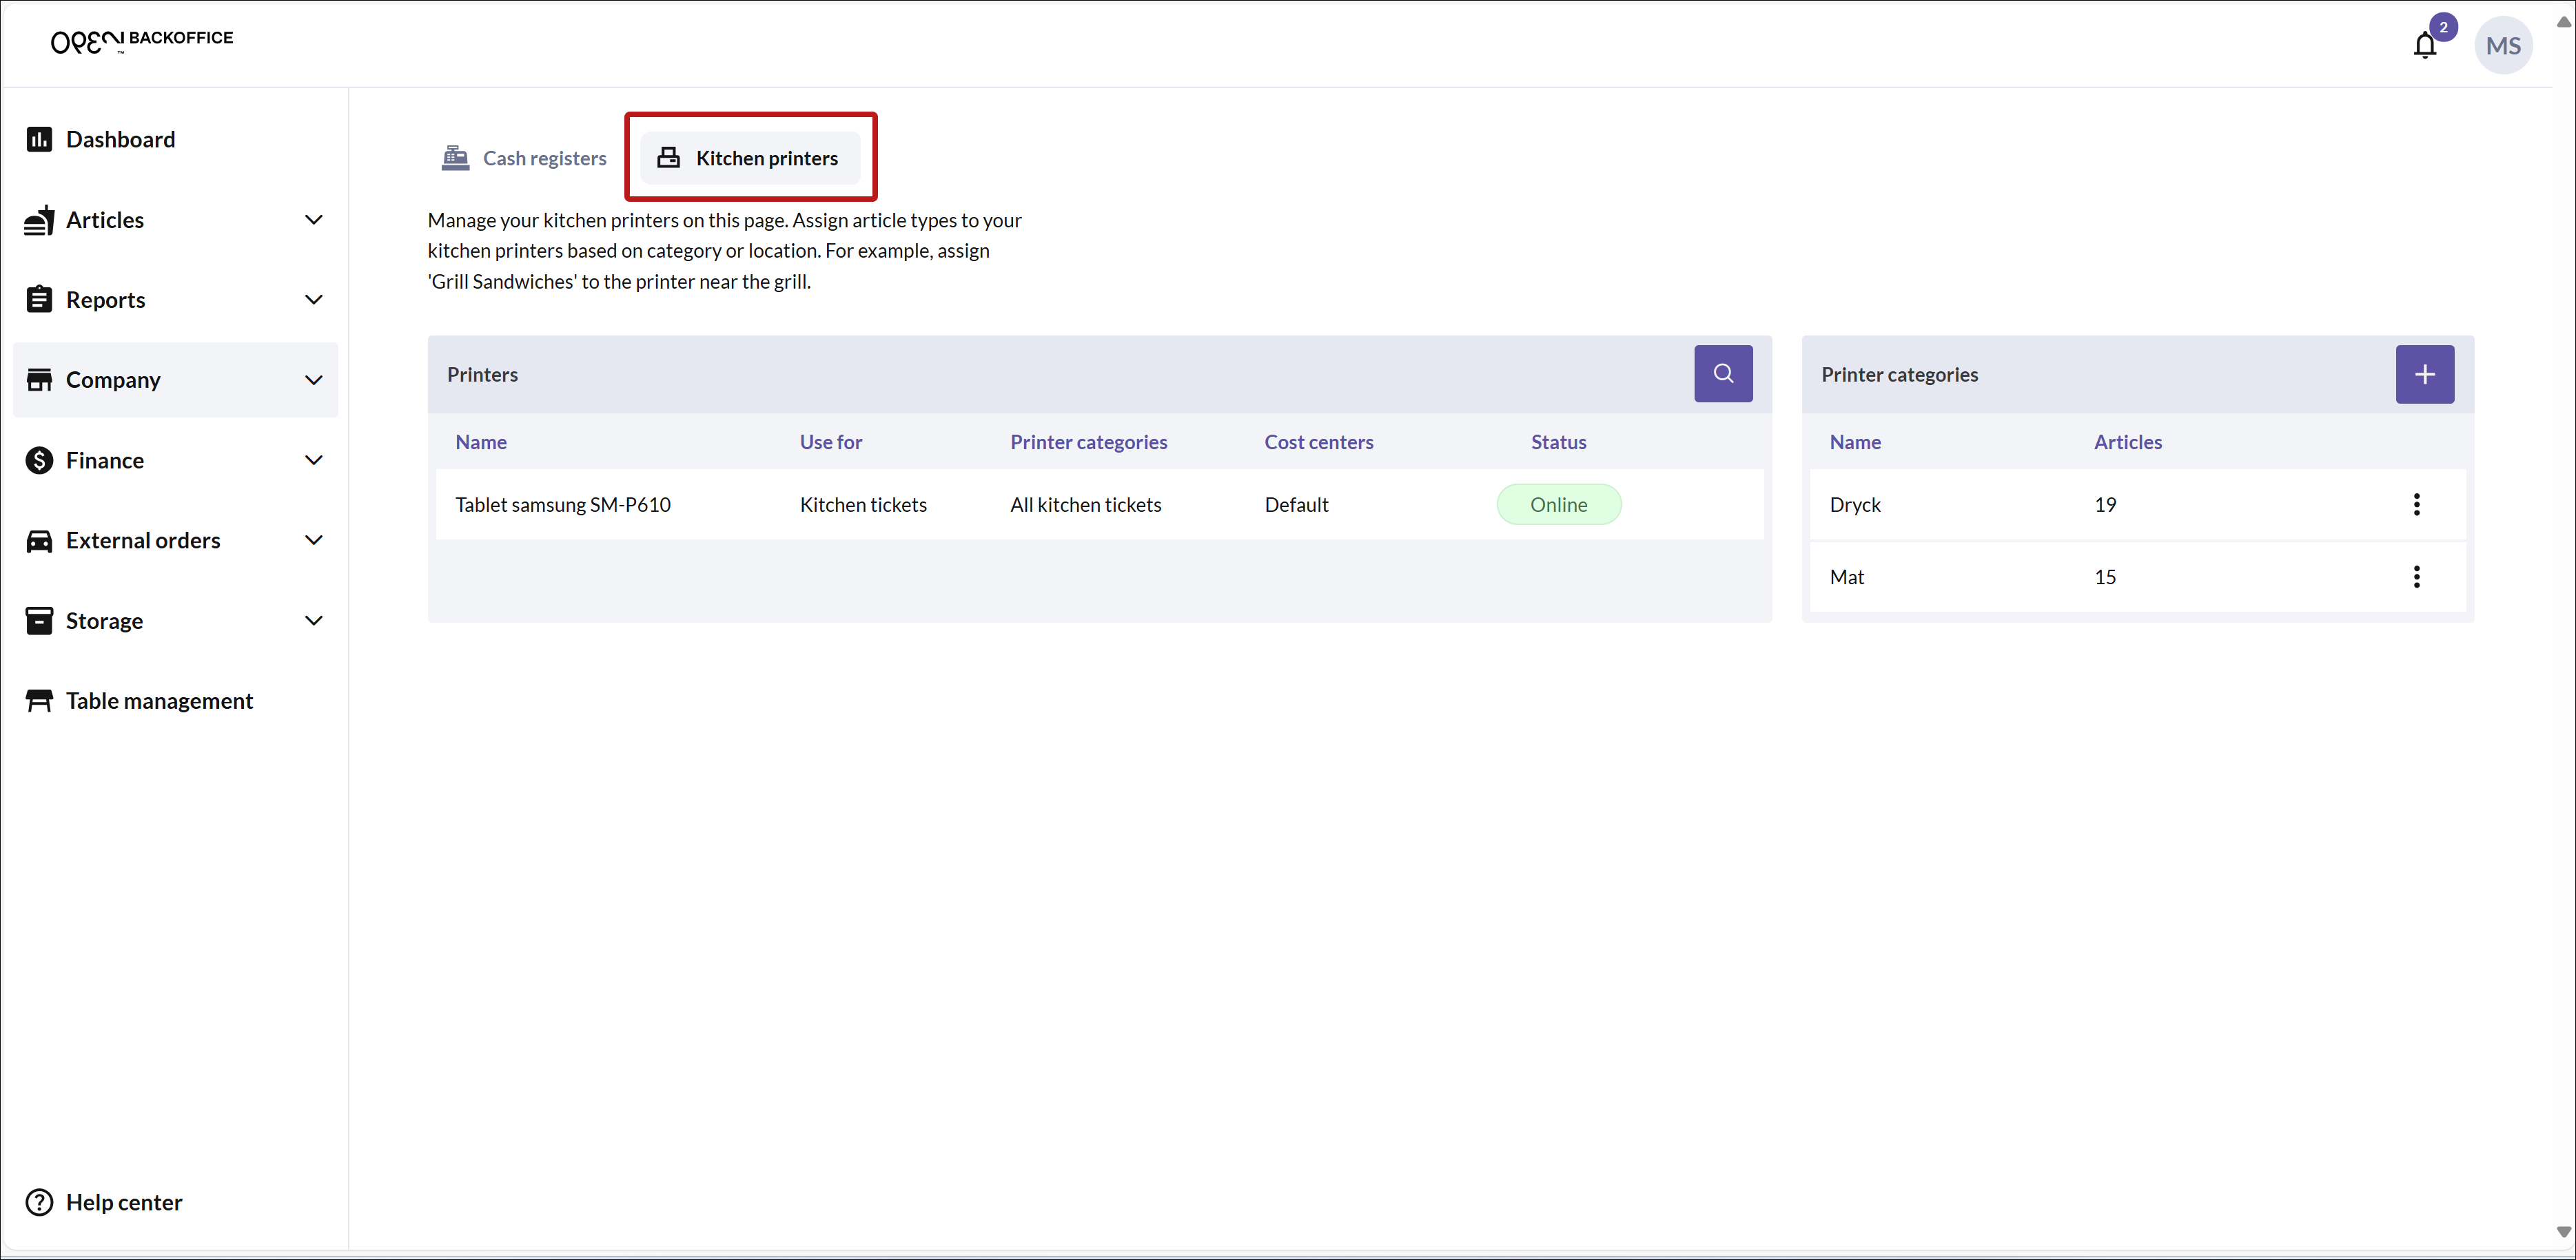
For more information on how to create printer categories, see the section Method 1: Assign articles to printer categories from the Devices page below. If you need help configuring your kitchen printer, see the guides Install Star TCP143IV printer (via Cloud) and Install Star mC-Print3 printer (via Cloud).
Manage dishes with different cooking times ("criss-cross tickets)
If an order includes dishes that require different cooking times and are prepared at different kitchen stations, you can adjust the kitchen tickets so that all stations are informed accordingly. For example, the pasta station needs to know that pasta should be ready at the same time as a pizza. To achieve this, you must set up printer categories for your kitchen printers. You can also choose how detailed the information on the kitchen tickets should be.
Set up printer categories for your kitchen printers
In BackOffice, select Company from the menu and navigate to the Devices page.
Choose the Kitchen printers tab.

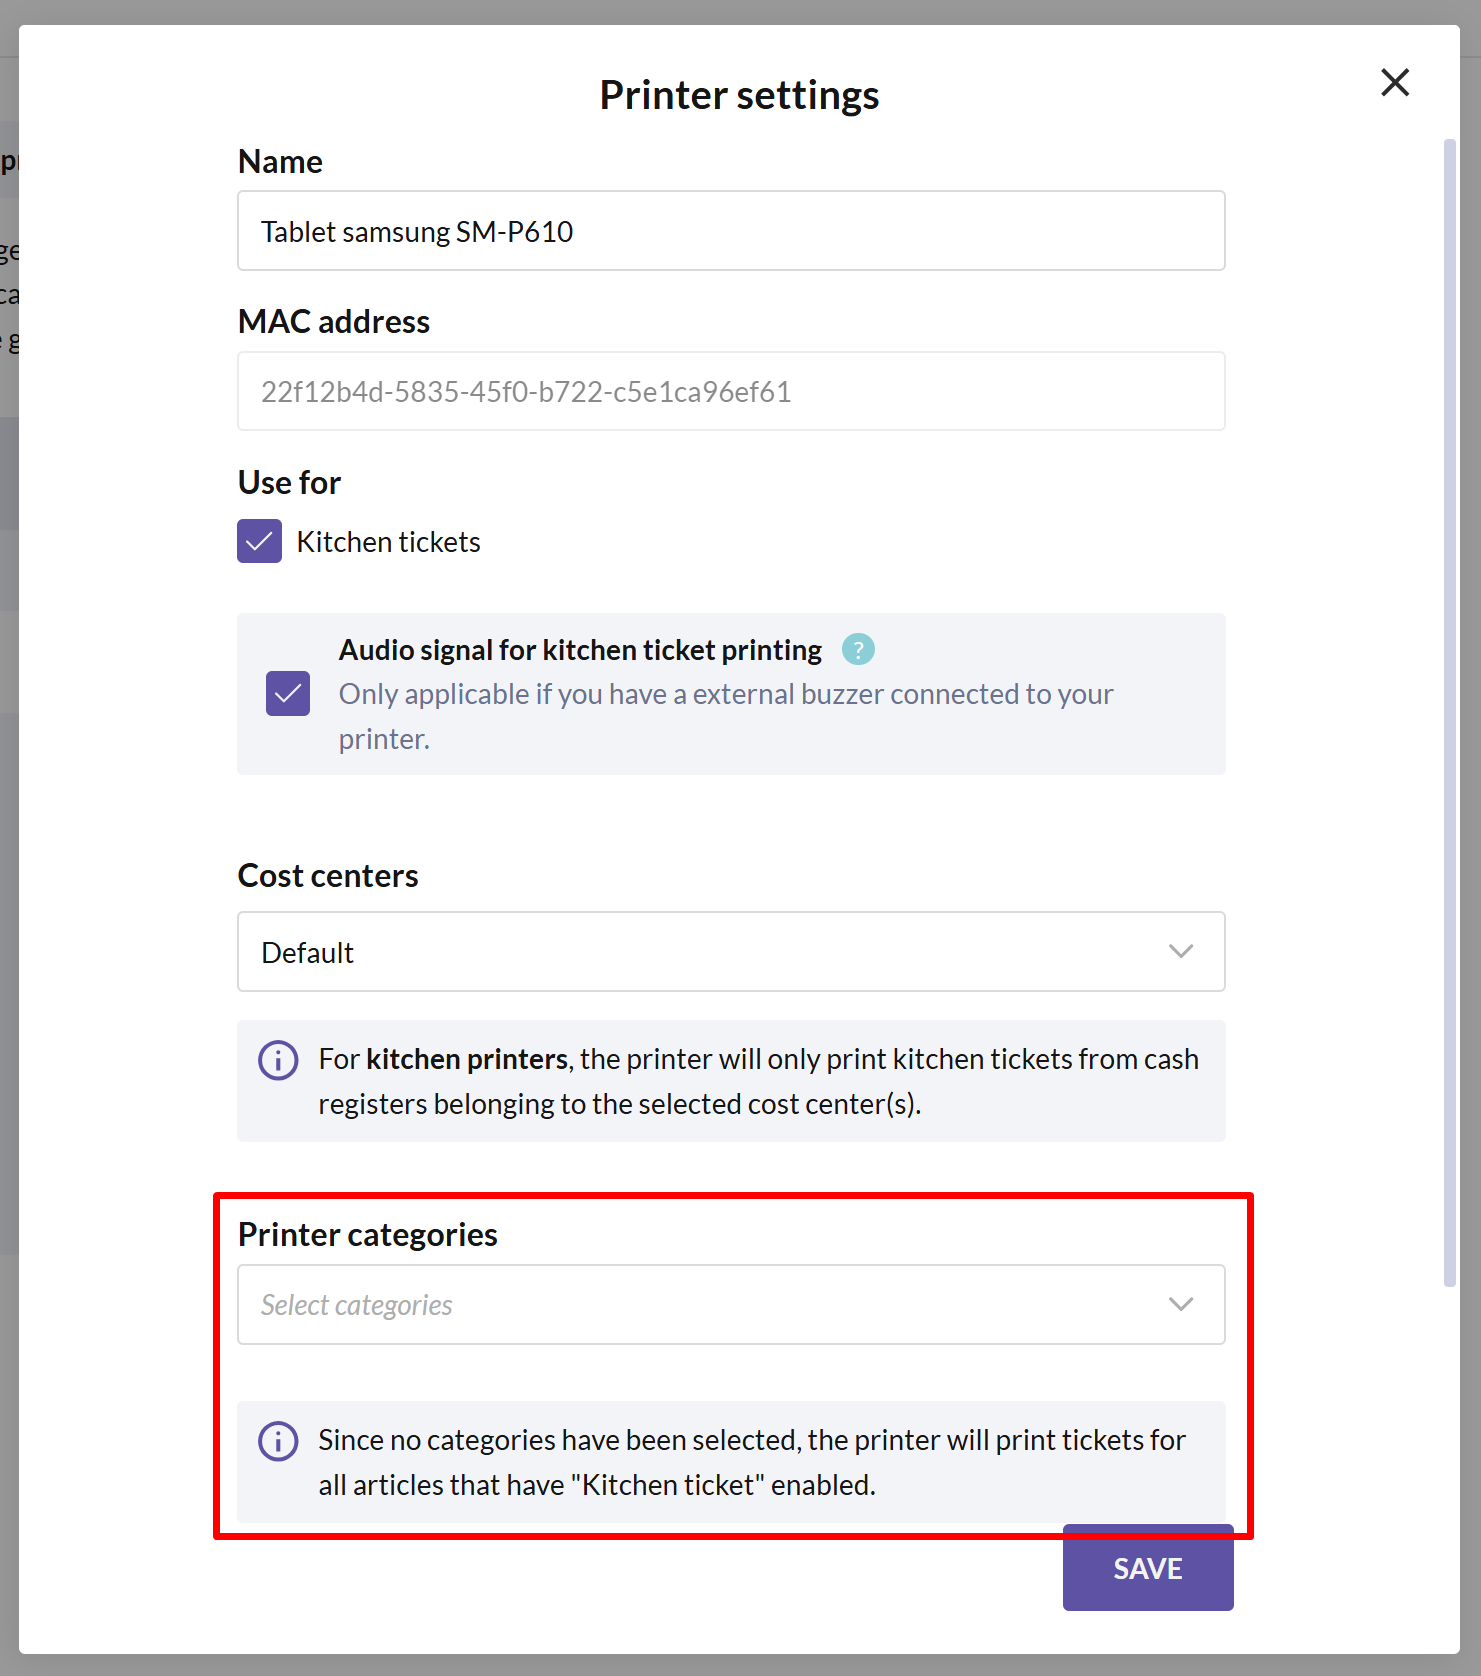
Configure which printer categories (types of dishes/drinks) each kitchen printer should print.
If you need further assistance with creating printer categories, see the section Method 1: Assign articles to printer categories from the Devices page below.
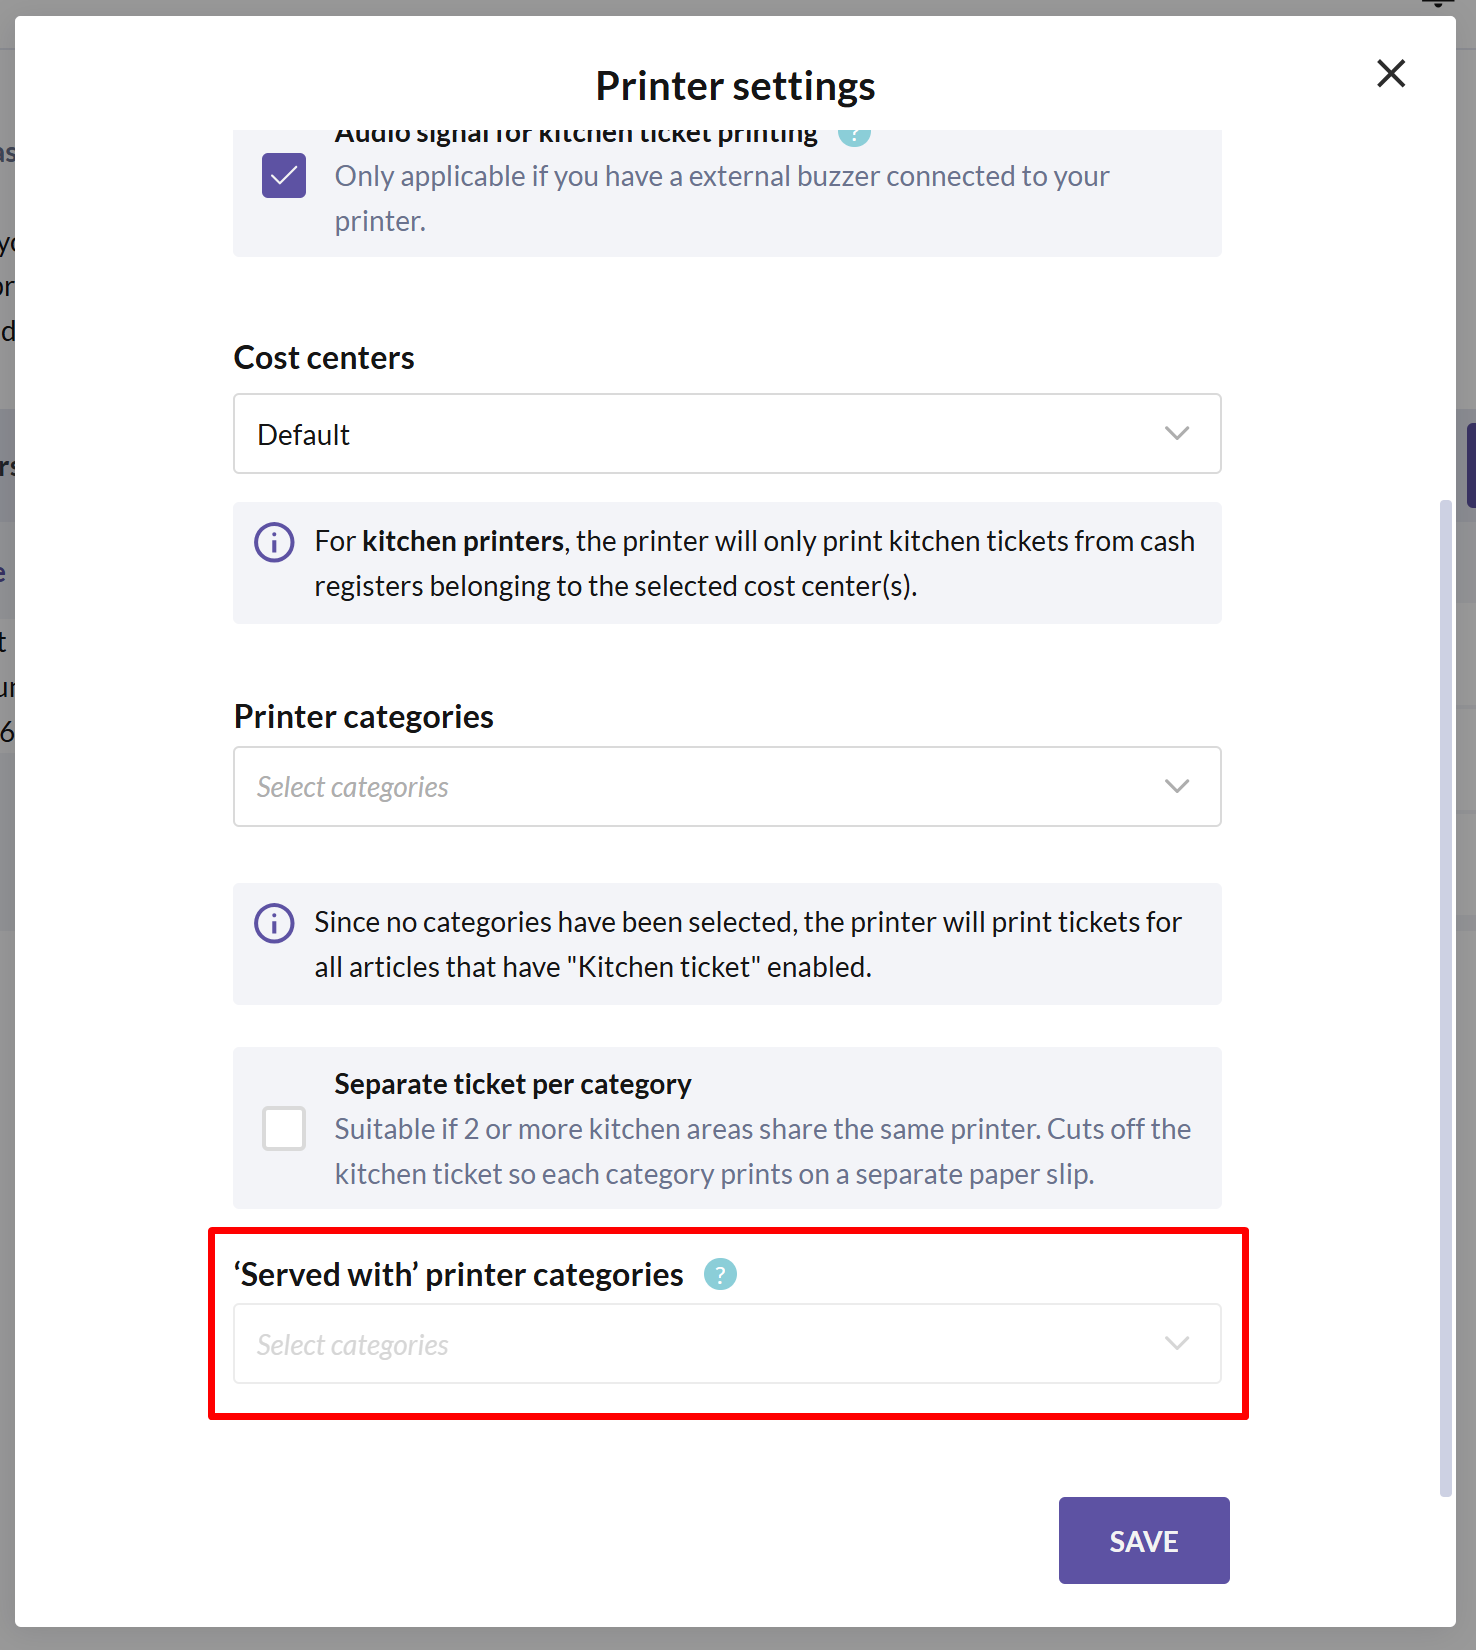
- Choose which additional printer categories each printer should note (known as 'Served with' printer categories).
For more information on configuring your kitchen printer, see the guides Install Star TCP143IV printer (via Cloud) and Install Star mC-Print3 printer (via Cloud).
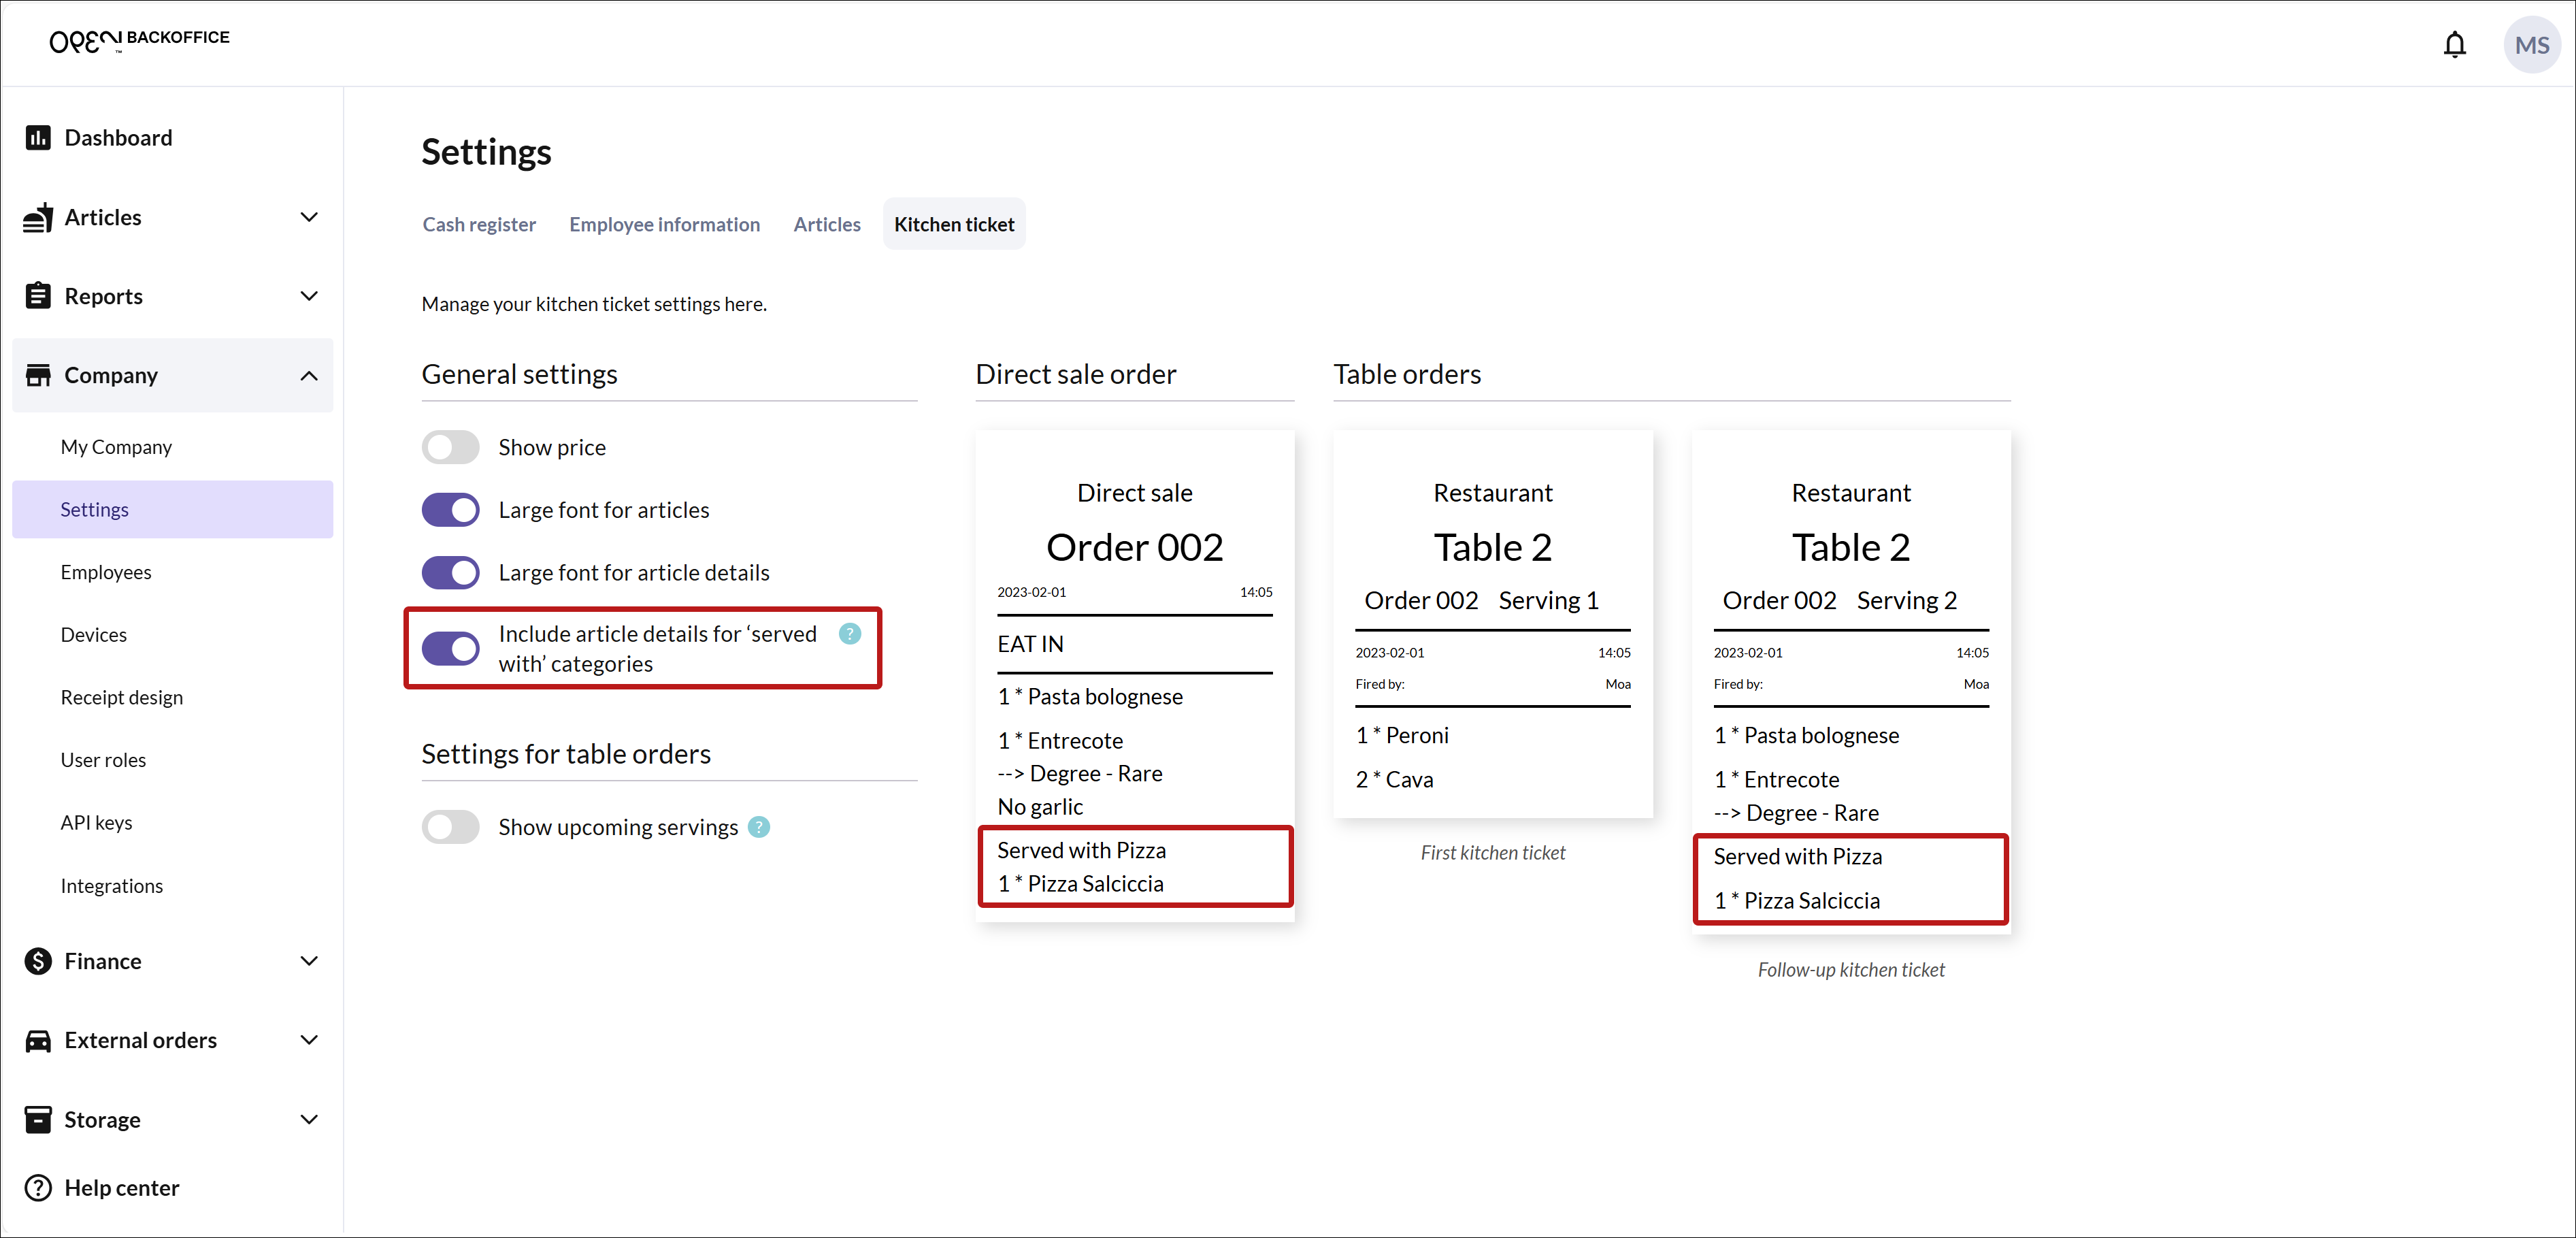
Show or hide article details for 'Served with' printer categories
- In BackOffice, select Company from the menu and navigate to the Settings page.
- Choose the Kitchen tickets tab.
- Select whether the kitchen ticket should display article details for 'Served with' categories or only the category name (e.g., "Served with Pizza").
Customize kitchen tickets for direct sales

Customize kitchen tickets to efficiently manage direct sales, such as in cafes or fast-food restaurants.
A kitchen ticket is printed when an order is paid for or parked, streamlining kitchen workflow.
You can control which articles are included on the kitchen ticket yourself. See the guide Ensuring that articles are included on the kitchen ticket below to learn more about how to manage this.
Add a custome order name from the cash register
This setting allows you to specify a custom name for the order from the cash register (in addition to the order number), which appears on the kitchen ticket. This can be useful in various scenarios, such as:
- When customers receive a flag or token with a table number that they place on their table. The cashier can then enter the table number on the order, making it easy for the waiter to locate the correct table when the order number is included on the kitchen ticket.
- If you have many regular customers and want to label the order with the customer's name, so that the serving staff can easily locate the one who placed the order.
To activate this setting, follow these steps:
- In BackOffice, select COMPANY from the menu and navigate to the SETTINGS page.
- Choose the CASH REGISTER tab.
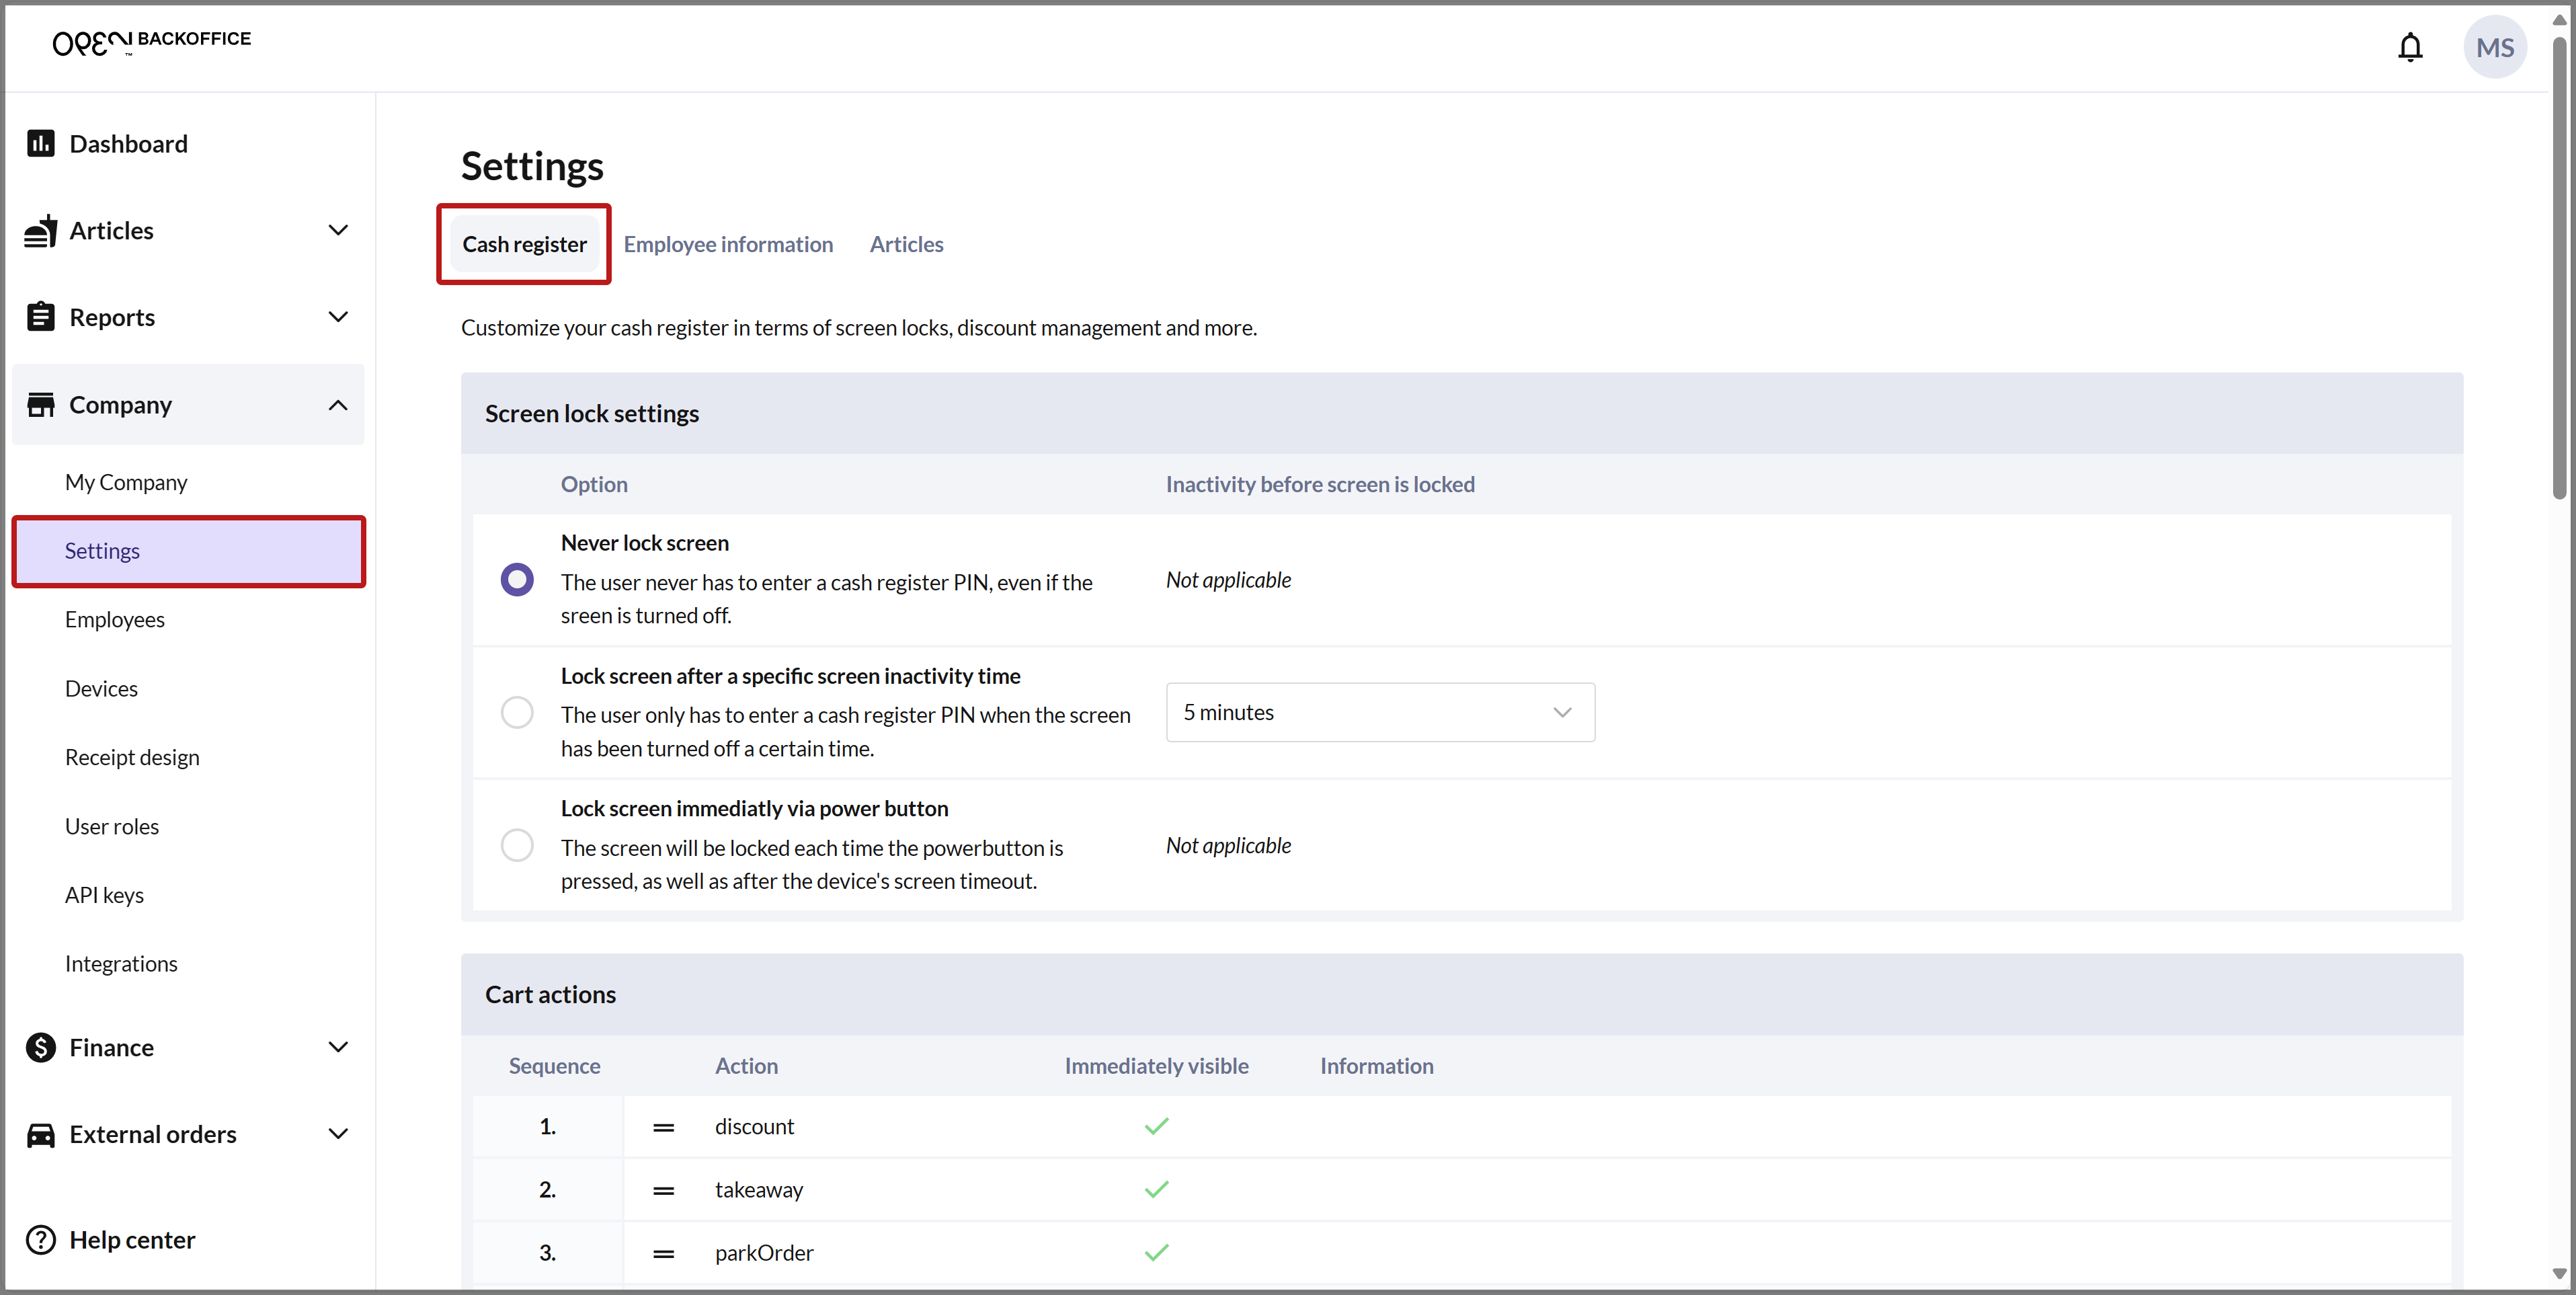
- Scroll down to KITCHEN TICKETS FOR DIRECT SALES.
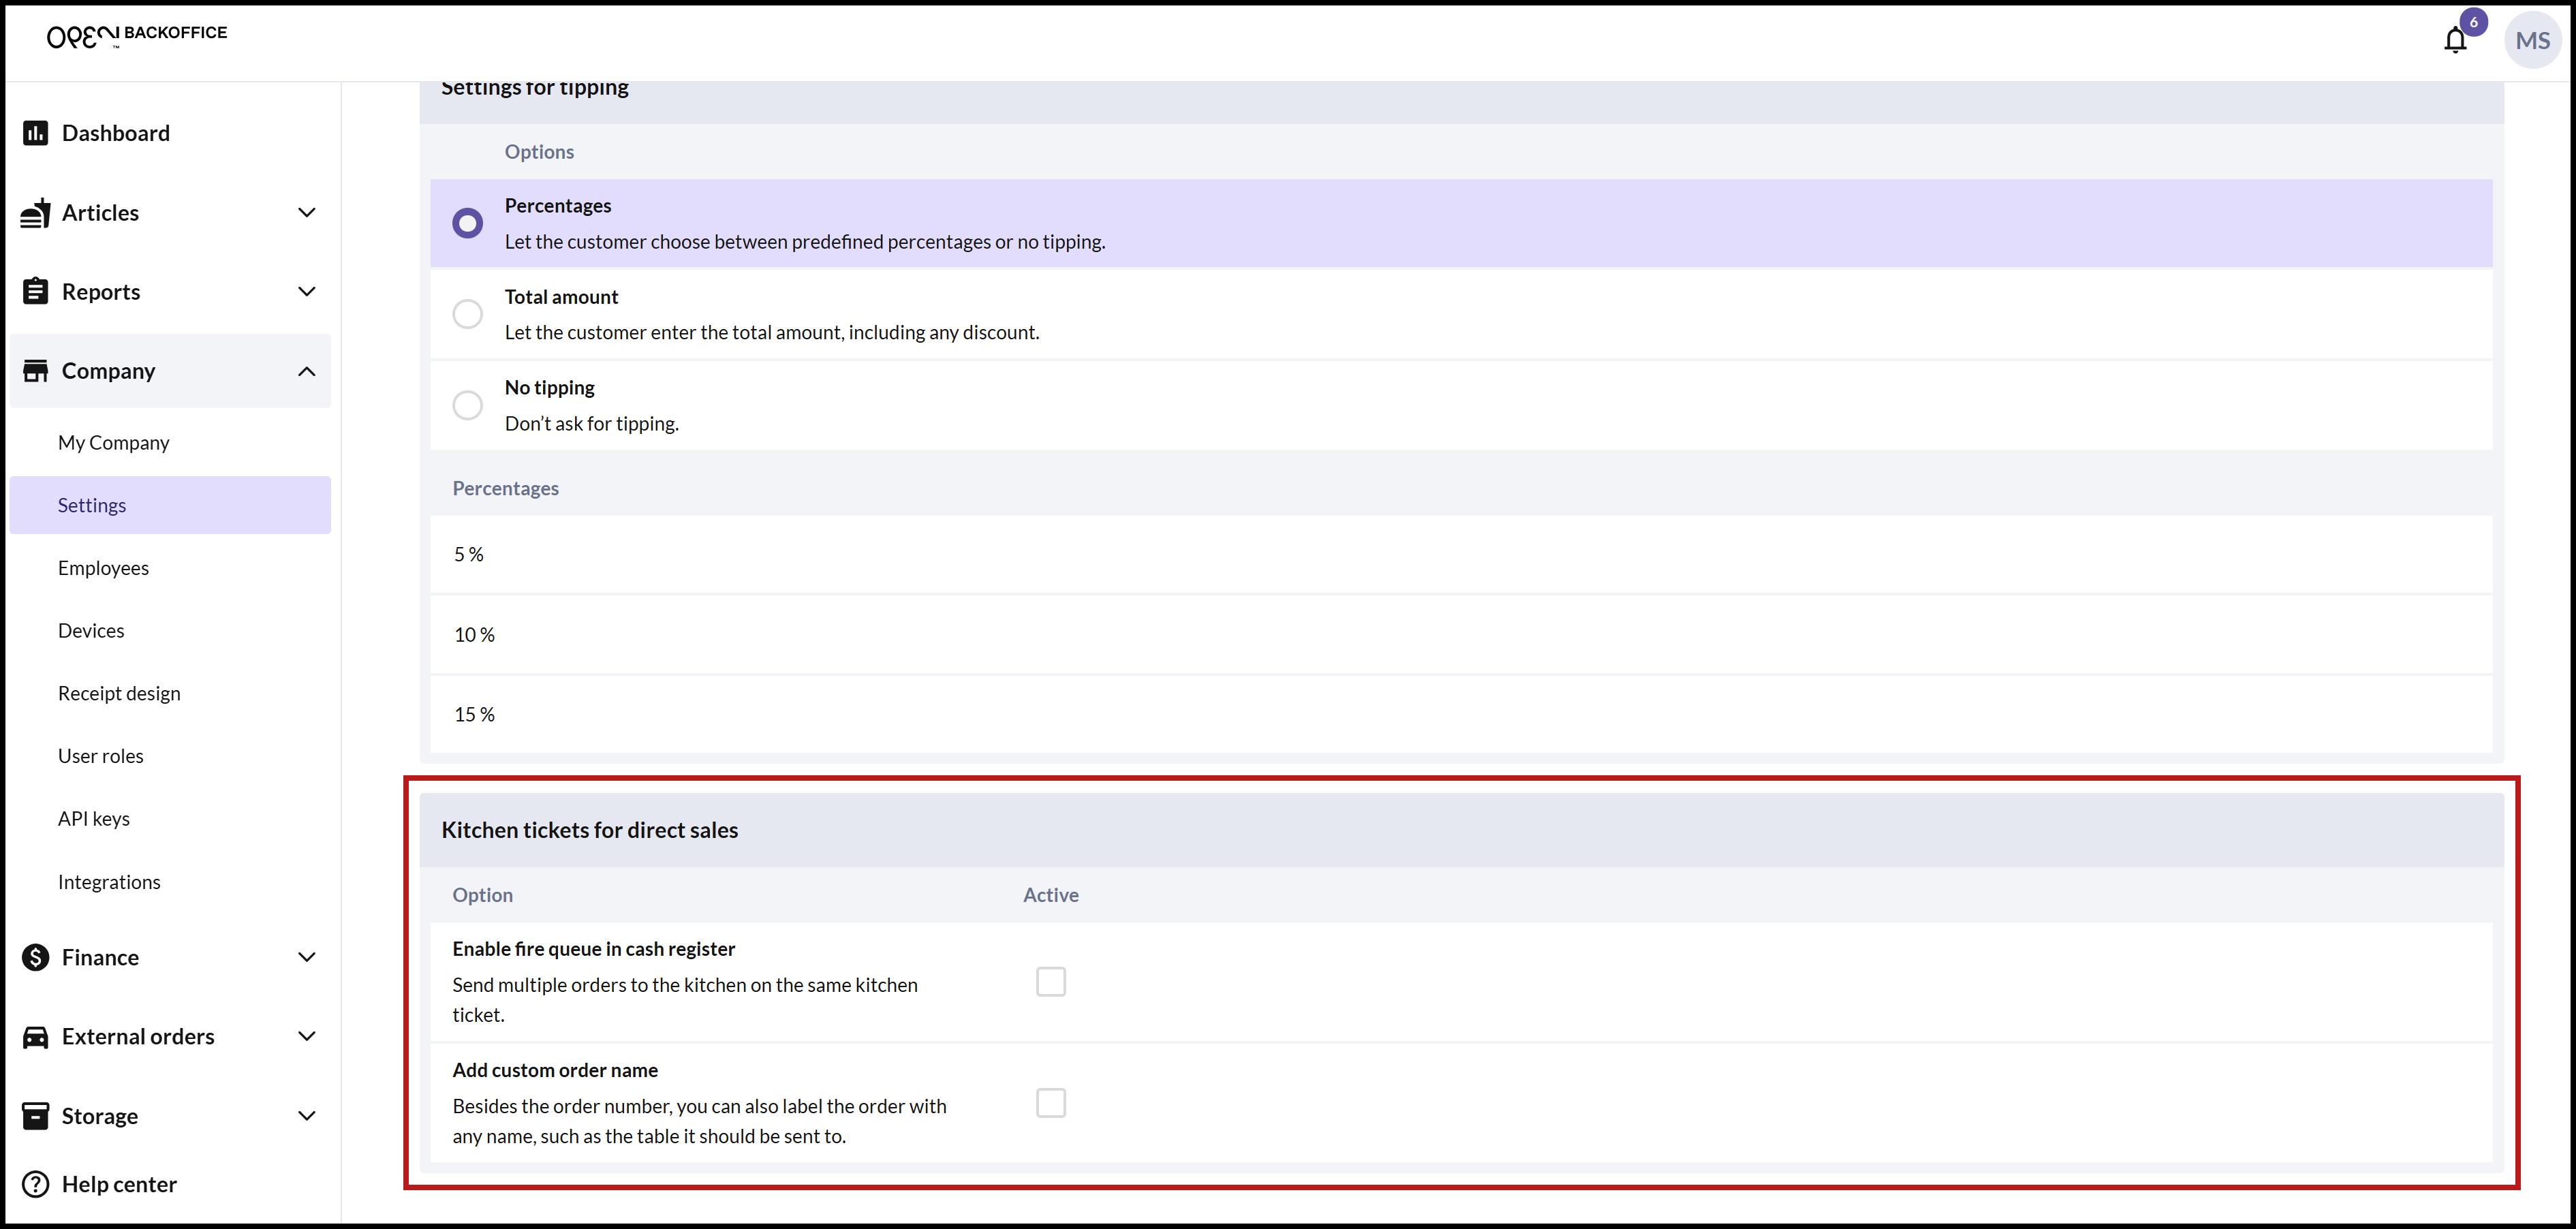
- Check the box for the setting ADD CUSTOM ORDER NAME.

When you go to process a payment for an order at the checkout, the dialog Label the order will appear. Here, you can enter an optional label, such as the table number given to the customer. You can easily skip this step by clicking the cross in the top right corner.
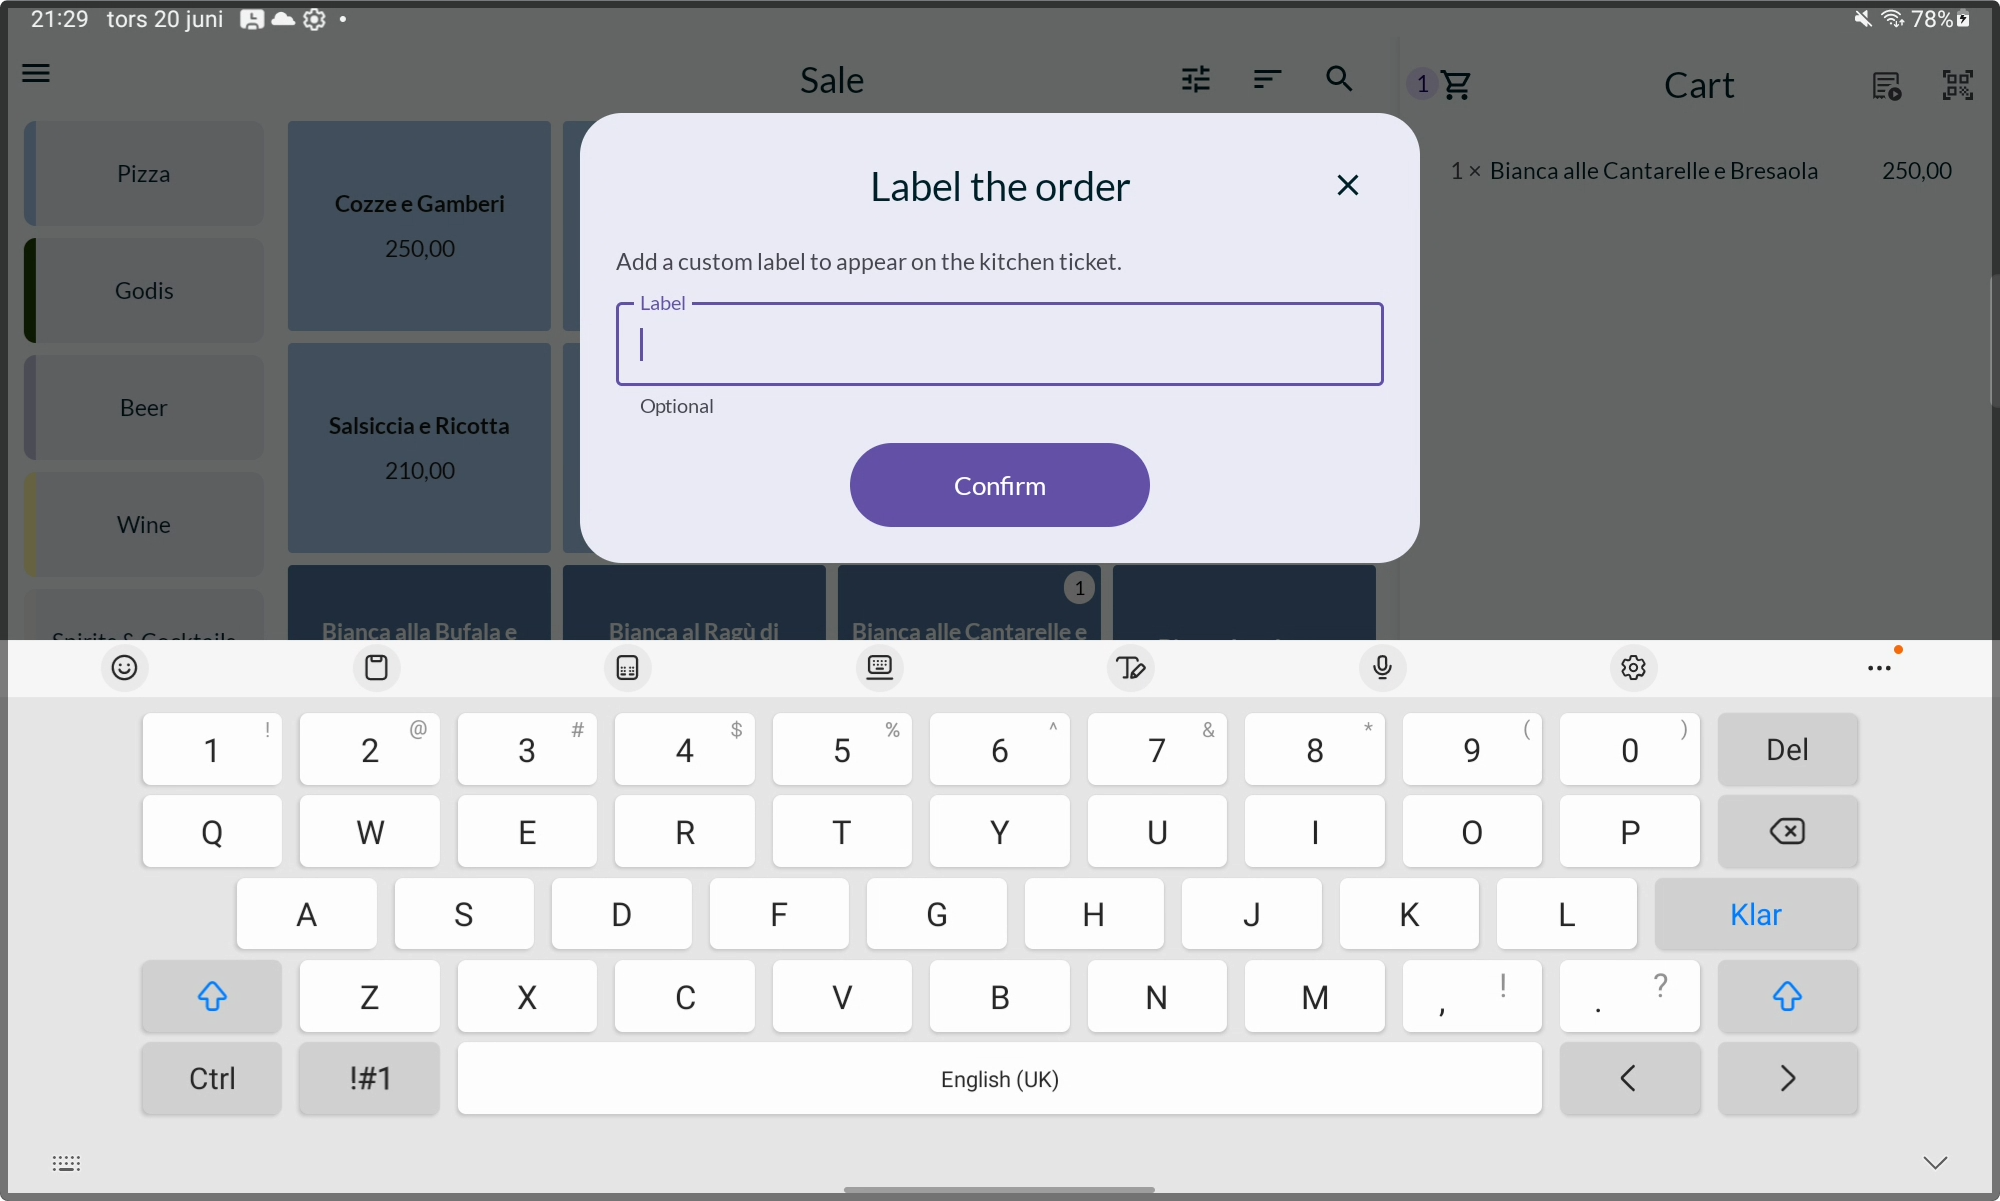
The custom order name will appear on the kitchen ticket.
Customize kitchen tickets for table orders
If you run a restaurant where guests order food at the table and pay afterwards, you can customise the kitchen tickets to suit your needs.
Show upcoming servings on the kitchen ticket
The way customers order food varies depending on the type of restaurant. In a lunch restaurant, customers often order one or two dishes at a time. In an à la carte restaurant, they typically order a full menu with multiple courses, such as appetizer, main course, and dessert. In such cases, the kitchen needs to know the entire order from the beginning to plan the preparation accordingly, ensuring that the main course can be prepared while the appetizer is being served.
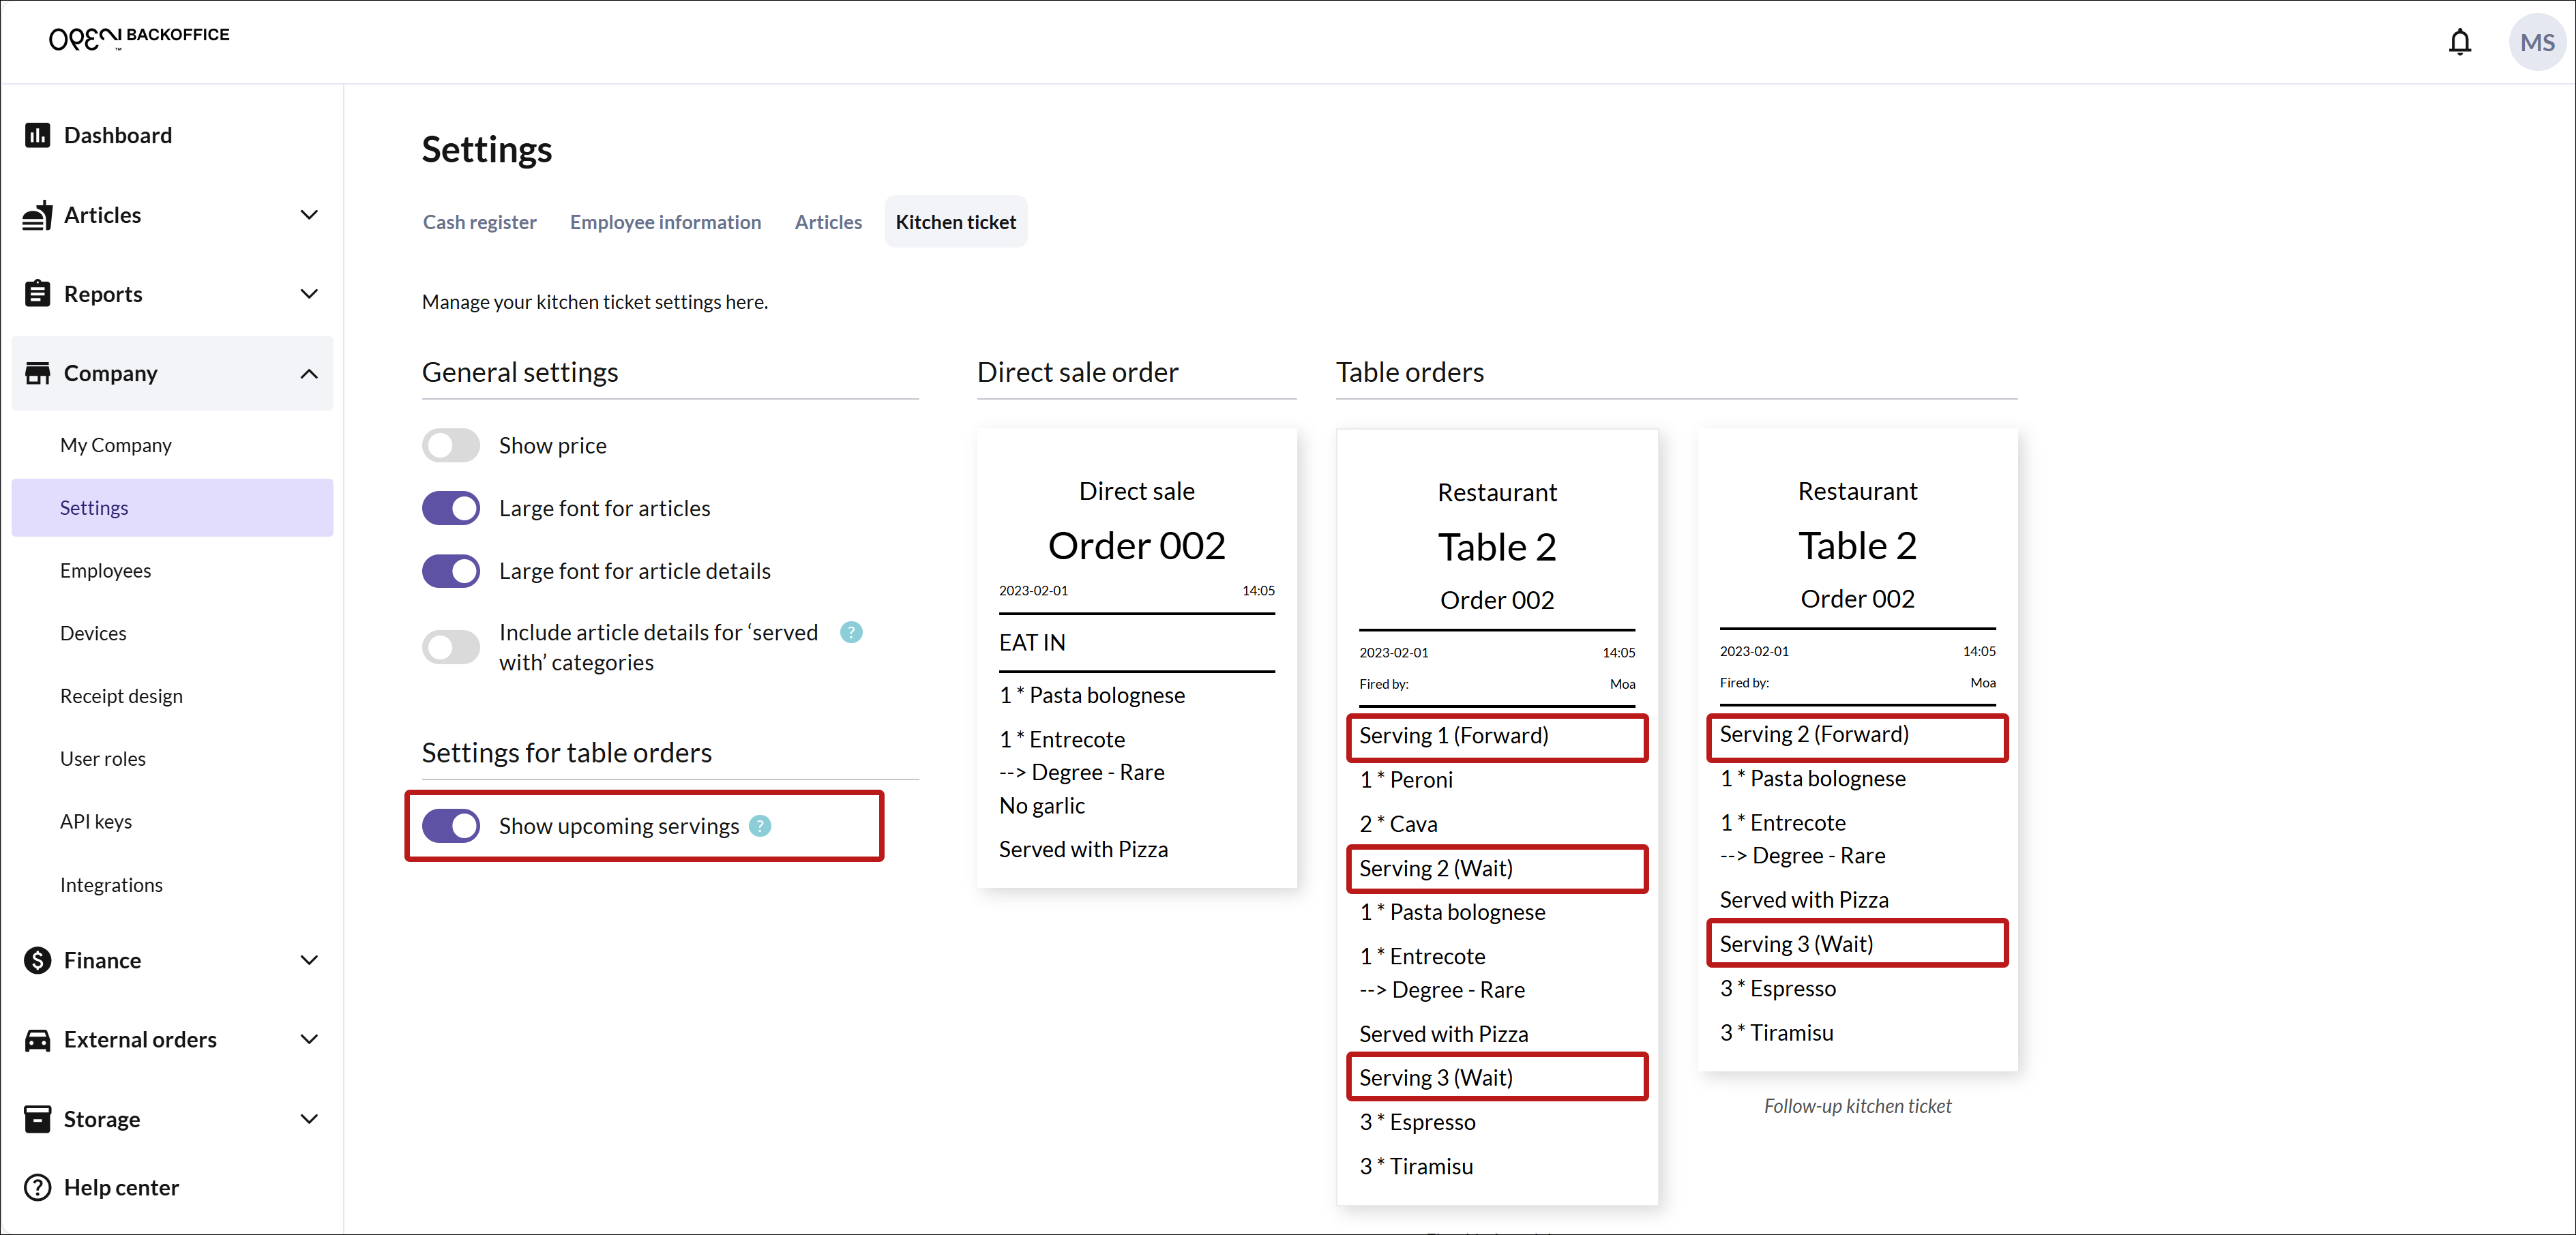
To facilitate this, you can enable the Show upcoming servings setting for kitchen tickets. When this setting is on, both the current serving (e.g., appetizer) and the upcoming servings (e.g., main course and dessert) are displayed as "waiting" on the kitchen ticket.
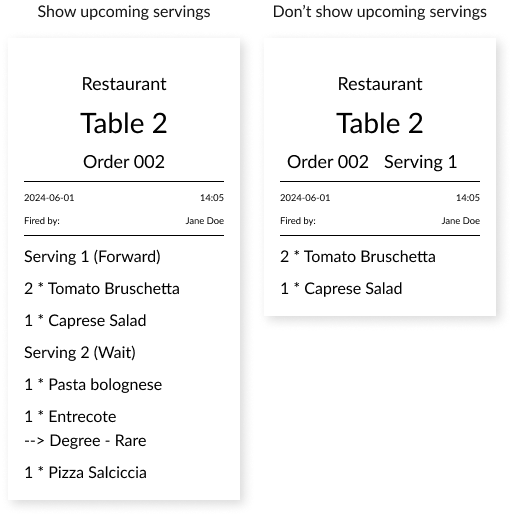
Here is an example of how kitchen tickets look depending on whether the setting is off or on.
To activate the setting, follow these steps:
In BackOffice, select COMPANY from the menu and navigate to the SETTINGS page.
Choose the KITCHEN TICKETS tab.

- Under Settings for table orders, toggle on the Show upcoming servings setting.
Ensuring that articles are included on the kitchen ticket
There are two ways to ensure that your articles will be included on the kitchen tickets, from the Articles page and from the Devices page. Below, we guide you through both methods to ensure that your articles are printed on the kitchen tickets.
Method 1: Assign articles to ticket categories from the Devices page
If you use multiple kitchen printers or have several kitchen stations sharing the same printer, the easiest way to ensure relevant articles are linked to the correct printer is by using printer categories. A printer category, such as "Pizza," allows you to choose which articles belong to that category. You can easily manage your printer categories and assign articles to them from the Devices page.
In BackOffice, select COMPANY from the menu and go to the DEVICES page.
Choose the KITCHEN PRINTERS tab.

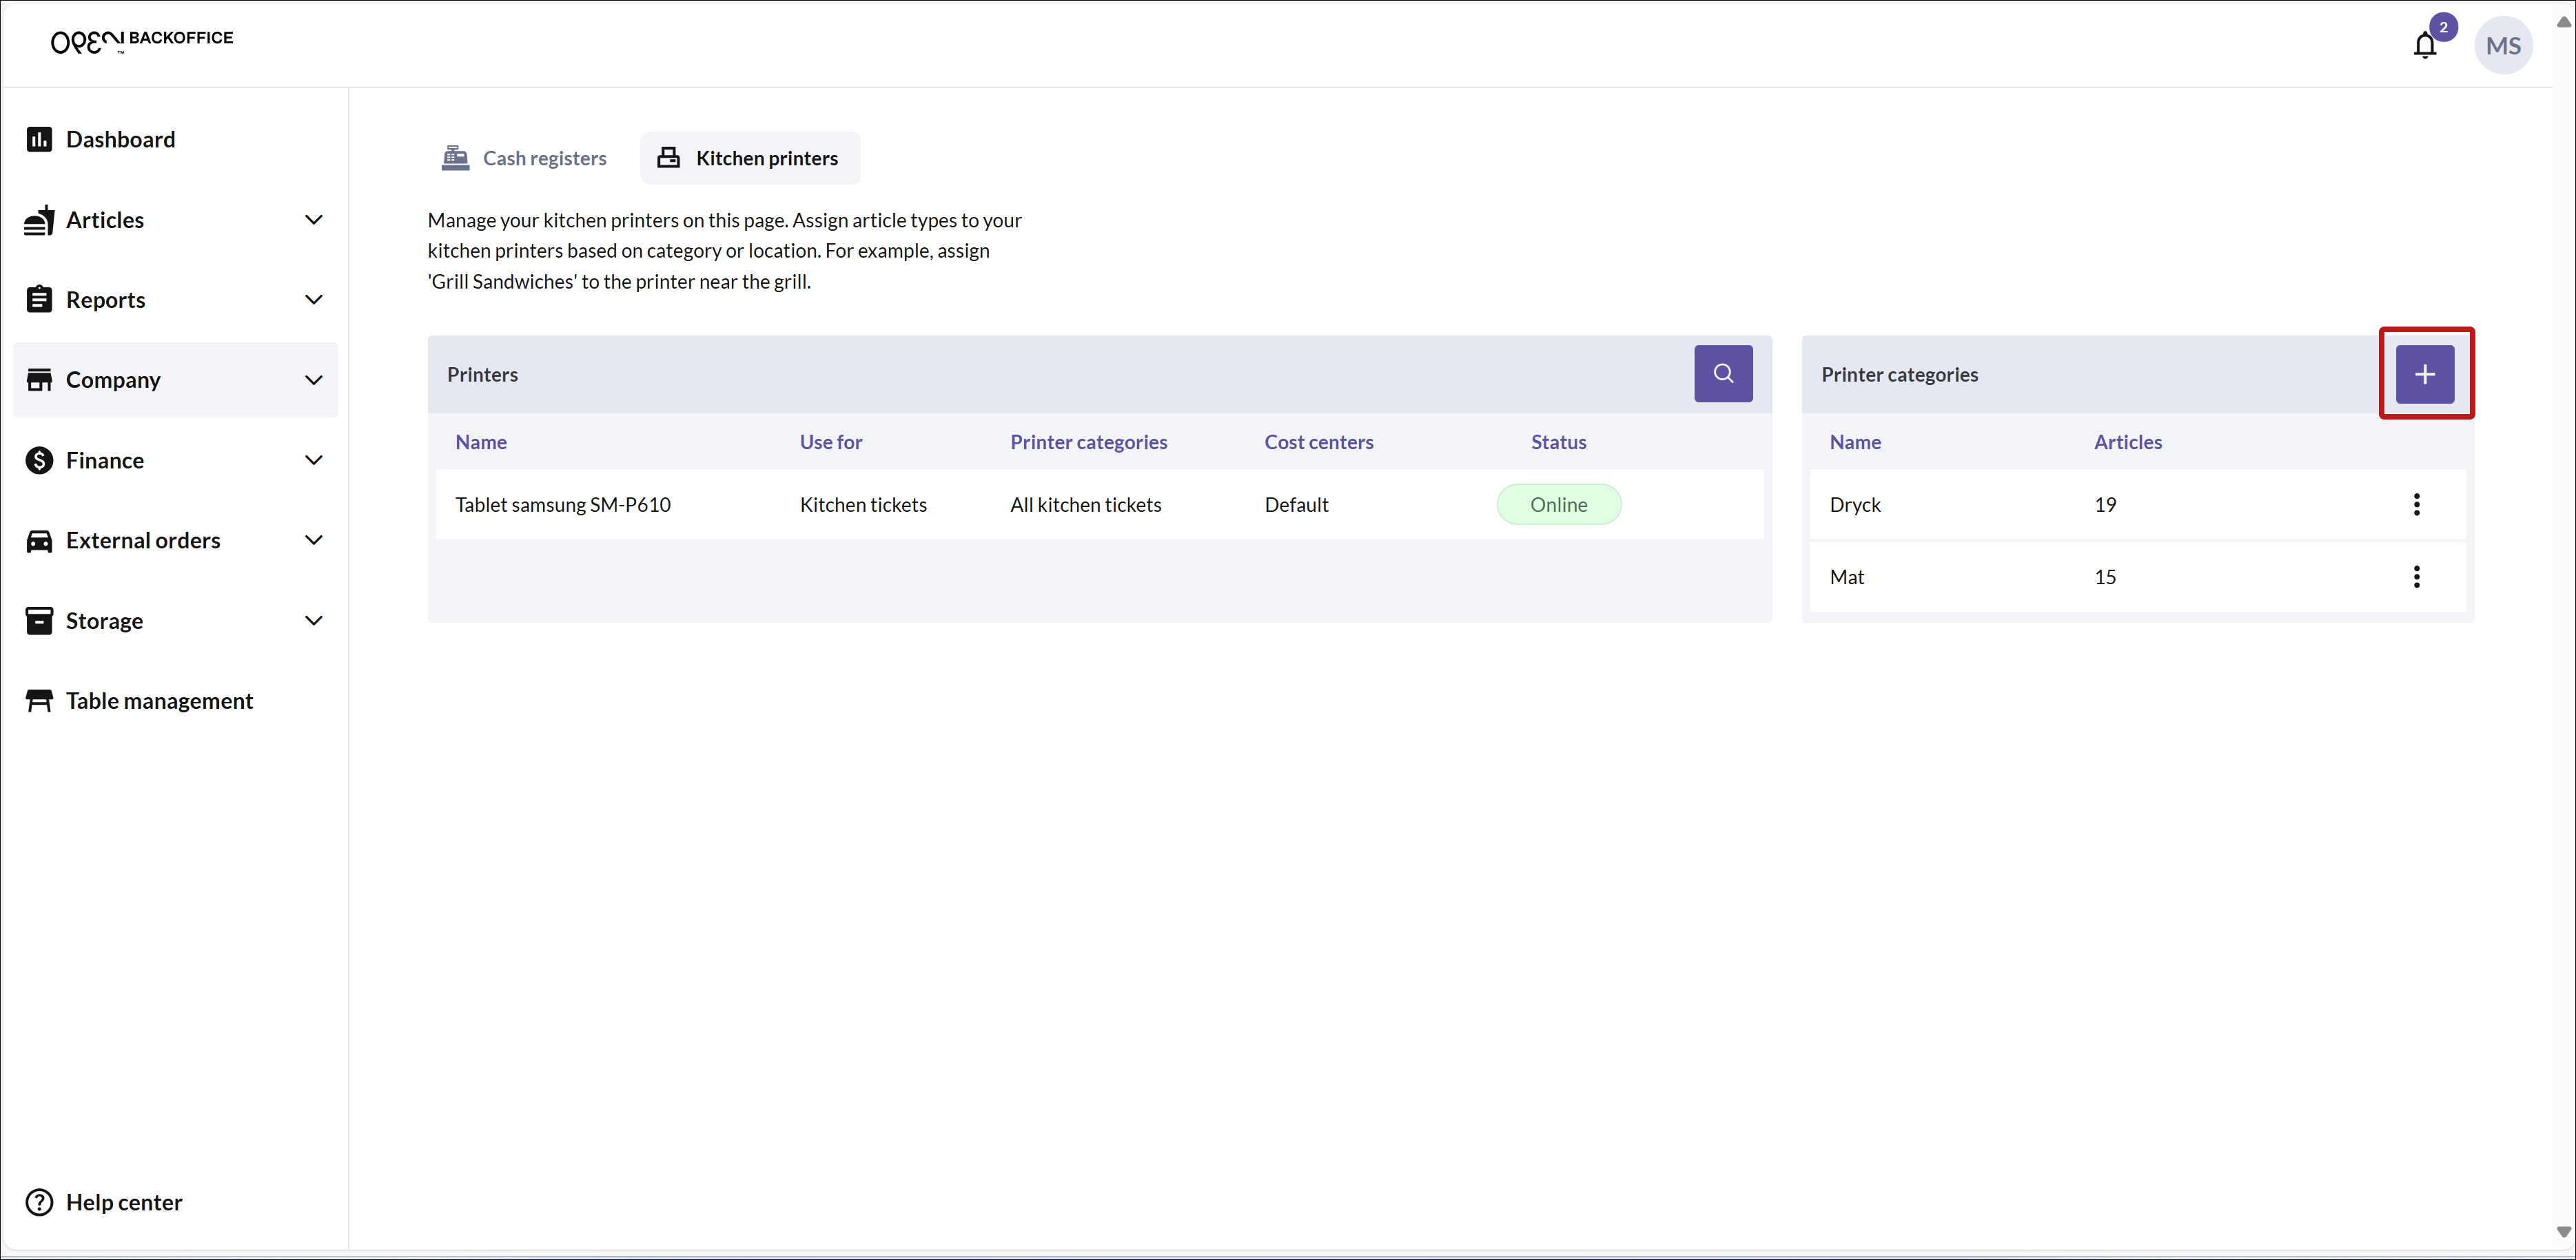
- To add a new printer category, click the + button in the top right corner.
On the new page that opens, name the category and select which articles should be included.
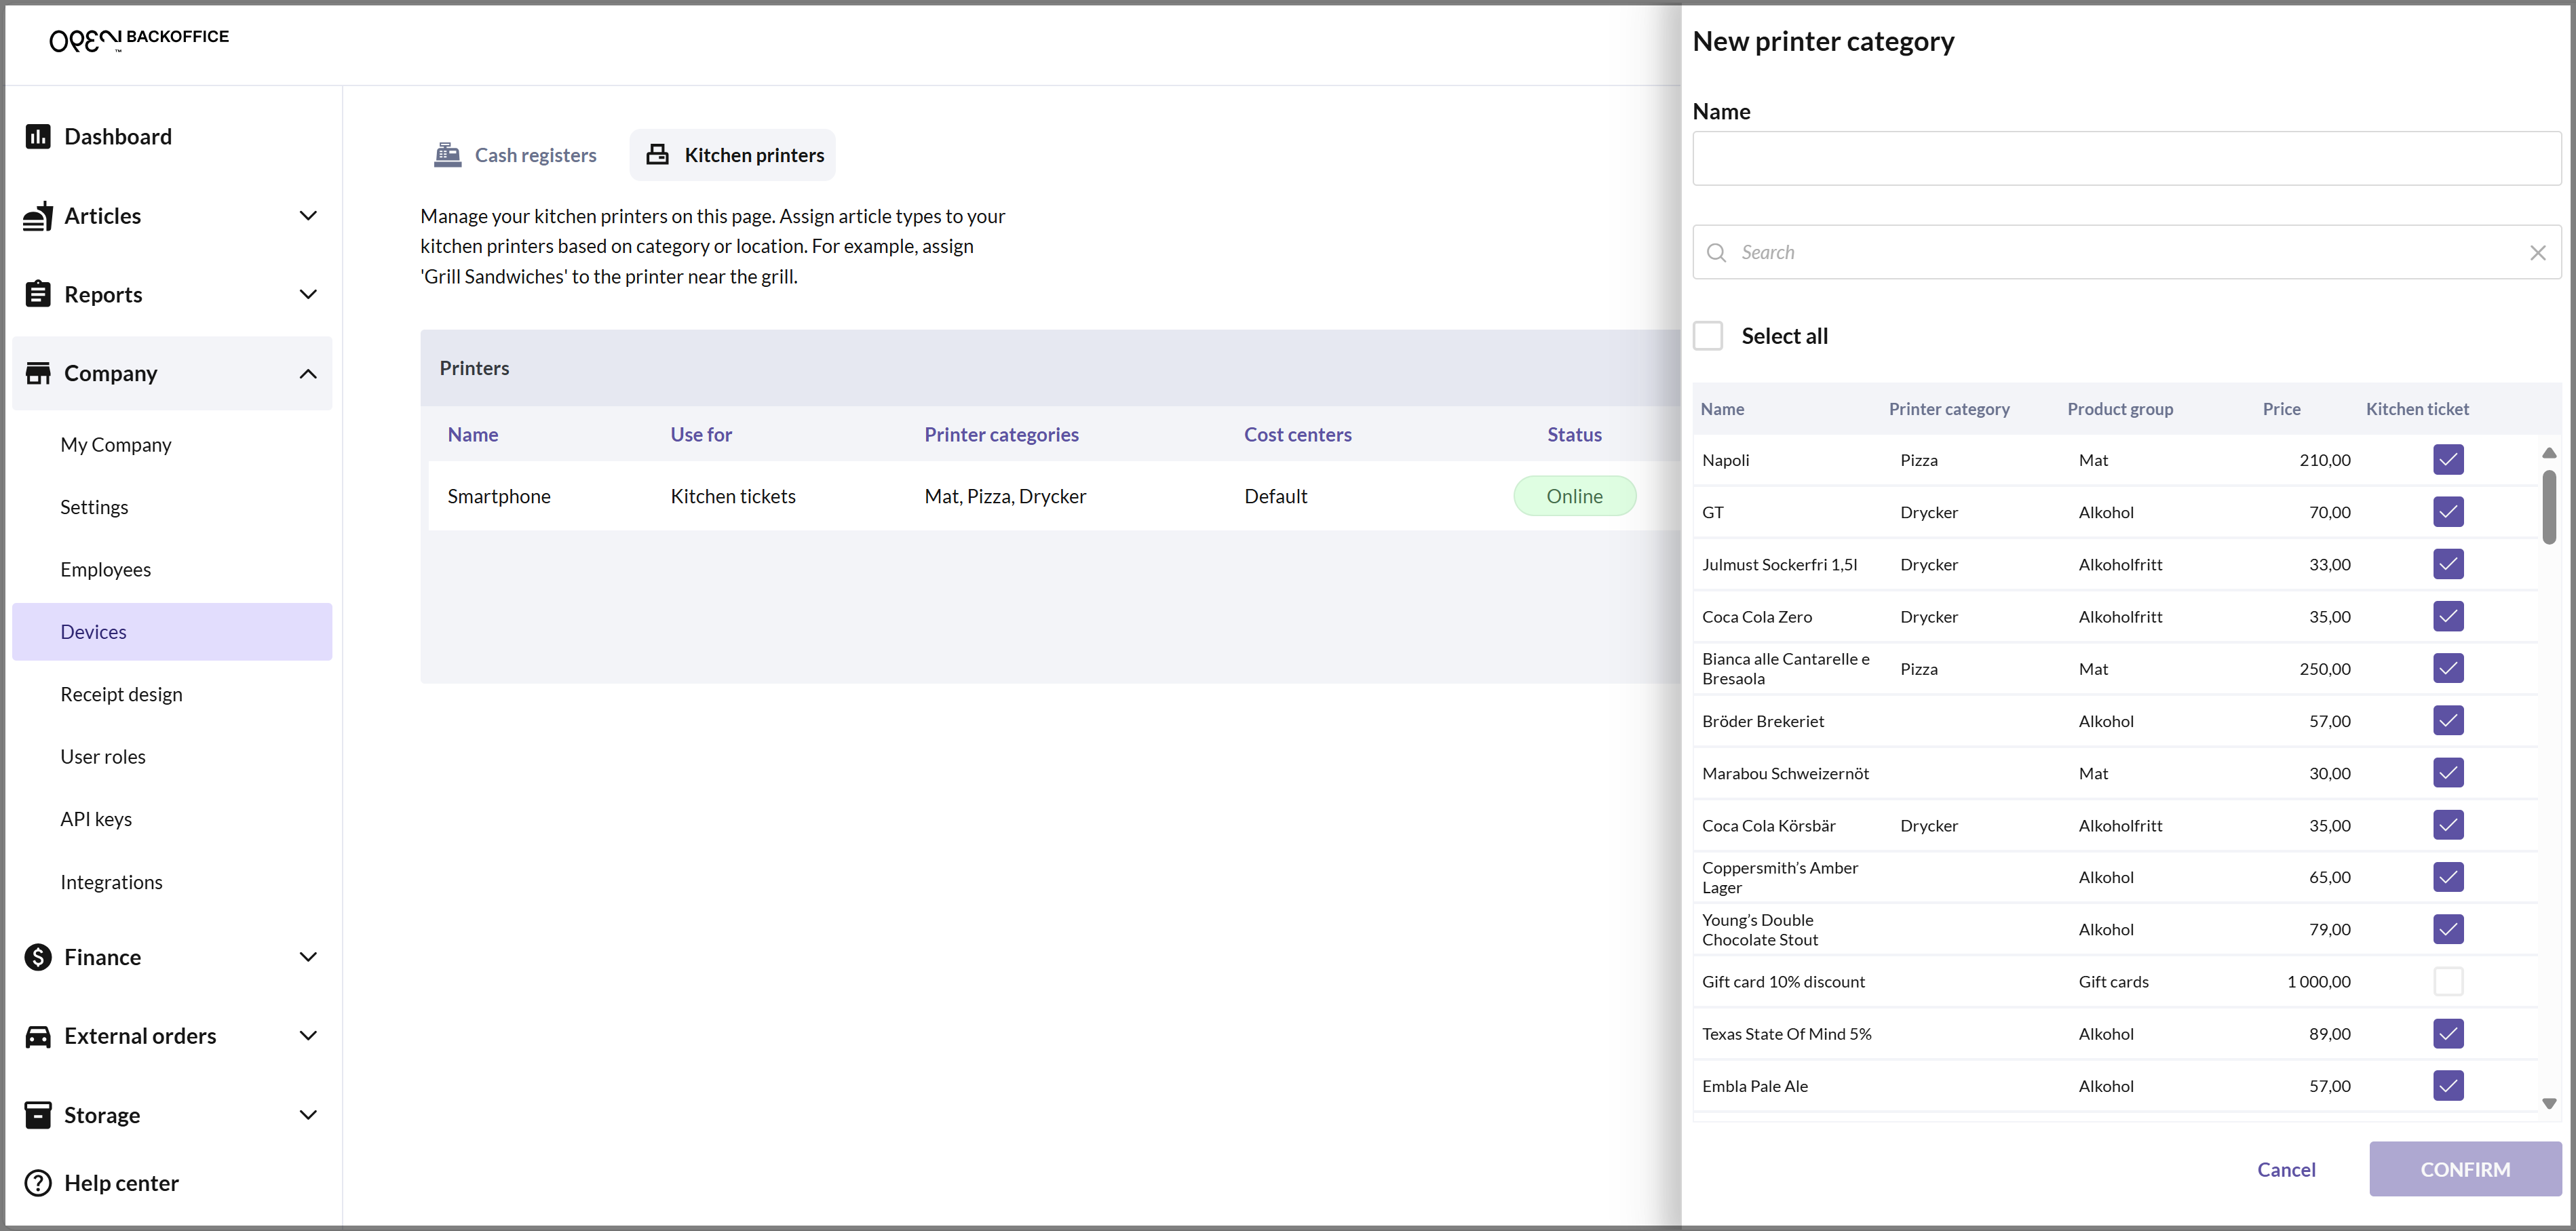
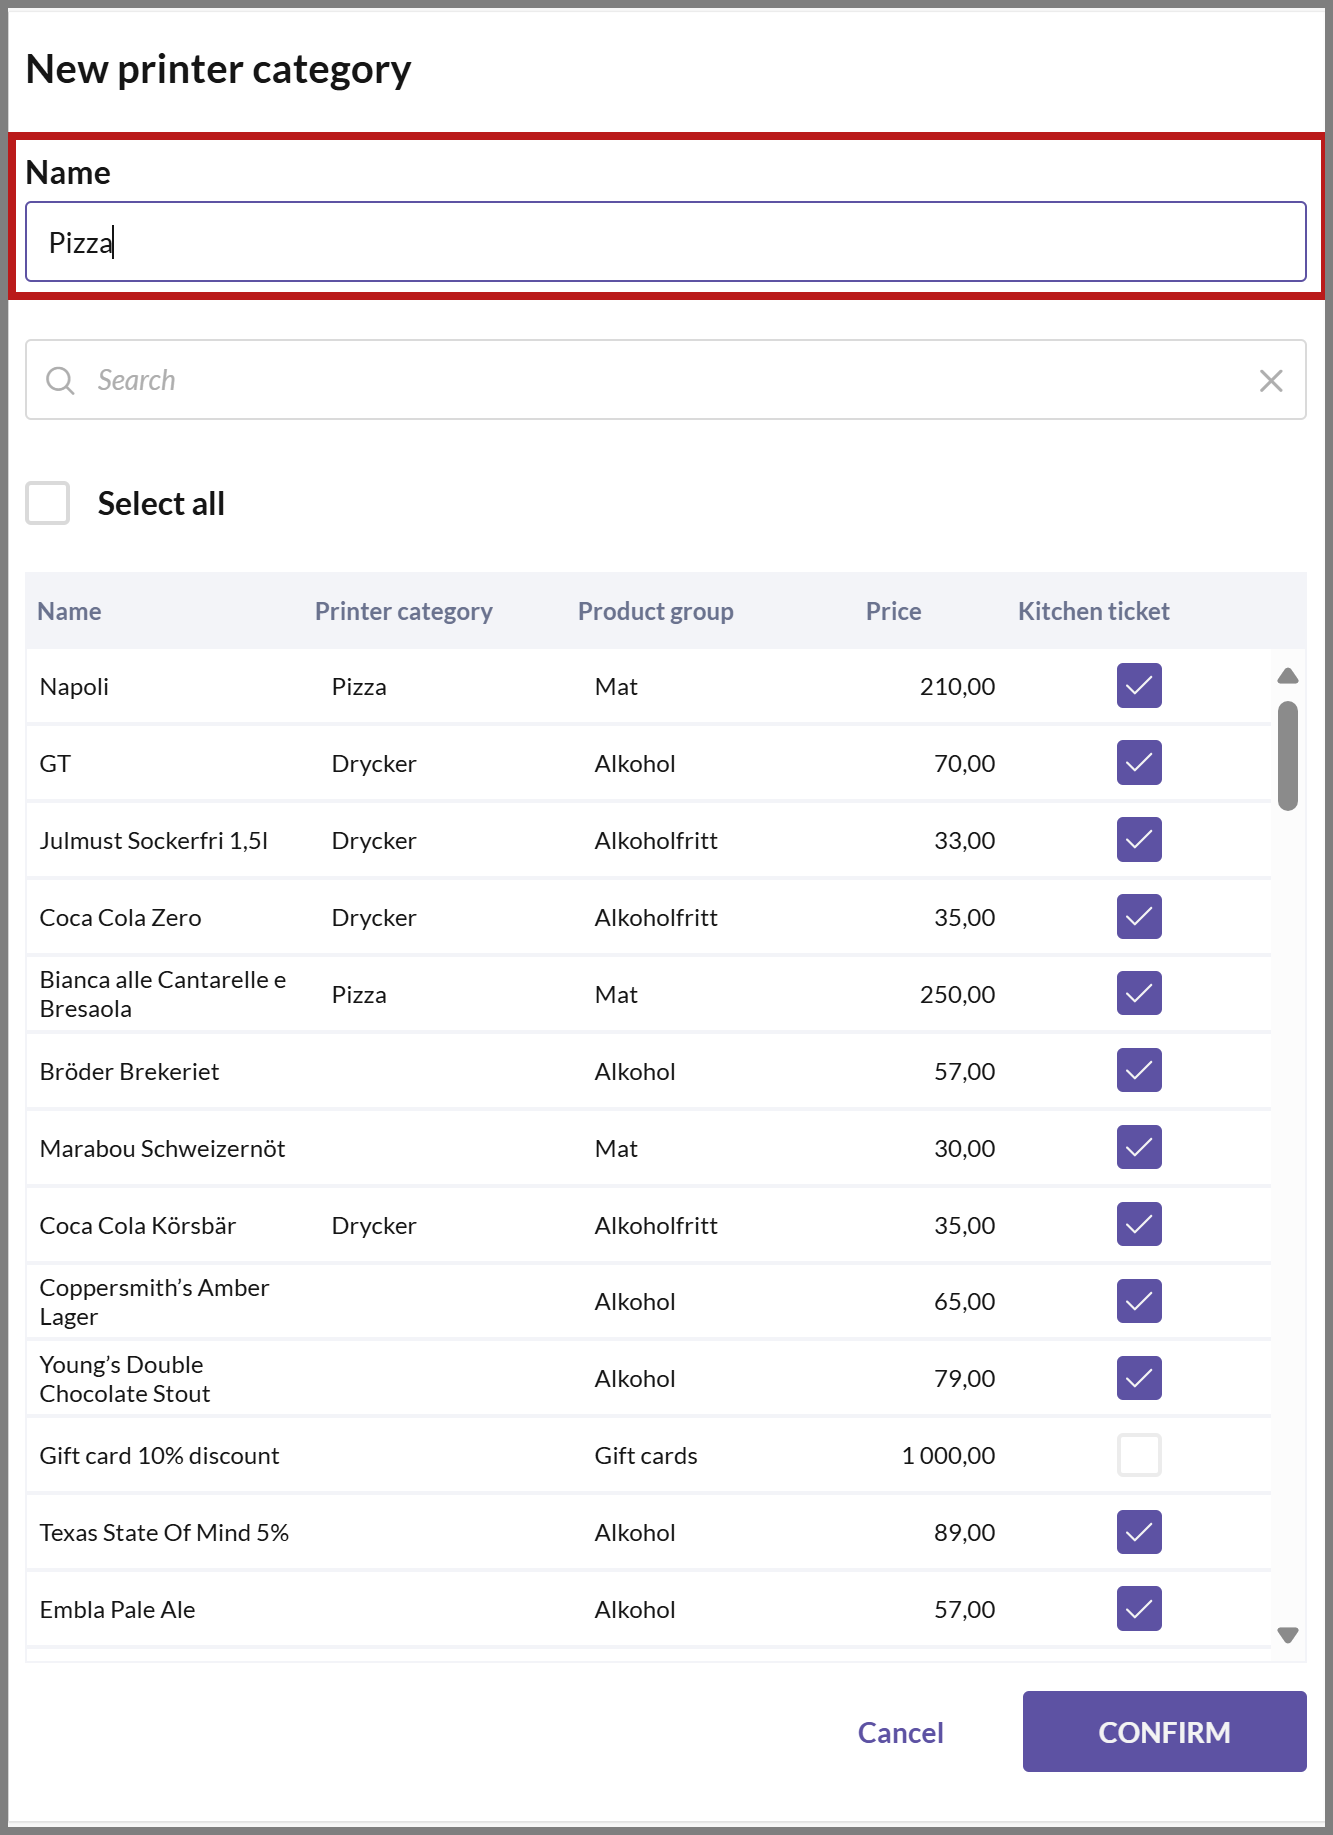
- Start by entering a name for the printer category, for example, "Pizza."

To easily find the articles you want to add to the category, you can search for the articles or filter by product group, for example.
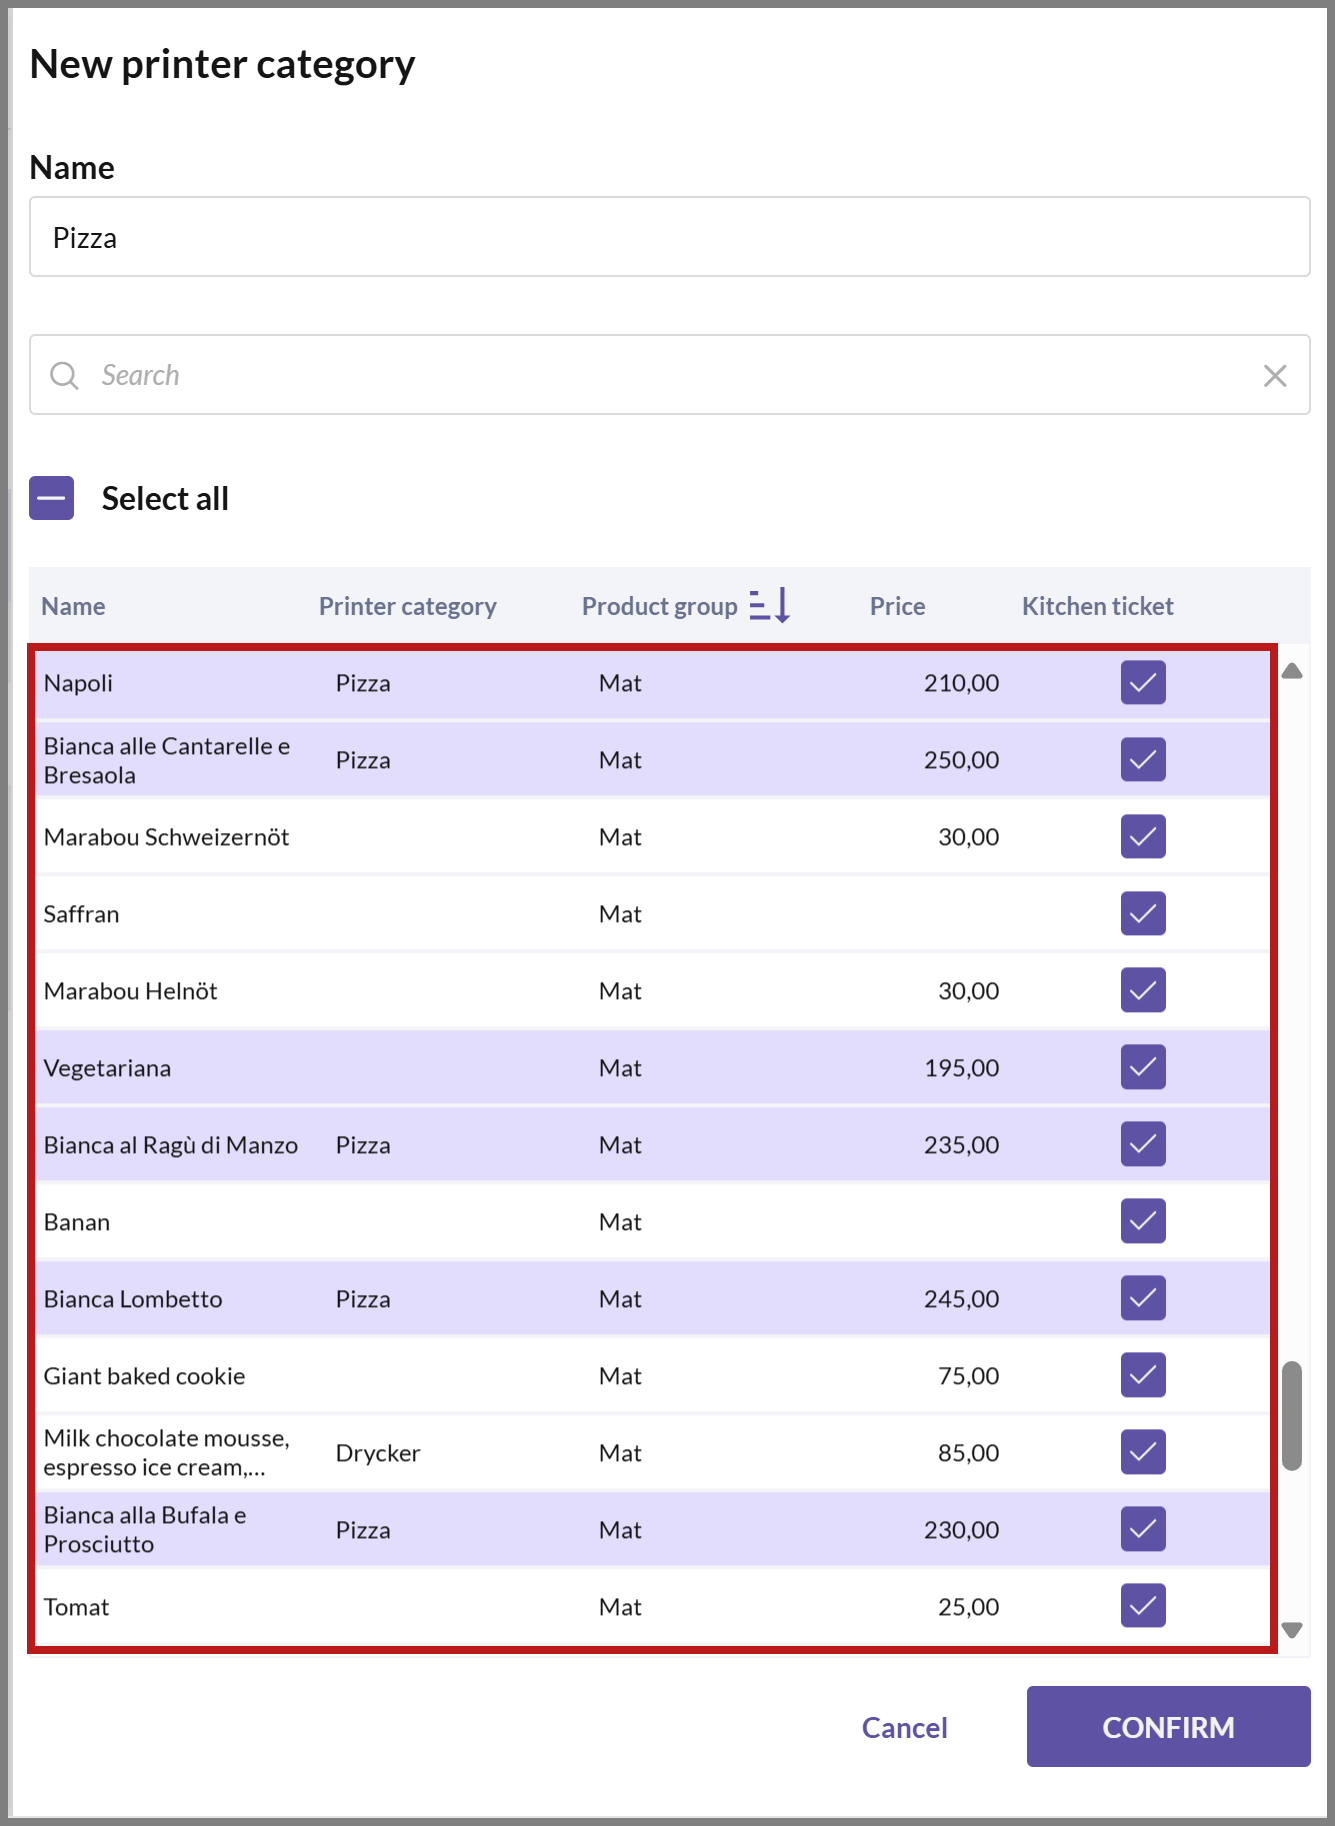
- Select the articles you want to add by clicking on them. The article rows will then be highlighted in pink. When you select an article for the category, the Print kitchen ticket setting is automatically activated.
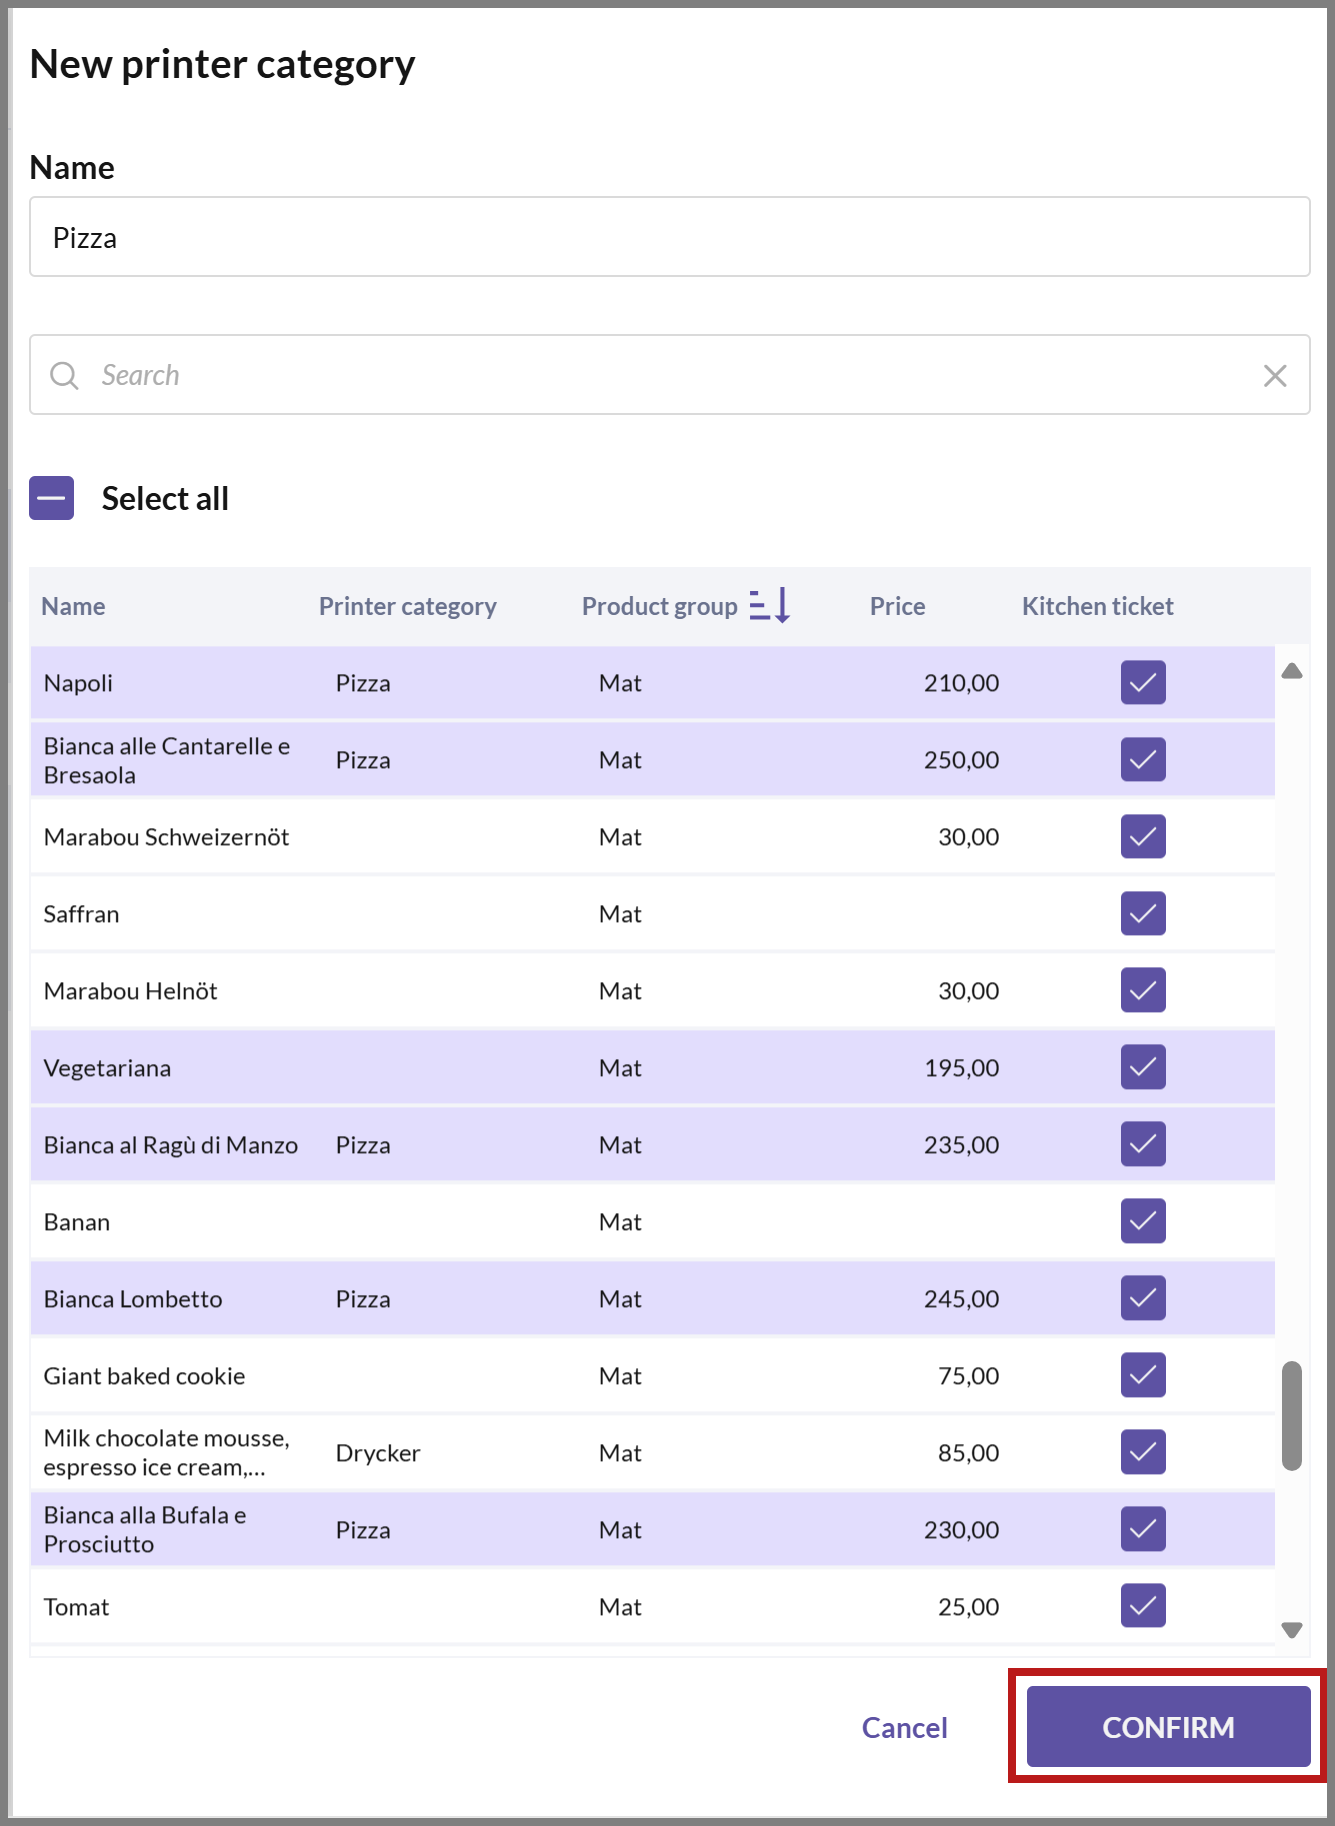
- Once you're done, click on CONFIRM.
- Now you can see your created category in the list on the right.
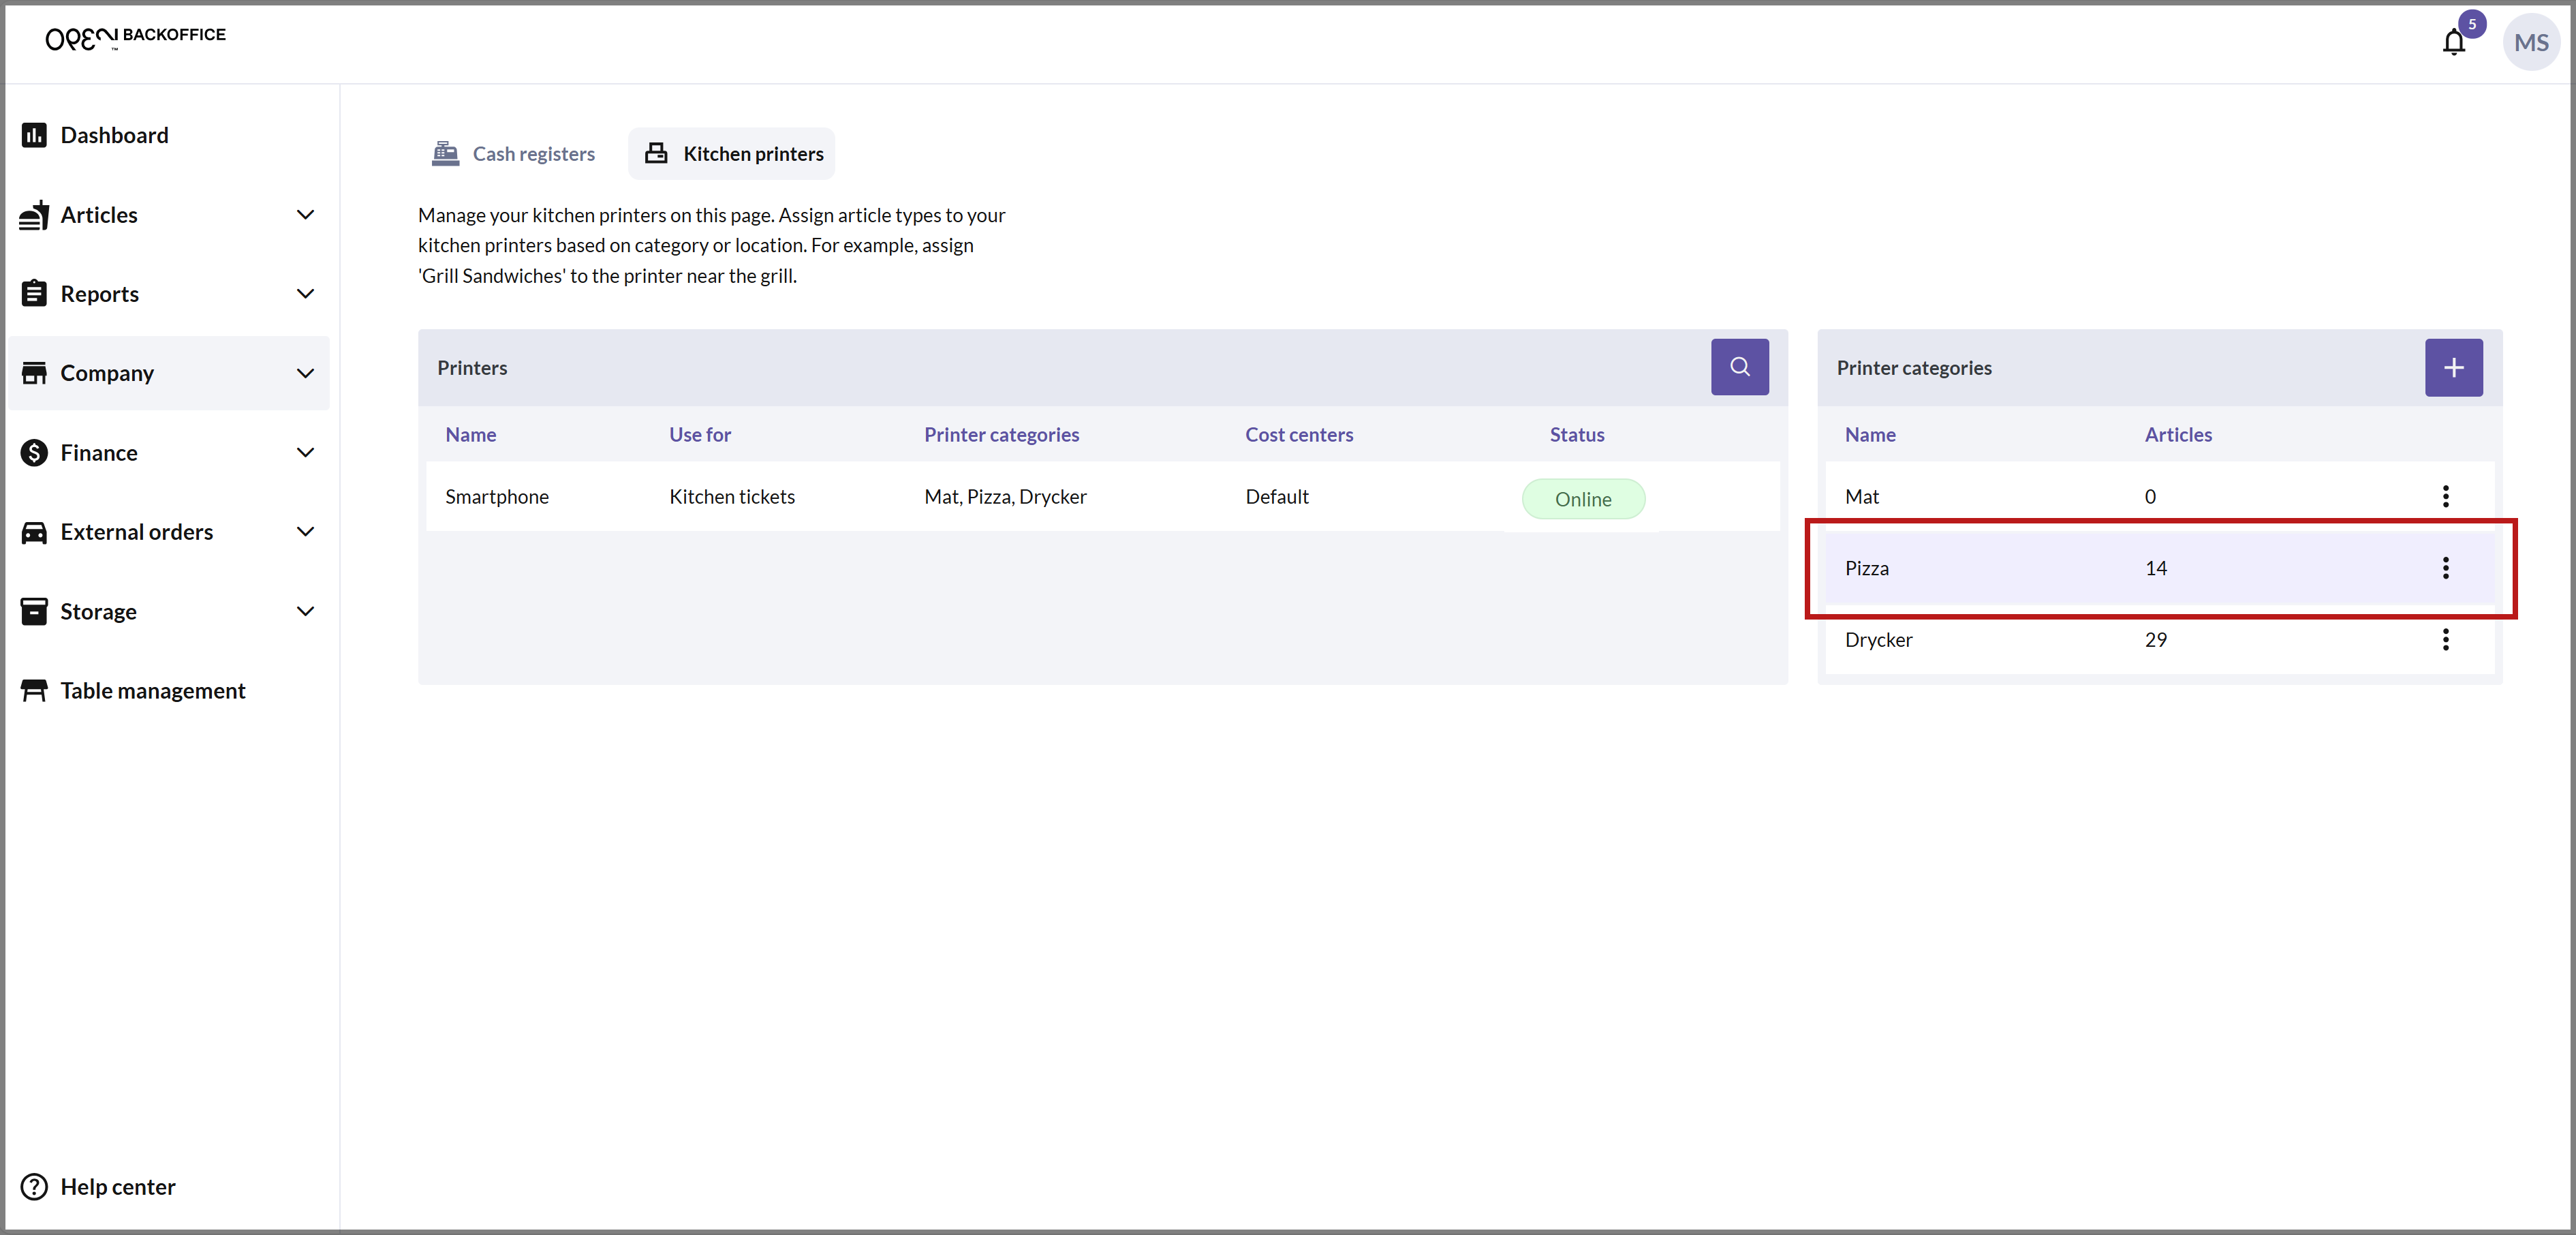
Make sure to assign the printer category to the appropriate kitchen printer from the printer settings.
Method 2: Activate "Print kitchen ticket" from the Articles page
For a simpler setup with a single kitchen printer, ensure that the "Print kitchen ticket" option is enabled for your articles on the Articles page.
In BackOffice, select ARTICLES from the menu and navigate to the ARTICLES page.
Enable the Kitchen ticket option for the desired articles.
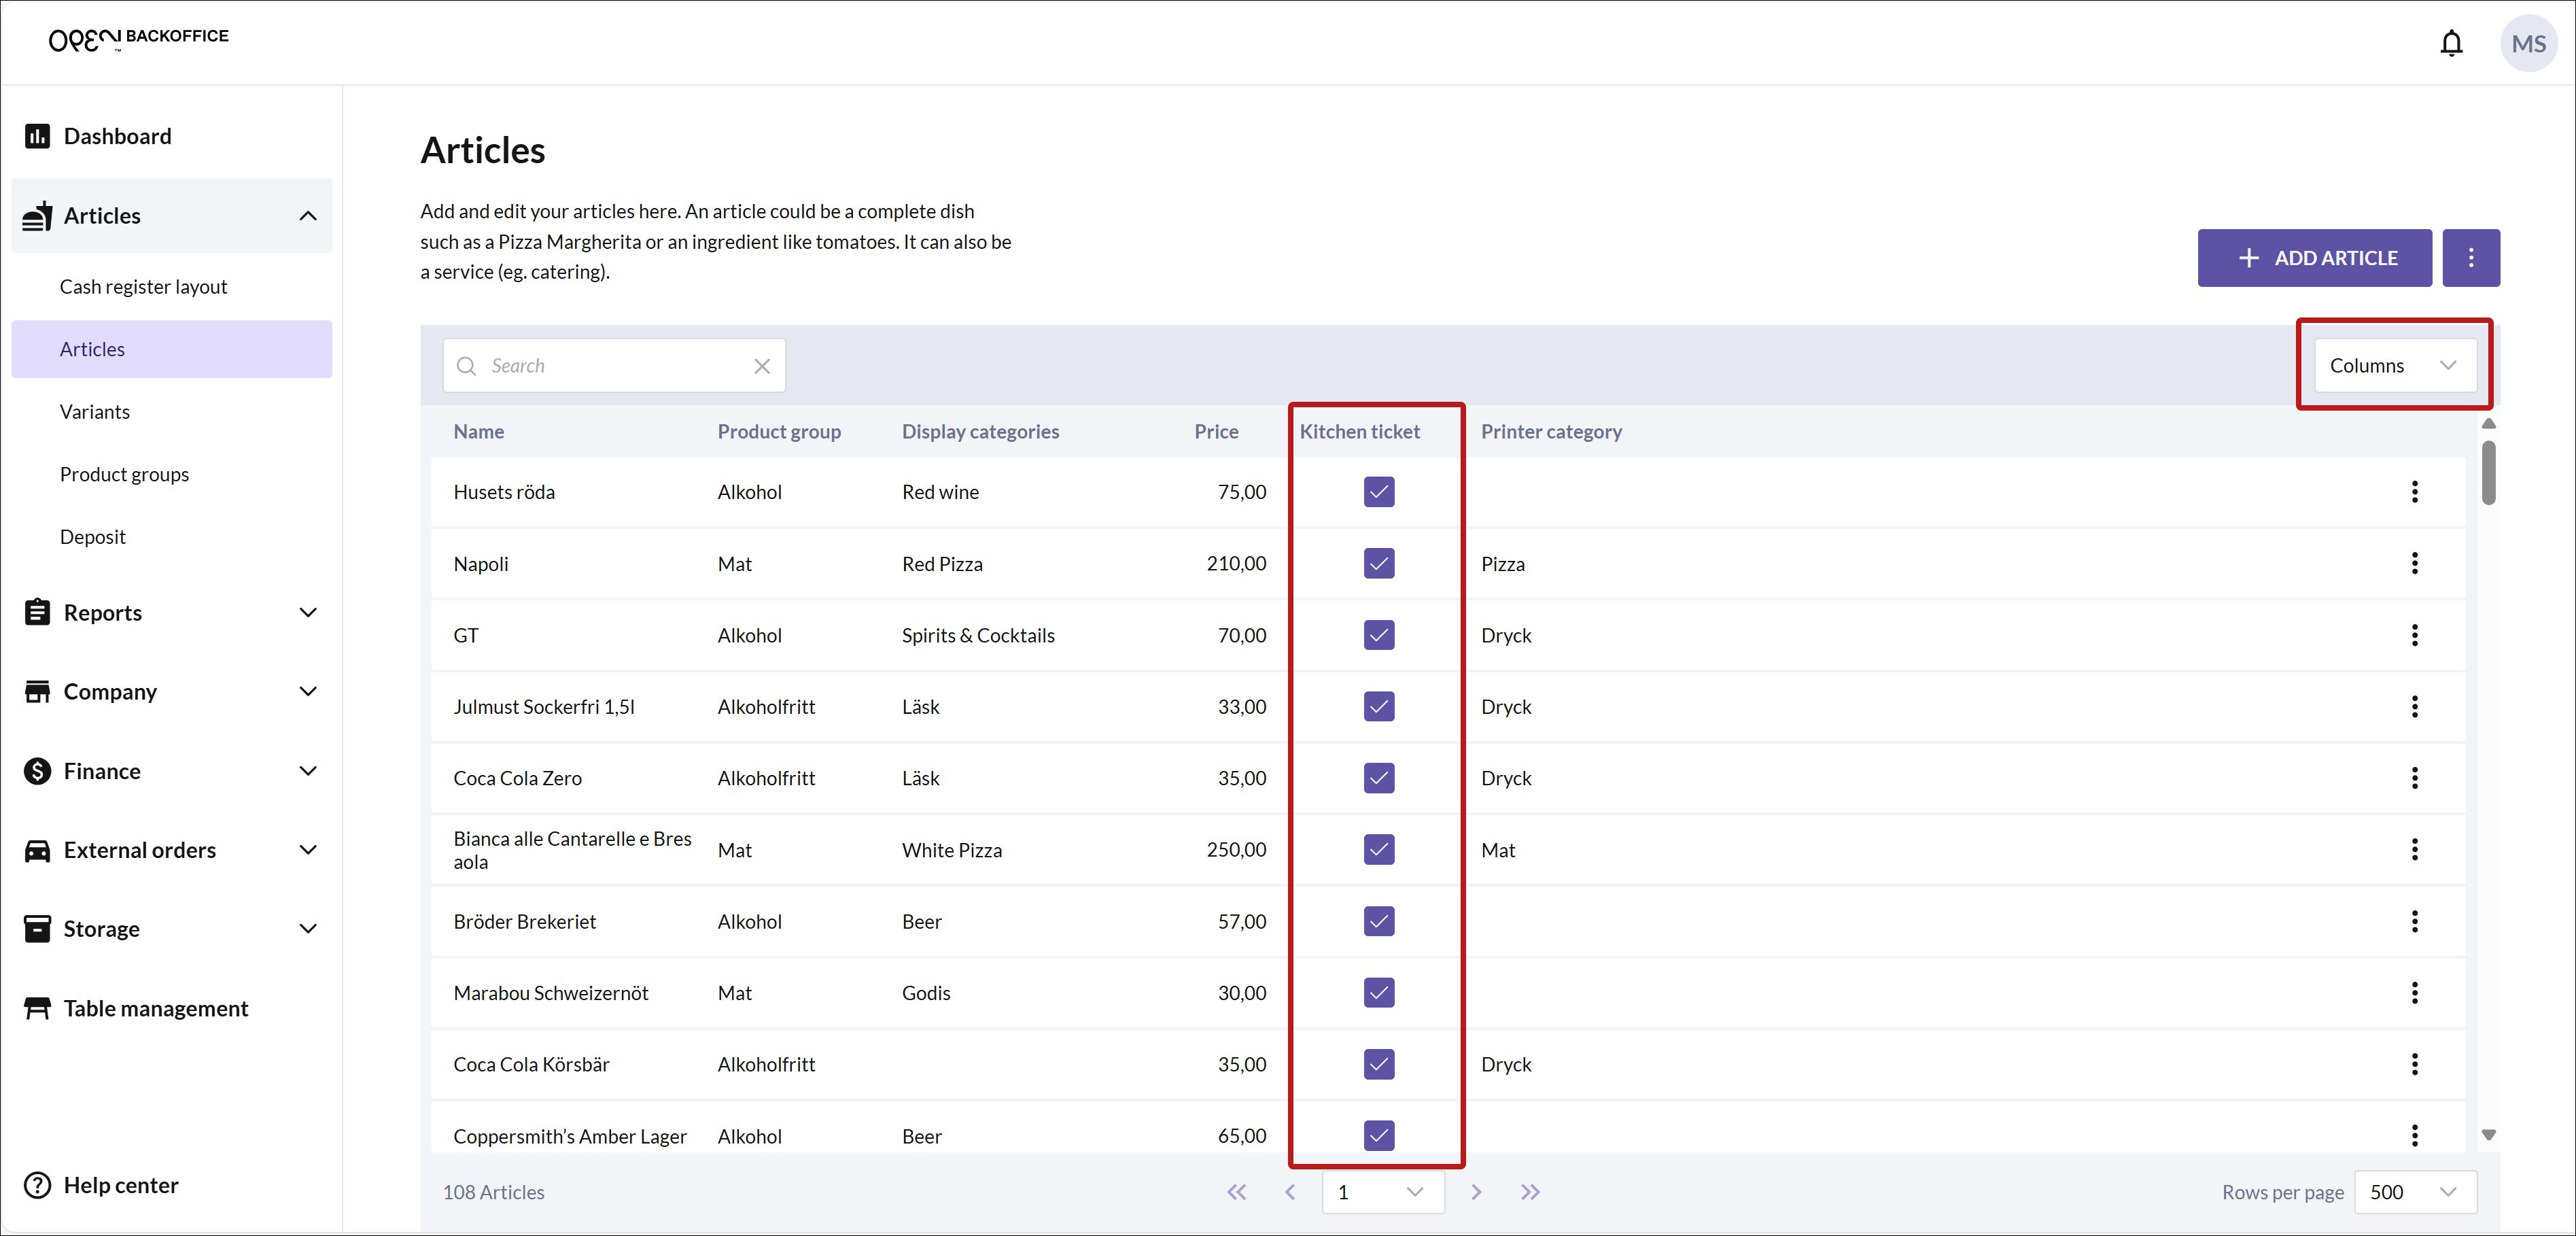
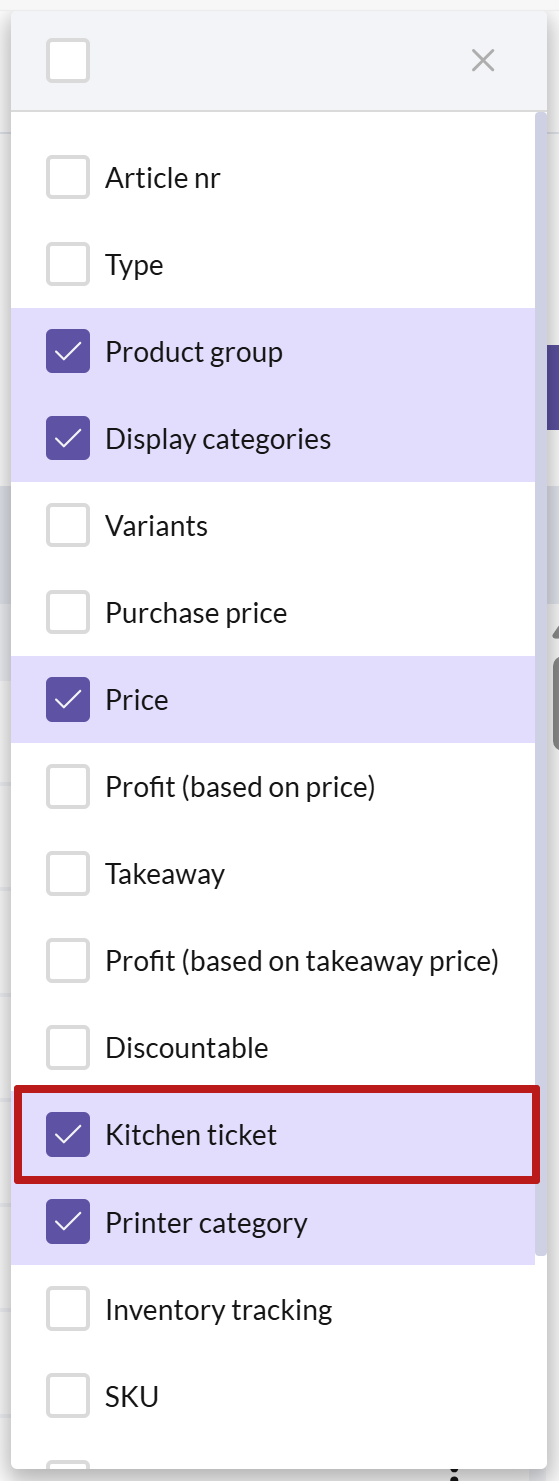
Make sure the column is visible by selecting it from the Columns menu in the top right corner.
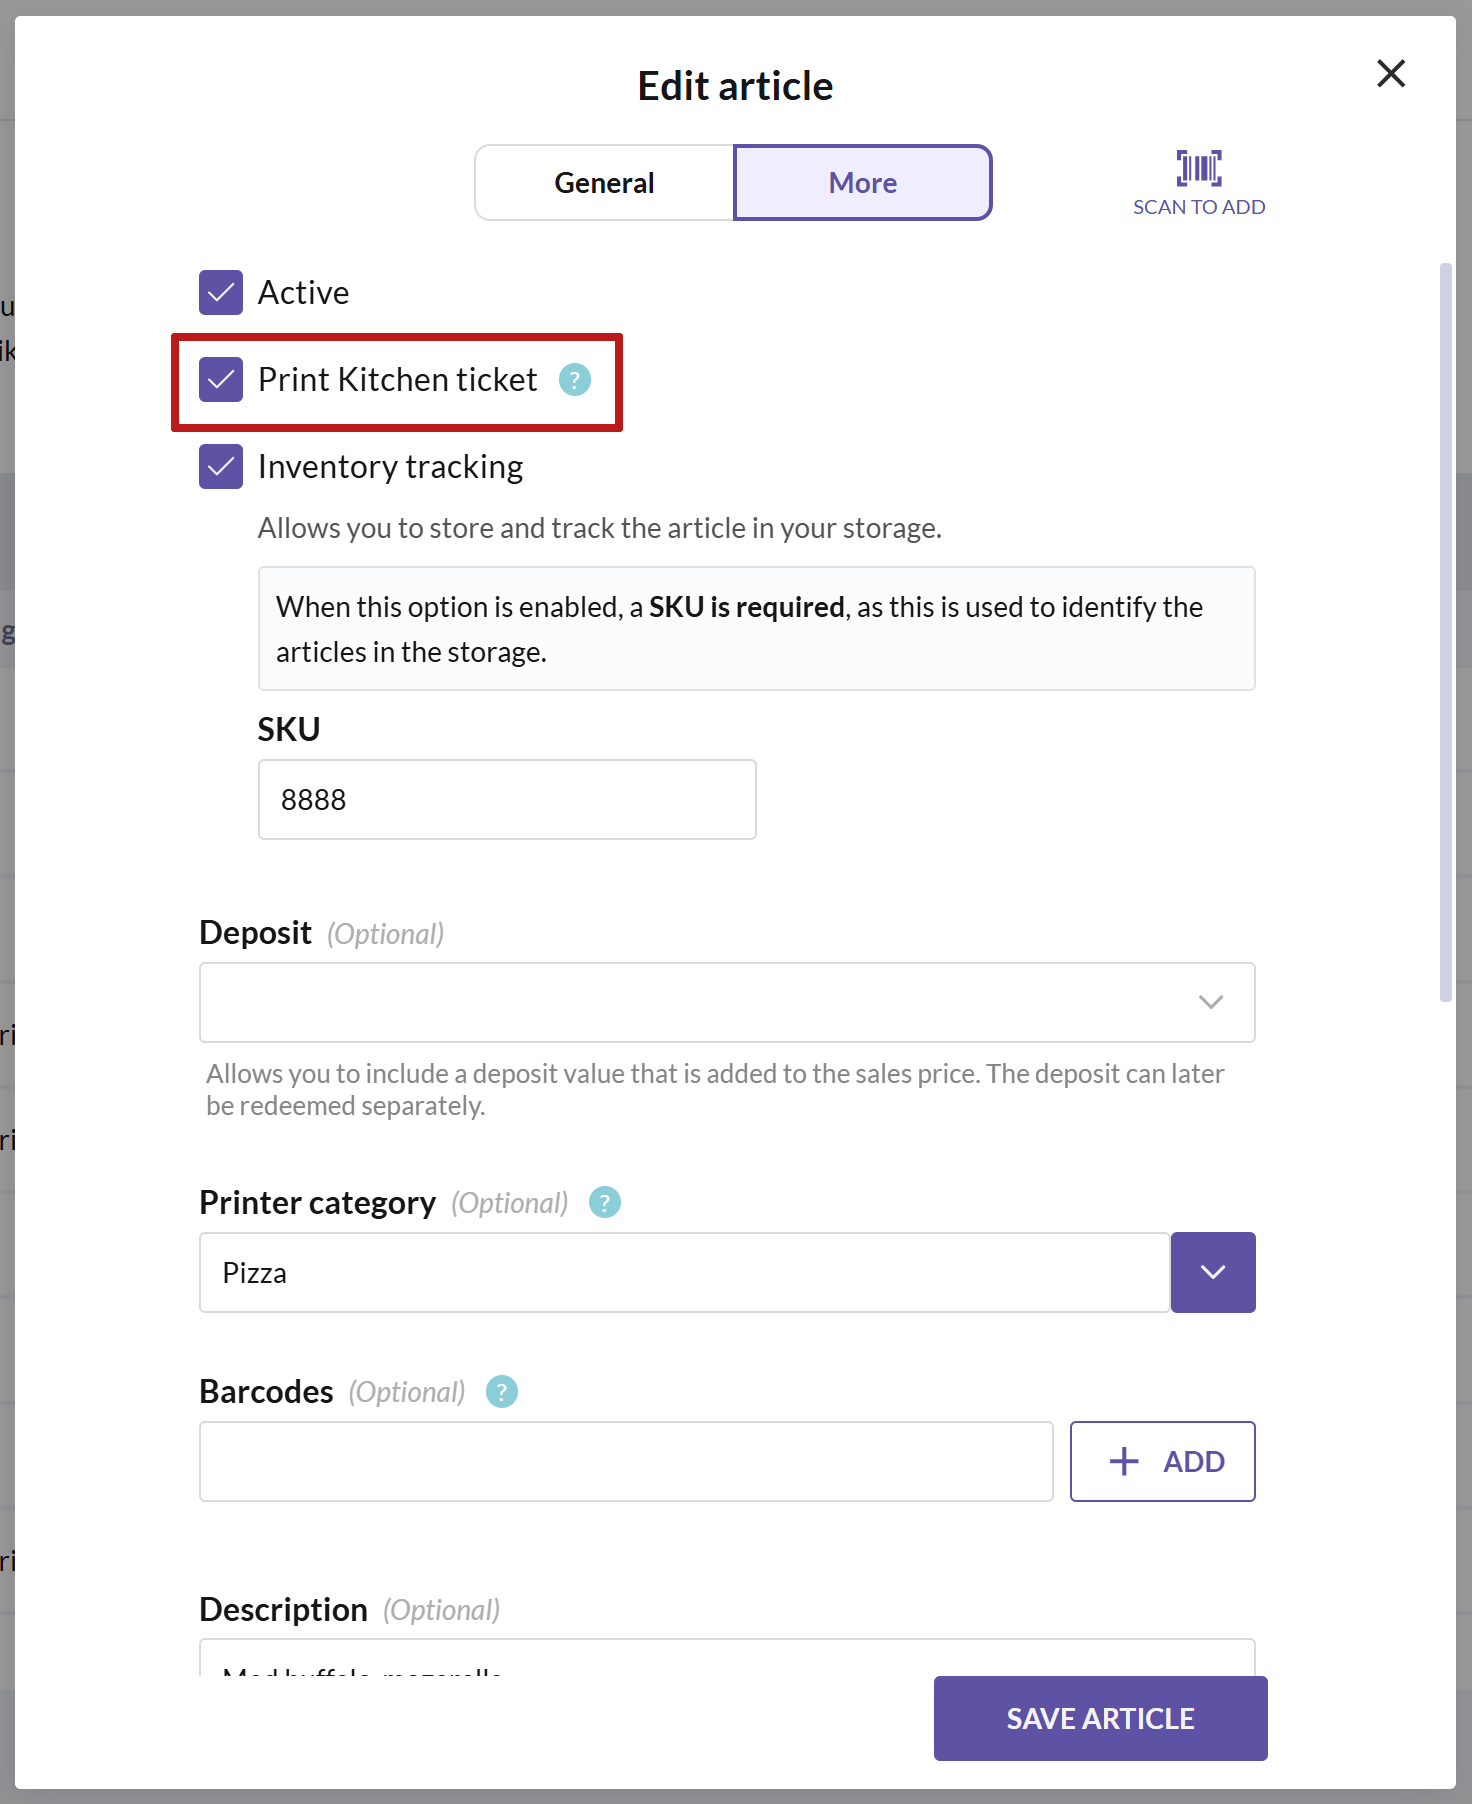
Note that you can also activate this option in the Edit article dialog box on the More tab.
As long as you don't specify specific printer categories for your kitchen printer, it will print all articles with the kitchen ticket setting enabled.